
Previous chapters have dealt with technical aspects such as bonding procedures and reconstructive techniques, and building on that foundation, this chapter discusses conditions that occur in everyday clinical practice. Clinical practice teaches dentists to decide on the best approach based on patient characteristics such as age and decayed, missing, and filled teeth (DMFT), steering treatment toward the pursuit of a stable and long-lasting result.
Table 10-1 provides a sample patient chart to which the clinician can refer as a guide to treatment options. The choice of treatment is determined by several factors (in addition to objective factors arising from a clinical examination):
TABLE 10-1 Sample patient chart
|
Age |
Years |
|
Sex |
M / F |
|
Patient habits |
Type |
|
DMFT |
Value |
|
Compliance |
Poor / Fair / Good / Excellent |
|
Specific clinical conditions |
Conditions and/or drug administration |
|
Risk assessment |
Low / Medium / High |
- Evaluation of patient habits
- Patient’s DMFT and risk of developing caries
- Compliance, ie, motivation and home care
- Specific clinical conditions and/or administration of drugs
The DMFT must be considered in relation to the patient’s age. Together with other factors, it will determine the risk (high, medium, or low) of developing caries. A young patient with a high DMFT will be considered more at risk than an older patient with the same DMFT. Hence, a therapeutic approach can be more or less invasive depending on the patient and their risk level, age, and compliance.
Case 1: Occlusal Stamping Technique
The occlusal stamping technique can be used if a tooth is affected by a Class 1 caries lesion but with anatomical conservation of the occlusal surface. Case 1 shows the treatment of an 18-year-old man with a DMFT of 1, good oral hygiene management, and excellent compliance who presented with a mandibular left first molar that is an ideal candidate for the occlusal stamping technique (Table 10-2 and Fig 10-1).


FIG 10-1 (a) Preoperative clinical appearance of mandibular left quadrant. Suspected caries in the bucco-occlusal groove. (b) After treating the occlusal surfaces with glycine and water under high pressure, the operating field is isolated from central incisor to second molar. (c) Liquid soap is used on the occlusal surface of the affected tooth to make it easier to separate the stamp from the occlusal crevices. (d) Flowable composite or liquid dam is used to make the occlusal stamp. in this case, a liquid dam is placed on the occlusal surface to record its anatomical features accurately. The liquid dam must be positioned in such a way as to incorporate the ridges and cusps unaffected by decay within the stamp. This will make it possible to create a repositioning index for the stamp. A brush is positioned on the stamp surface and secured to the stamp using the same material to allow it to act as a carrier. (e) After curing, the stamp has been detached from the tooth surface, washed with air and water (to remove residual liquid soap), and dried. (f) After producing the stamp, a small-diameter diamond bur is used to prepare a cavity and extend it into the grooves. (g) The bur works under irrigation, using circular movements to access the caries lesion and reveal its extent. (h) Damaged dentin is removed using a multiblade rosehead bur on a blue contra-angle handpiece. (i) Given the extent of damage to tooth tissue, a diamond bur is used to extend the opening in the enamel, while a rosehead bur can excavate the dentin. (j) View of prepared cavity. Carious tissue is removed following the biologic principle of minimal invasiveness to preserve healthy tissue. The enamel is finished using an Arkansas stone flame bur and a Brownie polisher (Shofu). (k) Once cavity preparation is complete, enamel and dentin etching as well as hybridization procedures are performed. (l) Reconstruction is performed by applying body composite using an incremental technique to fill the base of the cavity, leaving approximately 1 mm of space to mold the final layer. (m) More body composite is added to seal the cavity and is then adapted, condensed, and spread toward the cavity margins. (n) Polytetrafluoroethylene (PTFE) tape is placed on the occlusal surface to insulate the stamp from the body composite. (o) The stamp is pressed down into the composite to create an impression of the original morphology. (p) The PTFE tape is removed. (q) The outcome of the stamping is checked. (r) The marginal fit of the composite is improved. If required, the grooves can be marked with a sculpting instrument, following the stamped design. (s) After curing, brown stain can create custom pigmentation. (t) The restoration is finished and polished with rubber dam in place. (u) Once the rubber dam has been removed, the occlusal contacts are checked and adjusted if necessary. (v) The restorations are checked 1 week later. (w) One-year follow-up.
TABLE 10-2 Case 1 patient chart
|
Age |
20 |
|
Sex |
M |
|
Patient habits |
None |
|
DMFT |
1 |
|
Compliance |
Good |
|
Specific clinical conditions |
None |
|
Risk assessment |
Low |
Case 2: Multiple Lesions due to Dysplasia
If deformations are present, the enamel can assume a reddish-brown color with widespread streaks, structural deficiencies such as irregular grooves and lines or even hollow, crater-like formations. Case 2 describes a 36-year-old woman with a DMFT of 10 (Table 10-3 and Fig 10-2). This exposes the patient to an average risk of caries, allowing for her age and lack of bad habits.
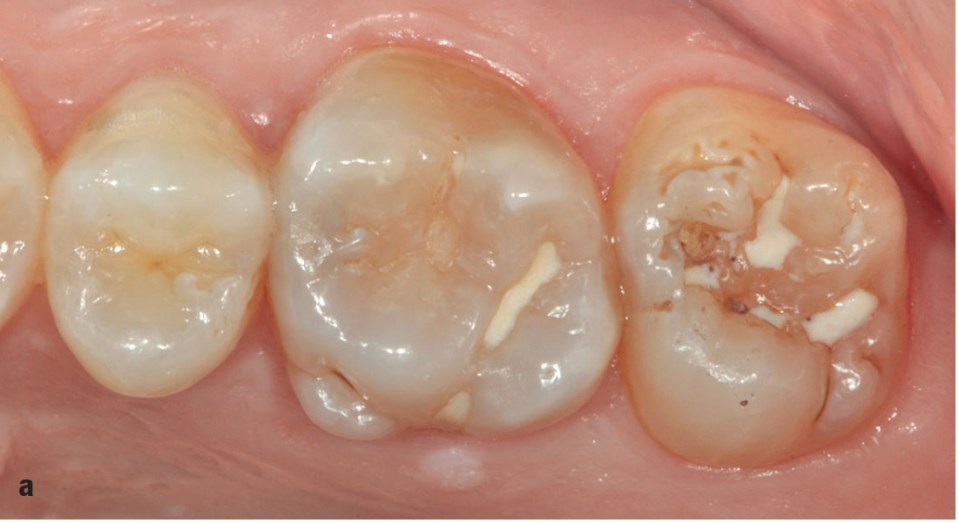


FIG 10-2 (a) Maxillary left posterior sector. (b) Mandibular left posterior sector. (c) Left side. (d) Left bitewing radiograph. (e) Glycine treatment removes stains from the occlusal surface and frees cavities from a buildup of food residues (previously not visible) present on the mesiobuccal side of the maxillary left second molar. This cusp portion appears to be affected by grooves, lines, and craters typical of enamel hypoplasia. (f) Hypoplasia distal to the second premolar. (g) Cavity opening. (h) View of newly prepared cavity. Note the buccal preparations in the second premolar and second molar. (i) A composite increment has been applied to reconstruct the buccal defect on the second premolar. (j) Once adapted, the increment is spread with a brush slightly moistened with modeling liquid. (k to m) Composite increment positioned buccally to the mesiobuccal side of the second molar to reconstruct the buccal defect. Once adapted, the increment is spread with a brush lightly moistened with modeling liquid. (n to q) Small cavities are filled by adding horizontal increments. In this specific case, the condenser instrument is initially used as a carrier and then as a condenser for the increment added to the cavity. The final stage of conversion is simplified by using a white microbrush. (r) Condensed increment. (s) Increment sculpted using a subtractive technique. (t) Occlusopalatal groove sculpting. (u) Modeling of newly completed restorations. (v) View of the restorations after applying a brown stain. (w) Restorations after an interocclusal record was taken. (x) After adjustment of restorations. (y) The mandibular left quadrant shows involvement of the second molar, which suggests more invasive structural damage. (z) Removing old restorations from the first and second molars. (aa) Buccal view of cavities. The second molar shows communication between the buccal and central cavities, while the distolingual side is clearly undermined. (bb and cc) Thicknesses of the most affected cusps are measured using a gauge. Where measurements are less than 1.5 to 2 mm in vital teeth, the best option is removal of the damaged cusps to perform an indirect restoration. The mesiobuccal and distolingual cusps of the second molar are therefore removed to perform two indirect composite restorations. (dd) After being prepared for inlays, the teeth are built up, and an impression is taken using precision material. (ee) Cementing an inlay on the mandibular first molar: packing pre-heated composite into the prepared cavity. (ff) The same operation is carried out on the second molar. Excess pre-heated composite resin can be seen emerging along the restorative margin. (gg) Newly cemented inlays and completed restoration on the second premolar. (hh) Long-term follow-up.
TABLE 10-3 Case 2 patient chart
|
Age |
36 |
|
Sex |
F |
|
Patient habits |
None |
|
DMFT |
10 |
|
Compliance |
Fair |
|
Specific clinical conditions |
None |
|
Risk assessment |
Medium |
Case 3: Replacing a Class 2 Restoration
This case concerns replacement of a poorly fitting composite restoration on the maxillary right first molar (Table 10-4
Stay updated, free dental videos. Join our Telegram channel
VIDEdental - Online dental courses


