Chapter 9
Management of Impacted Teeth
The management of impacted teeth is probably the most common problem in oral and maxillofacial surgery worldwide. Teeth that fail to erupt are usually the teeth which erupt last in a certain region where there is not enough space or because of crowding of teeth. The most common teeth which are impacted are mandibular and maxillary third molars followed by maxillary canines and mandibular premolars.
An impacted tooth is one which is prevented from completely erupting into a normal functional position. This may be due to lack of space, obstruction by another tooth, or an abnormal eruption path. The tooth may be soft tissue impacted or hard tissue impacted and may be unerupted or partially erupted. Impaction per itself is not an indication for removal, it is only a description of the position of the tooth.
However, impacted teeth may sometimes give rise to complications if they are left in place, and over several decades there have been recommendations that impacted teeth should be removed, even if they are asymptomatic. In the last 20 years, however, there has been much discussion and controversy regarding the need for prophylactic treatment of asymptomatic impacted teeth and there is now evidence that asymptomatic impacted teeth do not have to be removed. This discussion of prophylactic third molar surgery has been stimulated by research in medical decision-making, public health analysis, cost-effectiveness studies and by incorporating patient preferences in the decision-making process. It is well known in the practice of medicine that there is also a geographical and cultural variation in treatment indications and this variation can also be expected in the management of the third molar problem.
Since surgery is sometimes associated with complications, one must always balance the risk of complications caused by leaving the impacted tooth in place against the risk for complications and discomfort associated with surgery. The main complications related to third molar surgery are alveolar osteitis (fibrinolytic alveolitis, dry socket) infection and temporary or permanent nerve injury. Nerve injuries often cause temporary and permanent neuropathic pain or altered sensation in and around the mouth, resulting in significant difficulties for the patient with regard to eating, drinking, speaking, kissing, shaving, applying makeup etc. A nerve injury is one of the main causes of litigation in dentistry. Prevention of these injuries must therefore be taken into consideration before surgical removal of impacted teeth. The patient should always be advised of the risk of inferior alveolar nerve injury. It is probably easier for a patient to accept a permanent complication or disability of an intervention if it was properly based on a therapeutic indication than if surgery was performed on prevention and prophylaxis. Patient information about risks and complications is very important and the patient should always be part of the decision.
While many impacted third mandibular molars that cause problems are removed, impacted canines and premolars may often be guided to erupt spontaneously or by using orthodontic traction. Some impacted teeth, especially premolars, can be used as autotransplants to another region (see Chapter 11).
Management of Impacted Third Molars
Indications for Third Molar Removal
There should always be an appropriate indication for third molar removal. Indications can be local or for medical reasons.
Local Therapeutic Indications
- Recurrent or severe pericoronitis;
- Periodontal disease with a pocket depth of 5 mm or more distal to the second molar;
- non-restorable caries in the third molar;
- Resorption of the third molar or adjacent tooth;
- Caries in the second molar where the third molar removal would render restoration possible or more simple;
- Apical periodontitis;
- Cysts or tumors associated with the third molar (or adjacent tooth);
- When required prior to orthognatic surgery;
- Removal of third molar in a fracture line;
- When a third molar may be considered for autogenous transplantation.
Medical Conditions that Require a Serious Consideration of Prophylactic Third Molar Removal
Prior to:
- radiation therapy for head and neck malignancies;
- organ transplantation;
- chemotherapy;
- bisphosphonate therapy.
Contraindications for Third Molar Removal
There are situations when third molars should not be removed. Summarizing our current knowledge from the literature, published in reviews and guidelines, it is recommended that:
- third molar buds in young people should not be enucleated;
- asymptomatic pathology free third molars totally covered by bone should not be removed;
- routine removal of pathology free third molars totally or partially covered by soft tissue is not recommended but specific medical and local conditions may prove a prophylactic approach appropriate;
- third molar surgery is contraindicated in patients whose medical history or conditions expose the patient to an unacceptable risk to their health.
Presurgical Assessment of Third Molars
In addition to a thorough history-taking, clinical and radiologic assessment should always be combined before considering removal of a third molar.
Clinical Assessment
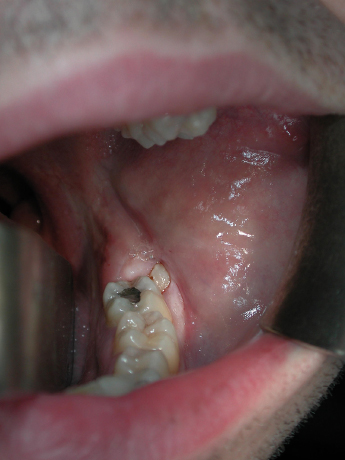
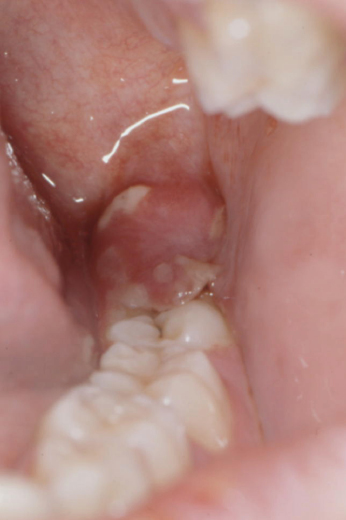
Clinical assessment should be carried out with the aim of assessing the status of the patient, the oral and maxillofacial region, the third molars and the adjacent teeth (eruption status, caries, periodontal status, occlusion) (Figs 9.1 and 9.2).
Radiological Assessment
Radiological examination is a complement to the clinical examination and is necessary in order to make decisions related to the procedure. A radiological evaluation will give information about anatomy of the impacted tooth, the region and the relation of structures. Usually a pair of periapical radiographs taken in different projections is enough and can be supplemented by a panoramic radiograph when more than one third molar requires assessment. If the initial radiographs suggest a close relationship between the roots of the lower third molar and the inferior alveolar nerve (IAN) canal, cone-beam computer tomography (CBCT) scanning can be used to give more detailed information of the anatomy in the region.
Important Factors to Consider
The following local factors are important to take into consideration when planning third molar surgery.
Application Depth
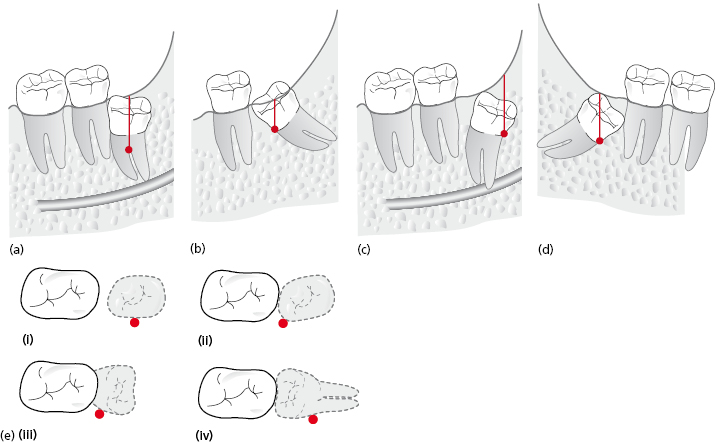
The alveolar bone level and tooth position will dictate the application point depth (Fig. 9.3). The depth of application and the point of elevation will dictate the amount of bone removal that is required to gain access to the optimal application point. This factor is the most predictive of difficulty of surgery.
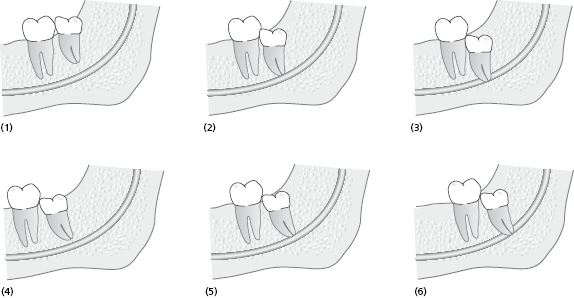
Another way to describe depth of impaction is Pell and Gregory classification, which assesses the relationship of the tooth to occlusal plane (classified as A, B, C) and relationship of the tooth to the anterior border of ramus (classified as 1, 2, 3) (Table 9.1). This classification may be used to describe the depth of impaction of the tooth but has been found to be less reliable in predicting difficulty than assessing the application point depth.
Table 9.1 Pell and Gregory classification.
| (1) Position A | The highest portion of the impacted mandibular third molar is on a level with or above the occlusal plane |
| (2) Position B | The highest portion of the impacted mandibular third molar is below the occlusal plane but above the cervical line of the second mandibular molar |
| (3) Position C | The highest portion of the impacted mandibular third molar is below the cervical line of the second mandibular molar |
| (4) Position I | None of the crown is in the ramus of the mandible |
| (5) Position II | Less than half of the crown is in the ramus |
| (6) Position III | More than half of the crown is in the ramus |
 |
|
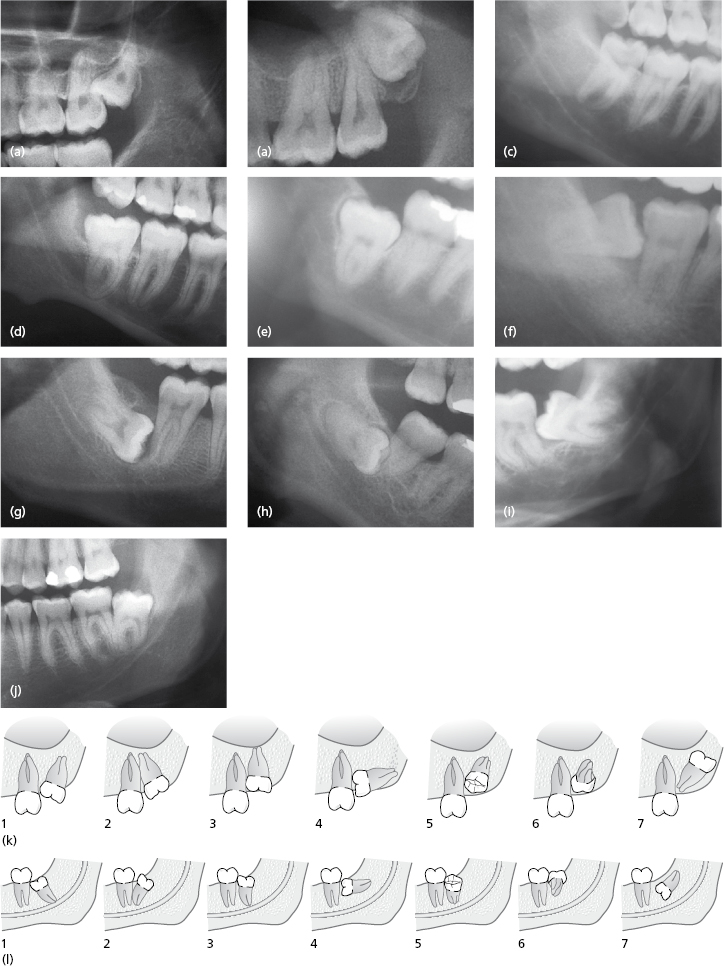
Angulation
The distinction between vertical, mesoangular, horizontal, and disto-angular orientation may affect the surgical approach, in particular with regard to the requirements for bone removal in order to gain access to point of application. The incidence and estimated degree of difficulty for the different angulations are:
- vertical impaction: 40% of all impacted mandibular third molars and usually the least difficult to remove.
- mesoangular impaction: 45% – can be of moderate difficulty;
- horizontal impaction: 10% – are generally of intermediate difficulty;
- distoangular: 5% – the most difficult to extract and frequently underestimated.
The application point and necessary bone removal is not only dictated by the angulation of the tooth but also root morphology and proximity to adjacent structures (adjacent tooth, antrum and nerve). In association with identifying the tooth angulation, the potential space for application points must be identified. Often distoangular lower third molars are in close proximity to the adjacent second molar and have limited space for mesial application point. Several examples of radiographs of third molars illustrating angulation of teeth and a summary of potential application points for bone removal and planned sectioning are provided in Figures 9.3 and 9.4.
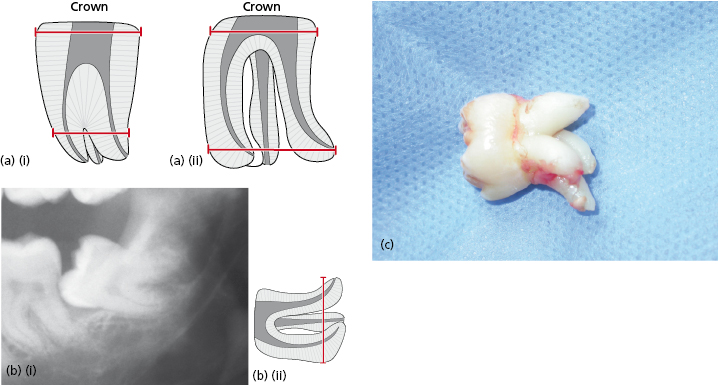
The Crown Size and Condition
The crown width of the third molar can be an important factor in making surgery more difficult. If the tooth is impacted and the crown is wide, sectioning of the crown will be required to minimize bone removal thus reducing potential pain and swelling for the patient. If the third molar is carious or heavily restored, or indeed non-vital, this may render the tooth more brittle on elevation thus impacting on surgical difficulty. See Figure 9.5.
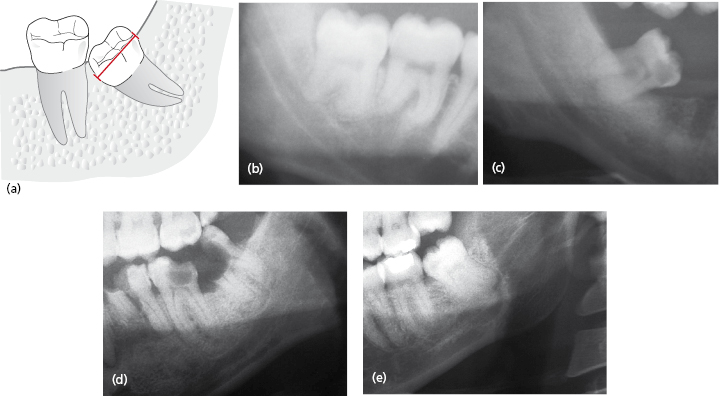
Distance Across Roots is Larger than Width of Crown–Root Junction
If the root width is greater than the width of the tooth at the alveolar crest, the difficulty of surgery will increase and root sectioning will be indicated (Fig. 9.6). Multiple roots or hooked roots will also contribute to surgical difficulty and are more commonly seen in certain ethnic groups.
Hypercementosis or ankylosis of third molar roots will also increase surgical difficulty and must be identified on radiographic evaluation.
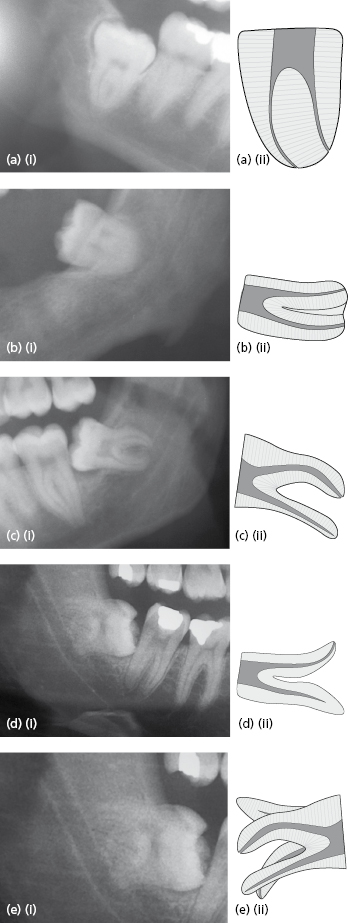
Root Number and Morphology
More complex root morphology is associated with increased difficulty of surgery (Fig. 9.7). Identification of such hooks is important, as they may fracture during removal of the tooth and a decision is then required as to whether to attempt their removal. Hooked, dancing or bent roots may provide a “challenge” to routine elevation. Even after sectioning of the crown and roots, if the root morphology is complex the roots will often require further sectioning and patience is often required to identify the “sweet spot” with which the resistant root will comply with elevation.
Occasionally lower third molar roots can perforate the lingual plate and this is often not evident until part way through surgery. Every effort must be made to ensure these roots do not get lost through the perforated lingual plate, one of the rare indications to raise a lingual flap for third molar surgery.
Root Surface Area
Assessment of the relative root surface area of the tooth to be extracted and the adjacent tooth must be estimated (Fig. 9.8). If the third molar is multi-rooted adjacent to a second molar with conical roots, the adjacent tooth is more easily mobilized during elevation of the third molar. If the root surface area of the adjacent tooth is significantly less than that of the tooth to be extracted then the surgical approach must be adjusted accordingly to prevent any undue application of pressure near the adjacent tooth.

If the adjacent tooth is subluxated it should be immediately replaced and a figure-of-eight suture placed across the occlusal surface to “restrain” the tooth. Antibiotics and oral hygiene should be initiated, and, of course, the patient advised.
Stay updated, free dental videos. Join our Telegram channel
VIDEdental - Online dental courses


