Chapter 8
Oral surgery
Contents
Principal sources and further reading D. Mitchell 2006 An Introduction to Oral and Maxillofacial Surgery, OUP. L. Peterson 2004 Contemporary Oral and Maxillofacial Surgery, Mosby. J. Pedlar and J. Frame 2001 Oral and Maxillofacial Surgery: An Objective Based Textbook, Churchill Livingstone. Additional background Pathology: J. Soames and J. Southam 2004 Oral Pathology, 3rd edn, OUP. Third molars: NICE 2000 Guidance on Removal of Wisdom Teeth. A. MacGregor 1985 The Impacted Lower Wisdom Tooth, OUP.
Principles of surgery of the mouth
The mouth is a remarkably forgiving environment in which to operate, because of its excellent blood supply and the properties of saliva. It is compromised less than could be expected by its teeming hordes of commensal organisms. This does not, however, constitute carte blanche for ignoring the basic principles of surgery, although these can and should be modified to suit the nature and the site of the surgery.
Asepsis and antisepsis, p. 342.
Analgesia
Thankfully, nowadays all patients should expect and receive painless surgery, both perioperatively and post-operatively. Analgesia and anaesthesia, Chapter 13.
Anatomy and pathology
are the interdependent building blocks of surgery. Know the anatomy and you can understand or even devise the operation. Know the pathology and you know why you are doing it, what can be sacrificed, and what must be preserved.
Access
For all minor and certain major oral surgical procedures, access is through the mouth via intra-oral incisions. Extra-oral surgery, Chapter 10.
Incisions
for dento-alveolar surgery are full thickness, i.e. mucoperiosteal flaps; for mucosal and periodontal surgery split thickness flaps are raised (pp. 204 and 212). For mucoperiosteal flaps, although the base does not have to be longer than its length, this design improves the blood supply to the flap and should be used where this is a concern. Improved access via a large flap, allowing minimally traumatic surgery, virtually always outweighs the trauma of additional periosteal stripping.
Always
plan the incision mindful of local structures. One cut, at right angles, through mucoperiosteum to bone, is the aim. Do not split interdental papillae. Try to cut in the depth of the gingival sulcus. Raise the flap cleanly, working subperiosteally with a blunt instrument, moving from easily elevated areas to the more difficult (p. 344).
Retraction
of the raised flap should be gentle and precise. It is the assistant’s duty to prevent trauma to the tissues by sharp edges, overheated drills, or bullish surgeons.
Bone removal
by drills must be accompanied by sterile irrigation to prevent heat necrosis of bone, damage to soft tissues, and clogging of the bur. When using chisels to remove bone remember the natural lines of cleavage of the jaws and make stop cuts (chisel technique, p. 362).
Removal
of the tooth/root is carried out using controlled force.
Debridement
is removal from the wound of debris generated by both the pathology and the operation. It is as important as any other part of the operation. Subperiosteal bone dust is a common cause of pain and delayed wound healing.
Haemostasis
and wound closure are covered on p. 350.
Post-operative oedema
is, to some degree, inevitable; it is minimized by gentle efficient surgery, which is more important than such measures as ice packs and peri- or post-operative steroids, although these can help.
Asepsis and antisepsis
Asepsis
is the avoidance of pathogenic microorganisms. In practical terms, ‘aseptic technique’ is one which aims to exclude all microorganisms. Surgical technique is aseptic in the use of sterile instruments, clothing, and the ‘no touch’ technique.
Antisepsis
is an agent or the application of an agent which inhibits the growth of microorganisms while in contact with them. Scrubbing up and preparation of operative sites are examples of antisepsis.
Disinfection
is the inhibition or destruction of pathogens, whereas sterilization is the destruction or removal of all forms of life. Pre-packaged sterile supplies and the use of an autoclave (121°C for 15min or 134°C for 3min) for resterilizable equipment are the only really acceptable techniques in dentistry. Disinfection using gluteraldehyde or hypochlorite is second choice, for use where true sterilization is not feasible. There are strict restrictions on the use of gluteraldehyde which limit its usefulness outside hospitals. It is not possible to render the mouth aseptic and it is fruitless to try; there are, however, three basic techniques which are of value:
Avoid introducing infection
This is achieved by always using sterilized instruments, and wearing gloves.
Avoid being infected yourself by the operative site
Wear gloves, face, and eye protection.
Reduce the contaminating load to the site
By pre-extraction cleaning of teeth, use of chlorhexidine mouthrinse, and prophylactic antimicrobials, when appropriate. There is no evidence base, but it is commonsense.
Cross-infection and its control
Much attention has been focused on this problem in recent years, first with hepatitis B and its related agents, then with HIV, and now with prions. Although screening is possible in some instances, this is of little real value since the majority of individuals with communicable viral particles are asymptomatic and hence not identifiable. Therefore safe practice mandates the use of sound cross-infection control as part of everyday practice on all patients.
Aerosols
are easily created and are a potential source of cross-infection. Minimize wherever possible by high vacuum suction. Wear glasses and a mask if exposure to an aerosol cannot be avoided. Masks are routine in theatre, although of unproven value in preventing wound infection.
Cleaning and sterilizing
Use disposable equipment when possible and never reuse. Clean instruments prior to sterilization. Use disposable or easily disinfected work surfaces. This book cover can be wiped down!
Gloves
should be worn routinely. Sterile gloves for surgery.
Immunization
against Hep B is available. Get it and get all staff with clinical contact to do likewise.
Waste disposal
It is everyone’s responsibility to ensure sharps are carefully placed in rigid, well-marked containers and disposed of by an appropriate service. Dealing with potentially contaminated impressions and appliances, p. 629. Treatment of the known high-risk patient, p. 718.
Needlestick injuries
If this happens to you, rinse wound under running water and record date and patient details. In hospital, follow local policy; in practice, contact local public health laboratory. DH guidance in the UK recommends universal source testing for Hep B, C, and HIV after an appropriate risk assessment. Antiretroviral ‘prophylaxis’ post contamination with HIV can help reduce risk of developing HIV-positive status.
Forceps, elevators, and other instruments
Extraction forceps
come in numerous shapes and sizes. The choice of forcep is largely down to individual preference or, more frequently, availability. ‘Universal’ forceps are straight-bladed upper or lower forceps used to grip the roots of teeth to allow a controlled extracting force. ‘Eagle beak’ forceps are upper and lower molar forceps which engage the bifurcation of molar teeth allowing a buccally directed extraction force. ‘Cowhorns’ are designed to penetrate the molar bifurcation either to be used in a figure of eight loosening pattern or to split the roots. Most forceps come with a deciduous tooth equivalent.
Elevators
used to dilate sockets to facilitate extraction or to remove dental hard tissue by themselves. These are the instruments which should always be used to remove impacted teeth. They should be used with gentle (finger pressure) forces. The commonly used patterns are Couplands No. 1, 2, and 3, Cryers right and left, and Warwick–James right, left, and straight.
Scalpel
A Bard–Parker handle with a No. 15 blade is the usual.
Periosteal elevators
A number are available; the Howarths, originally designed as a nasal rasparatory, is a favourite. McDonalds and ‘No 9’ are others.
Retractors
Tongue, cheek, and flap retractors are needed and are legion in number; Dyson’s tongue retractor, Kilner’s cheek retractor, Bowdler–Henry’s rake retractor, and the Minnesota flap retractor are favourites. Lack’s is an all-purpose retractor (really a bent bit of metal)!
Chisels versus burs
Depends upon your training. Generally, burs (No. 8 round T-C for bone removal, medium taper fissure TC for tooth division) are kinder on the conscious patient and the best bet for the inexperienced. Chisels are more appropriate in theatre and are particularly useful (3mm and 5mm TC tipped) for disto-angular third molars and upper third molars.
Curettes
The Mitchells (no relation) trimmer is probably the most valuable instrument in this category.
Needle holders and sutures
vary more than any of the above, depending on your location. The usual suture size for IO work is 4/0; the material may be non-absorbable (silk) or absorbable (Dexon®, Vicryl®). It is difficult to justify the continued use of any non-absorbable IO suture for routine use.
Scissors
Remember to keep dissecting scissors, e.g. McIndoe’s, separate from suture-cutting scissors, and keep both sets sharp.
Dissecting forceps
are designed to hold soft tissue without damaging it; Gillies dissectors are popular. College tweezers are not dissecting forceps and are used to lift up sutures prior to removing them.
Aspirator
Sterile/disposable suction tip small enough to get into the defect.
The extraction of teeth
The extraction of teeth must be viewed as a minor surgical procedure; therefore the medical history will be pertinent, e.g. bleeding diathesis, etc. More common and specific considerations are the sex, age, and build of the patient. NICE guidelines currently state that patients at risk of bacterial endocarditis do not require antibiotic cover. Extractions in children are technically simple; it is the child who is most likely to be a problem, whereas stoical old men who may not bat an eye at the procedure often have teeth aptly described as ‘glass in concrete’. Malpositioned teeth present problems of access and isolated teeth, especially upper second molars, tend to be ankylosed. Heavily restored and root-filled teeth can be very brittle. In all these cases a pre-extraction X-ray can help.
Extraction of teeth
begins with positioning After LA has taken, the patient is positioned supine at the height of the operator’s elbow for upper teeth, and sitting with the operator behind for (right-handed dentists) lower extractions on the right and in front for lower extractions on the left. The position is reversed for left-handers, but unfortunately the world seems biased against this group, and many dental chair systems seem to preclude comfortable positioning for them.
Common technique
The socket is dilated either using an elevator between the bone of the socket wall and the tooth or by driving the forceps blades into the socket. The blades of the forceps are applied to the buccal and palatal/lingual aspects of the tooth and pushed either along the root of the tooth or, in certain molar extractions, into the bifurcation. The tooth is then gripped in the forceps and, maintaining a consistent and quite substantial vertical force, the tooth is moved depending on its anatomy:
 have conical roots—rotate then pull.
 have either two fine roots or a flattened root—move bucco-palatally until you feel them ‘give’, then pull down and buccally.
 have three large divergent roots—these are moved buccally while maintaining upward pressure, but frequently need a variety of rocking movements before they are sufficiently disengaged to complete extraction.
 can usually be removed with a simple buccal movement, but sometimes need to be rocked or even rotated.
 are rotated and lifted out.
 are two-rooted and can usually be removed by a controlled buccal movement. Remember to support the patient’s jaw.
Deciduous teeth
are extracted using the same principles, but while permanent molars can be removed using forceps which engage the bifurcation, these should not be used on deciduous teeth.
Third molars
As with all operative techniques in dentistry, the doing is worth a thousand words. To become competent there are three golden rules: practice, practice, and practice.
Complications of extracting teeth
Access
Small mouths present an obvious, but usually manageable problem. Crowded or malpositioned teeth may need trans-alveolar approach. Trismus, if due to infection, e.g. submasseteric abscess, should be managed in hospital where facilities for external drainage and airway protection are available.
Pain
Has the LA worked? Try further LA as regional block, infiltration, or intraligamentary injection. Is it pain or pressure? If pressure, reassure and proceed. If pain and other signs of adequate LA are present, then acute infection is the most likely culprit. Can the extraction wait by using delaying tactics such as draining an abscess? The vast majority can and very few adult extractions really justify a GA.
Inability to move the tooth
Don’t worry; it happens to us all. Have you got an X-ray? If not, get one and look for: bulbous or diverging roots, very long roots, ankylosis, or sclerotic bone. Do not press on regardless; it will work sometimes but shows lack of consideration and will cost you in time and goodwill in the long run. Most ‘solid’ teeth have an easily identifiable cause, e.g. diverging roots, and raising a flap and using a trans-alveolar procedure (p. 354) will quickly and easily remedy this.
Breaking the tooth
is a common occurrence and may even assist extraction if, e.g. the roots of a molar are separated. More often, unfortunately, the crown #, leaving a portion of root(s) in situ. It is quite acceptable to leave small (<3mm) pieces of deeply buried apex, but provide antibiotics, tell the patient, and review. Larger pieces of root must be removed as they have a high incidence of infective sequelae (p. 370).
# of alveolar &/or basal bone
Breaking the alveolar bone is relatively common. If # only involves the alveolus containing the extracted tooth, remove any pieces of bone not attached to periosteum and close the wound. Rarely, the alveolus carrying other teeth will be involved, in which case remove tooth by a trans-alveolar procedure and splint remaining teeth (p. 106). Basal bone # is rare; ensure analgesia (LA &/or systemic analgesics) and arrange reduction and fixation (p. 464).
Loss of the tooth
Stop and look; in the mouth, is it under the mucoperiosteum or in a tissue space: these can usually be milked out. Look in the suction apparatus. Is it in the antrum (p. 384), through the lingual cortex or even the ID canal? Has it been swallowed or inhaled? Chest X-ray is mandatory if not found.
Damage to other teeth/tissues and extraction of the wrong tooth
Prevent by confirming with the patient the teeth to be removed and making careful notes. Plan the operation; do not use inappropriate instruments or ones which you don’t know how to use. If the wrong tooth is extracted, replant if feasible and proceed to remove the correct tooth. Tell the patient and make careful notes.
Dislocated jaw Reduce (p. 468); bleeding (p. 350); pain, swelling, and trismus are common sequelae, and discussed on p. 362.
Bisphosphonate Related Osteonecrosis (BRON)
(p. 581); the principle is not to carry out any surgery which requires osteoclast activity for healing on someone taking these drugs. If this is inevitable, explain relative risks to patient and take recommended precautions (p. 352).
Post-operative bleeding
Bleeding disorders are covered on p. 492.
Principles of management of post-operative bleeding.
Classically, post-op bleeding is described as: immediate (primary), reactionary, and secondary.
Immediate
When true haemostasis has not been achieved at completion of surgery.
Reactionary
Occurs within 48h of surgery and is due to both general and local rise in BP opening up small divided vessels which were not bleeding at completion of surgery.
Secondary
Occurs ~7 days post-op and is usually due to infection destroying clot or ulcerating local vessels. In practice, bleeding following removal of teeth is common and usually simple to diagnose. The patients are seldom shocked or hypotensive but are often very anxious and nauseated by the taste, smell, and sight of blood, and by blood in the stomach, which is irritant. Bleeding usually comes from one or all of three sources: (i) gingival capillaries; (ii) vessels in the bone of the socket; and (iii) a large vessel under a flap or in bone, such as the inferior alveolar artery. The first two are by far the more common.
Management
Reassure the patient they won’t bleed to death. Remove accompanying entourage and get the patient to an area with reasonable facilities. Take a drug history (anticoagulants?). Wear gloves and apron: patients often vomit. (If patient has to wait to be seen they should bite firmly on a clean handkerchief or gauze, rolled to fit the area the bleeding seems to be coming from). In good light, with suction, clean the patient’s face and mouth, remove any lumps of clot, and identify the source of bleeding. Is it from under a flap? If from a socket, squeeze the gingivae to the outer walls of the socket between finger and thumb; if bleeding stops it is from a gingival vessel. In these cases, LA and suturing are needed. If bleeding continues it is from vessels in bone, which need some form of pack.
Technique
Give LA if needed, and have assistance with suction. If flap involved remove old sutures, evacuate clot, identify bleeding point, and place a tight suture around it. Bleeding should be much ↓; if not, repeat until it is, then close wound and have the patient bite on a swab for at least 15min. If it is a gingival bleed a tight interrupted or mattress suture will compress the capillaries, again followed by a swab to bite on. If bleeding is from the depths of the socket, the clot may need to be removed and replaced by a pack or supported by a resorbable mesh (oxidized cellulose) &/or agents such as tranexamic acid, adrenaline, or epsilon aminocaproic acid soaked into the mesh. If removing clot and packing the socket, remember this will delay healing and predispose to infection, so use BIPP or Whitehead’s varnish packs. If all else fails, all the above measures plus a pressure pack, analgesia, a sedative antiemetic, and a night in a hospital bed will do the trick. Patients requiring this degree of treatment should be investigated haematologically and for liver disease.
Suturing
Every dentist should master the basic skills of suturing.
Materials
Most sutures are suture material fused to a needle, although threaded reusable needles are used in some countries. Needles may be round-bodied, cutting or reverse cutting. Straight, curved, or J-shaped. Almost all IO work is done with a 16–22mm curved cutting or reverse cutting needle held in a needle holder. Suture material may be resorbable (Dexon®, Vicryl®, or Monocryl®) or non-resorbable (silk, nylon, prolene, or Novafil®). Monofilament suture (e.g. nylon) causes less tissue response than braided (e.g. silk).
Skin
is best closed with nylon, prolene, or Novafil®. Mucosa and deep tissues best closed with an absorbable. Vessels are tied off using resorbables, except major veins and arteries, which are transfixed and tied with silk. BSS can be used for skin but must be removed early. Suture strength is described as 0 (thickest) to 4/0 (commonest in IO use) to 11/0 (thinnest for microvascular work).
Types of stitch
are shown in Figure 8.1.
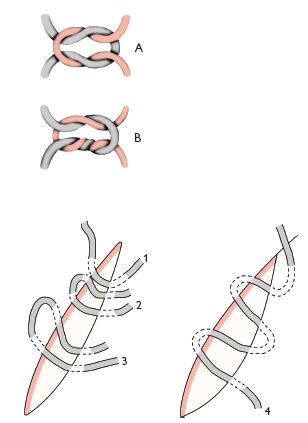
Fig. 8.1 A Reef knot. B Surgeon’s knot.
Suture technique
Closure of a wound or incision should, whenever possible, be without tension, by closing deep layers and over supporting tissue. Hold the needle in the needle holder ~⅔ of the way from its tip. Suture from free to fixed tissue taking a bite of 2–3mm on both sides. Leave the sutured wound edges slightly everted in apposition. Except when swaging tissue to bone, e.g. when arresting haemorrhage or when tying vessels, do not overtighten the suture as wound margins become swollen, and you need to allow for this.
Knot tying
The two most useful are the square (reef) knot and the surgeon’s knot (see diagram).
Instrument tying
is easy to learn from a book but needs considerable practice to perfect. The knot is started by passing the suture once (square knot) or twice (surgeon’s knot) around the tip of the needle holders; the knot is tightened and then locked by passing the suture around the needle holder in the opposite direction once. It is possible to control the suture tension by completing the knot in three loops instead of two.
Hand tying
is invaluable for those wishing to develop surgical expertise or involved in major maxillofacial surgery. It takes a substantial amount of time and practice and is impossible to learn from a book. Get a sympathetic senior to demonstrate.
Suture removal
is not someone else’s job to be casually forgotten about. Do the stitches need to be removed? In inaccessible sites, difficult patients, or areas in which scar quality is less important, a resorbable suture should be used. An alternative is tissue glue, e.g. Dermabond®, Indermil®. Facial skin sutures should be removed at 4–6 days. When removing sutures use sharp scissors (avoid ‘stitch cutters’ if you can), lifting up and cutting a bit of suture that has been in the tissue, thus avoiding dragging bacteria through the incision on removal.
Dento-alveolar surgery: bisphosphonates
These drugs are mentioned in p. 581. They constitute a wide group of agents which act primarily by inhibiting osteoclast function which helps prevent fractures in osteoporosis, stabilizes Paget’s disease, relieves bone pain and fractures in bone metastases in a range of malignancies and can treat hypercalcaemia of carcinomatosis. Unfortunately one of their side-effects is necrosis of jaw bone, usually (although not always) associated with extractions or dento-alveolar surgery (Figure 8.2). Procedures dependent on bone remodelling (orthodontics) or pathology that causes it (infection, fractures) are also affected.
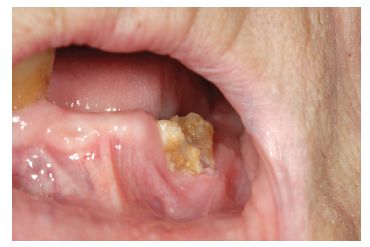
Fig. 8.2 Clinical example of bisphosphonate related osteonecrosis of the jaws (BRON).
If asked to render ‘dentally fit’
someone who is to start bisphosphonates it is probably best to adopt a similar approach to those having head and neck radiotherapy—try to ensure they never need to have a tooth removed in the future. Obviously a balance has to be struck between inappropriately rendering everyone edentulous and the optimistic watch and wait approach that would be usual.
If you have to remove a tooth in a patient on bisphosphonates
there will be many instances where patients have been started on these drugs and need teeth removed. If this can be avoided by endodontics, coronectomy etc. then do it. If not, warn the patient of risks (range from <1% for low risk drug in osteoporosis patient to 30% in a myeloma survivor at 10 years). Use prophylactic chlorhexidine and broad spectrum antibiotic, atraumatic extraction and alveolar septoplasty to ensure all bone lies well below gingival margin. This is on the basis that vascularized mucosal coverage will prevent superinfection of bone that will not remodel.
Treatment of established BRON
There are no agreed effective treatments to date. Tactics that work for osteoradionecrosis do not seem to help. Limited sequestrectomy coupled with some form of coverage of the exposed bone seems to help and a variety of supplemental drug treatments are being used but there is no established evidence base for this. Refer to your local OMF department.
Dento-alveolar surgery: removal of roots
Does the root need to be removed? If large, being extracted for pulpal or apical pathology, is symptomatic, is an impediment to denture construction, or is in a patient in whom risk of minor local infection is not tolerable (e.g. immunocompromised or at risk from IE) then the answer is yes.
Non-surgical methods
The use of root forceps or elevators may allow simple removal of roots close to the alveolar margin. When using root forceps ensure the root can be seen to be engaged by the blades. Elevators can be used to direct a root along its path of withdrawal providing (a) one exists, and (b) an elevator can be introduced between bone and root. Do not waste time persisting with non-surgical methods if your initial attempt is unsuccessful.
Surgical methods
Plan your operation. Do you know why the root cannot be delivered, exactly where it is, and about any adjacent structures? If not, get an X-ray.
 ) and are better avoided around the buccal branch of the facial artery (mesial root
  ). Include an interdental papilla at either side of the flap and start vertical cuts 2/3 of the way distal to the included papilla. Big flaps heal as well as small ones; the important consideration is access.
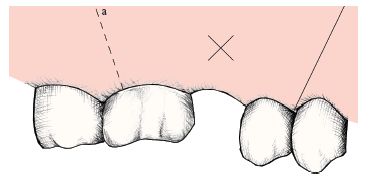
Fig. 8.3 Outline of two-sided flap in heavy shade.
Special cases
Under GA
Mallet and chisel can replace bur and the ‘broken instrument’ technique can be used. This involves using a straight instrument or elevator guided through the bone using the mallet, and either then being used as an elevator or being placed in contact with the tooth or fragment, which is delivered by a sharp blow. Use with care.
Dento-alveolar surgery: removal of unerupted teeth
The teeth most commonly requiring removal, other than third molars, are maxillary canines and premolars, supernumaries, and mandibular canines and premolars. Rarely, permanent or deciduous molars may be impacted or submerged.
Maxillary canines
(pp. 140, 142) The canine may lie within or across the arch, buccally or, most frequently, palatally. Assessment requires a careful examination, palpation, and X-rays (either two films at 90° or the parallax technique, pp. 16, 142).
Techniques
Buccal impactions are approached via a buccal flap, palatal via a palatal flap, and cross- or within-arch impactions need a combination of the two. Buccal flaps are as previously described (p. 354). Palatal flaps involve the reflection of the full thickness of the mucoperiosteum of the anterior hard palate, the incision running in the gingival crevice from  to
to  for bilateral canines or to the contralateral canine reg/>
Stay updated, free dental videos. Join our Telegram channel
VIDEdental - Online dental courses


