Chapter 29 Density of Bone: Effect on Surgical Approach and Healing
The density of available bone in an edentulous site has a primary influence on treatment planning, implant design, surgical approach, healing time, and initial progressive bone loading during prosthetic reconstruction.1,2 A direct bone-implant interface has been demonstrated with a variety of endosteal implant designs and materials. Three requirements necessary for initial rigid fixation—atraumatic bone preparation,3 close approximation of living bone to the biocompatible implant surface,4 and absence of movement at the interface during healing5—are all closely dependent on the bone density at the implant site. The quality of the recipient bone directly influences the amount of trauma generated during osteotomy preparation. This in turn provokes a cascade of reactions at the bone-implant interface that affect the quality of the load-bearing surface.
Once the implant is initially integrated with the bone, the bone-loading process from occlusal forces becomes a critical factor in long-term implant survival. The bone density under load is directly related to the bone strength and is therefore a critical parameter for long-term survival.6,7 The occlusal stresses applied through the implant to the bone must remain within the physiologic to mild overload zone; otherwise, pathologic overload with associated bone loss and microfracture, and implant mobility may occur. The treatment planning and scientific rationale of strength, modulus of elasticity, bone-implant contact percent, and stress transfer difference related to bone density has been addressed in a previous chapter. This chapter addresses the modifications of the surgical and healing aspects related to each bone density in the oral environment.
LITERATURE REVIEW
Lekholm and Zarb8 listed four bone qualities found in the anterior regions of the jawbone: quality 1 comprises homogeneous compact bone; quality 2, a thick layer of compact bone surrounding a core of dense trabecular bone; quality 3, a thin layer of cortical bone surrounding dense trabecular bone of favorable strength; and quality 4, a thin layer of cortical bone surrounding a core of low-density trabecular bone. Irrespective of the different bone qualities, all bone was treated with the same implant design and standard surgical and prosthetic protocols.
Following the proposed protocols of Brånemark et al., it was found that implant survival in initial surgical success was related to the quality of bone.4 A higher surgical failure was observed in softer bone types, especially in the maxilla. For example, Engquist9 reported the surgical loss of 38 of 191 implants in the maxilla in D4 bone (20% loss), compared with 8 of 148 mandibular implants (5% loss) before stage II surgery. Jaffin and Berman reported an overall 8.3% surgical and initial healing loss in 444 maxillary implants with softer bone.10 Friberg et al. reported a 4.8% implant failure at stage II uncovery for 732 maxillary posterior implants, which was greater than mandibular failure.11 Quirynen et al. also reported a 4.1% implant loss at stage II uncovery out of 269 implants in the maxilla.12 Fugazzotto et al. reported 22 failures out of 34 implants placed in quality 4 bone.13 Hutton et al. identified poor bone quantity and quality 4 as the highest risk of implant failure in a study of 510 implants with an overall failure rate in the maxilla nine times greater than in the mandible.14 Sullivan et al. indicated a 6.4% stage II failure rate in the maxilla (12/188) and a 3.2% failure in the mandible (7/216).15 Snauwaert et al. reported more frequent early failures in poor density maxillae.16 Herrmann et al. correlated failure factors such as poor bone quality and volume.17 A number of reports in the literature demonstrated the greatest risk of surgical failure was observed in the softest bone type (D4), especially when found in the maxilla.
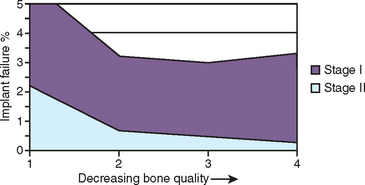
On the other extreme, a large clinical study from 33 U.S. Department of Veterans Affairs (VA) hospitals by the Dental Implant Clinical Research Group (DICRG) states quality 1 bone had the highest surgical failure rate (4.3%), followed by quality 4 (3.9%), quality 2 (2.9%), and quality 3 with the fewest failures at 2.6% (Figure 29-1). The overall implant surgical failure was 3%; the maxilla had better success at stage II surgery (98.1%) than the mandible (96.4%).18 It must be emphasized that these reports only present implant failures up to stage II uncovery. The DICRG also noted that the failure rate was twice as great for surgeons who had placed fewer than 50 implants, compared with more experienced surgeons. The literature contains many published reports that indicate an implant surgical failure range from 3.2% to 5% in the mandible and 1.9% to 20% in the maxilla, with most reports indicating the greatest failure rates in maxillary implants with soft bone. It is clear from these reports that a wide range of results may be achieved and therefore consideration should be given to methods that improve surgical survival.
Misch developed a different surgical protocol for different bone qualities in 1988. Following these specific methods, prospective and retrospective multicenter clinical studies in a wide range of office settings found surgical survival above 99%, regardless of the density type of bone, the arch (mandible versus maxilla), sex and age of the patient.19–24 Therefore a different surgical protocol for different bone densities appears warranted.
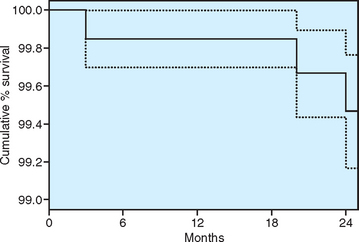
The implant design, surgical protocol, healing, treatment plans, and progressive loading time spans are unique for each bone density type.1,2,25 More recently the use of improved rotary instruments, implant designs, and surgical approaches for different bone qualities has been recognized as a valid recommendation. A multicenter prospective clinical study by Misch et al. of 364 consecutive implants in 104 consecutive patients found a surgical survival rate (up to abutment connection) at stage II of 100% for D1, 98.4% for D2, 99.8% for D3, and 100% for D4 implants19 (Figure 29-2). Altering the surgical approach and implant design for each bone density can yield an overall implant surgical survival of 99.8% and a 2-year survival of 99.4%. In this chapter the surgical considerations and optimal healing time are discussed relative to each bone category, based on the literature, prospective clinical studies, and long-term experience.
BONE DENSITY CLASSIFICATIONS
Misch defined four bone density groups in all regions of the jaws that vary in both macroscopic cortical and trabecular bone types.2 The regions of the jaws are divided into: (1) the anterior maxilla (second premolar to second premolar); (2) posterior maxilla (molar region); (3) anterior mandible (first premolar to first premolar); and (4) posterior mandible (second premolar and molars). The regions of the jaws often have similar bone densities.
A common point at which to evaluate bone quality is during surgery. The presence and thickness of a crestal cortical plate and the density of trabecular bone are easily determined during implant osteotomy preparation. The density of bone is determined by the initial bone drill, and evaluation continues until the final osteotomy preparation.
It should be emphasized that the bone density (D1 to D4) classification of Misch is slightly different from Lekholm and Zarb’s bone quality types (Q1 to Q4). According to Misch et al., D3 bone has fine trabeculae and is 47% to 68% weaker than D2 trabeculae, and 20% stronger than D4 trabeculae, whereas Lekholm and Zarb stated that Q3 bone has favorable-strength trabeculae similar to Q2.7,8 In other words, the actual strength of the trabecular bone is different for each bone density, regardless of the presence or absence of cortical bone adjacent to the implant. In addition, the Lekholm and Zarb bone quality only evaluated bone in the anterior maxilla and mandible. The Misch bone density scale also evaluated the posterior molar regions of the jaws. As a result, a primary difference between D3 and D4 bone is also the presence of cortical bone in D3, which increases its overall strength and modulus of elasticity.6,7 The quality 4 bone of Lekholm and Zarb is similar to Misch’s D3, whereas D4 bone is even weaker because little to no cortical bone is present to improve the strength or the elastic modulus of the fine trabecular bone.
Dense Cortical (D1) Bone
Advantages of D1 Bone
The homogeneous, dense D1 bone type presents several advantages for implant dentistry. Composed histologically of dense lamellar bone with complete haversian systems, it is highly mineralized and able to withstand great occlusal loads. The cortical lamellar bone may heal with little interim woven bone formation, ensuring excellent bone strength while healing next to the implant.26,27 Four splinted, threaded, titanium plasma spray implants immediately loaded in the anterior mandible have yielded very predictable long-term success (above 94%), to support an overdenture.28 Other screw-type implants inserted with a similar surgical and prosthetic approach also resulted in similar long-term survival in this bone region.29
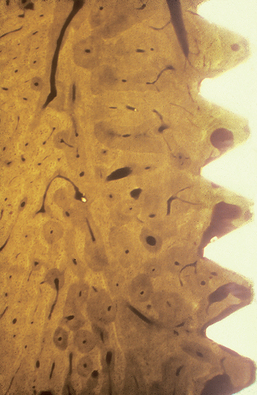
The percentage of light microscopic contact of bone at the implant interface is greatest in D1 bone type and greater than 80% (Figure 29-3). In addition, this bone density exhibits greater strength than any other type.6,7 The strongest bone also benefits from the greatest bone-implant contact (BIC). Less stresses are transmitted to the apical third of the implants than in other bone types. As a result, shorter implants can better withstand greater loads than in any other bone densities. In fact, the placement of longer implants may decrease surgical survival rates, as overheating during osteotomy preparation is a primary concern in this bone type. Greater heat is often generated at the apical portion of the osteotomy, especially when preparing dense cortical bone.30
Disadvantages of D1 Bone
D1 bone has fewer blood vessels than the other three types, and therefore it is more dependent on the periosteum for its nutrition. The cortical bone receives the outer one third of all its arterial and venous supply from the periosteum.31,32 This bone density is almost all cortical, and the capacity of regeneration is impaired because of the poor blood circulation.33 Therefore delicate and minimal periosteal reflection is indicated. When D1 density is present, the bone width is usually abundant. Fortunately, there are few occurrences when facial or lingual undercuts are observed with D1 bone densities, and flap reflection can be safely kept to a minimum. The precise closure of the periosteum and the overlaying tissue has been shown to help recover the blood supply and is encouraged.34
Implant Osteotomy
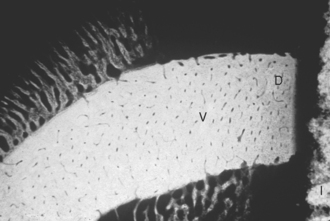
The primary surgical problem of D1 bone is that the dense cortical bone is more difficult to prepare for endosteal implants than any other bone density (Box 29-1). The most common cause of implant failure in this bone quality is surgical trauma resulting from overheating the bone during the implant osteotomy procedures, because rotary drills progress with more difficulty. The zone of devitalized bone that forms around the implant is larger in this bone density and must be remodeled and replaced by vital bone for the interface to be load bearing (Figure 29-4). As a result, implant surgical failure may be greater in D1 bone than any other bone density.2,18 Therefore the dental surgeon must strive to minimize the thermal trauma. The heat generated during an implant osteotomy is related to the presence and temperature of irrigation,35–37 amount of bone being prepared,38,39 drill sharpness and design,40–43 time of preparation,44 depth of the osteotomy,37,30,41,45 pressure on the drill,40 drill speed,39,46,47 and variation in cortical thickness.35,48
Box 29-1 Implant Osteotomy Preparation in Dense Compact (D1) Bone
Bone cell survival is very susceptible to heat. Eriksson has demonstrated that in rabbit, bone temperature as low as 3° C above normal (40° C) can cause bone cell necrosis.49 Therefore a conscious effort is made to control temperature elevation every time a rotary instrument is placed in contact with bone. At least 50 mL/min of cooled irrigation, such as sterile physiologic saline, is used as a profuse irrigant and is a critical element to reduce heat.35–37,50 Distilled water should not be used, as rapid cell death may occur in this medium.51 Intravenous dextrose solution (D5W) also may be used, with the clinical advantage of decreasing hand piece breakdown occurring from the effects of the salt in a saline solution, although the surgical gloves often feel sticky near the conclusion of the surgery. The irrigant also acts as a lubricant and removes bone particles from the implant osteotomy site. Without irrigation, drill temperatures above 100° C are reached within seconds during the osteotomy,52 and consistent temperatures above 47° C are measured several millimeters away from the implant osteotomy. The temperatures of the irrigant can also affect the bone temperature.36,39 Copious irrigation is suggested, especially in D1 bone.
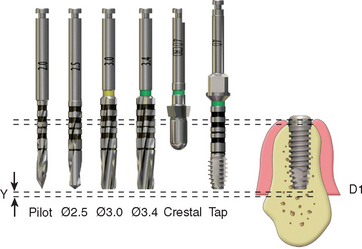
The amount of heat produced in the bone is directly related to the amount of bone removed by each drill.53 A 3-mm pilot drill generates greater heat than a 2-mm pilot drill.39,54 As a result, most manufacturers suggest the first drill be 2 mm in diameter. In a similar fashion, the amount of heat generated by successive drills is also directly related to the increase in drill diameter.52,43 A 3-mm drill after a 2-mm drill cuts 0.5 mm on each side of the drill. A 2.5-mm drill after a 2-mm drill only cuts 0.25 mm of bone on each side of the osteotomy. The smaller incremental drill size allows the surgeon to prepare the site faster, with less pressure and less heat.42 In addition, when large increases in drill diameter are used to prepare bone, the surgeon may inadvertently change the angulation of the drill, because the larger drill is removing a greater bone volume and the tactile sense is decreased. As a result, an elliptical osteotomy may be prepared that does not correspond accurately to the round implant diameter. The gradual increase in osteotomy size also reduces the drill shatter at the crestal opening, which can inadvertently chip away pieces of bone on the crest where complete bony contact is especially desired. The gradual increase in drill diameter also keeps each drill sharper for a longer period, which also reduces the heat generated (Figure 29-5).
In the past, the rotational speed of the drill has been suggested to be less than 2000 rpm, and several manufacturers have recommended speeds al low as 750 rpm. It has been an accepted theory that the higher the speed, the higher the bone temperature during preparation.4 This is false; otherwise, slow-speed hand pieces would be used to prepare natural teeth. A high-speed hand piece (300,000 rpm) can remove bone over an impacted tooth or during an apicoectomy and still allow bone regeneration. Rafel prepared bone at 350,000 rpm in a human mandible and found a temperature of only 23.5° C at a distance of 3 mm from the drill periphery.47 High-speed drills at 300,000 rpm have been used to prepare blade implant osteotomies, yet bone grew over the blade shoulder and was in direct contact with the implant.55
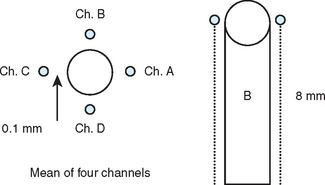
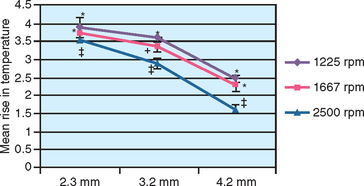
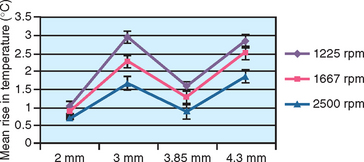
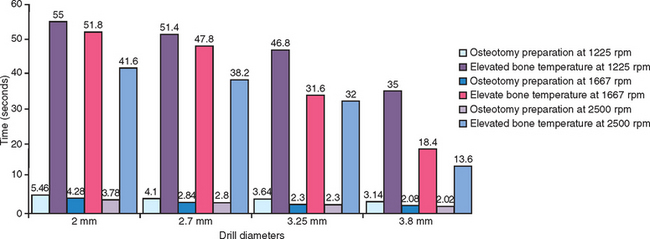
A study by Sharawy et al. compared four drill designs (two internal irrigated and two external irrigated) at speeds of 1225, 1667, and 2500 rpm.39 Thermocouples connected to a computer to record temperature and time were placed within 1 mm of the osteotomy site in D2-type bone (Figure 29-6). All drill designs in the study recorded lower bone temperatures with the greatest rpm and, conversely, found the highest bone temperatures with the lowest rpm (Figures 29-7 and 29-8). As important, the slowest rpm resulted in bone temperatures at or above 40° C, which may be a threshold of bone-cell death. The highest rpm (2500) increased the bone temperature by 2° to 3.5° C, whereas the 1225 rpm recorded a bone temperature above 41° C. Therefore the higher speed of 2500 rpm may prepare bone at a lower temperature than 1500 rpm, especially when in dense bone.39 The rotational speed of the drill is one of the more critical criteria to reduce bone temperatures.
Eriksson reported bone cell death when a temperature of 40° C was applied for 7 minutes, or when a temperature of 47° C was applied for 1 minute.49 In other words, time and temperature are interrelated critical factors in implant site preparation. As the temperature increases, the time the bone temperature is elevated must be reduced. In the study by Sharawy et al., the time the bone temperature remained elevated was recorded for each rpm evaluated.39 When the drill prepared an 8 mm depth osteotomy, the temperature remained elevated for 45 to 58 seconds (Figure 29-9). The slower the rpm (1225), the longer the bone temperature remained above the baseline. Because two to three drills are used to prepare an implant site, at 1225 rpm the first drill may increase the temperature to 41° C, the second drill to 45° C, and the third drill to 49° C, when the time between each sequence is not extended more than 1 minute. Therefore, after each drill is used within an osteotomy, a 1-minute pause should be observed before the next drill. In the Sharawy et al. study, the first drill diameter recorded the longest preparation time and the highest temperature, and the longest recovery time.39 Therefore to reduce the preparation time within the bone to a minimum in D1 bone, the surgeon should not apply constant pressure to the drill, but “bone dance” with intermittent pressure for 1 second in the D1 bone and 1 to 2 seconds out of the bone while the cooled irrigation is allowed to perfuse the site. The surgeon should also pause approximately every 5 to 10 seconds of bone preparation for 1 minute to allow the limited blood supply access to the surgical site, permit dissipation of heat, irrigate the area to reduce bone temperatures, and remove debris from the osteotomy site.
The pressure used against the bone should neither be so hard as to stall the drill, nor so light that the drill only creates heat and does not prepare the bone. Hobkirk and Rusiniak found that the average force placed on a hand piece during preparation of an osteotomy is 1.2 kg.48 Matthews and Hirsch concluded that the force applied to the hand piece was more influential than the drill speed in temperature elevation.40 When the pressure on the hand piece was increased appropriately, drill speeds from 345 to 2900 rpm did not affect the temperature. They found that increasing both speed and pressure allowed the drill to cut more efficiently and generated less heat. The effect of drill speed and pressure related to bone temperature was also reported by Brisman.46 In cortical bone, speeds of 1800 rpm with a load of 1.2 kg produced the same heat as when speed increased to 2400 rpm with pressure of 2.4 kg. The greater speed and greater pressure was more efficient than low speeds. Increasing pressure alone increased heat; increasing speed alone also increased heat. Different amounts of pressure are therefore used in response to the density of the bone. Sufficient pressure should be used on the drill to proceed at least 2 mm every 5 seconds. If this is not achieved, new (sharper) or smaller-diameter drills are indicated for each site preparation. The pressure on the drills should not reduce the rpm, which makes the drill less efficient and increases heat. Hand pieces of sufficient torque should be used to prevent this complication.
Lavelle has demonstrated lower drilling temperatures in cortical bone with internally irrigated drills.56 Thus many manufacturers suggest that an internally irrigated drill be used during implant osteotomy preparation. However, the bone temperature in the study by Sharawy et al. compared two different internal irrigated drill systems (Zimmer and Nobel Biocare) with two different external irrigated systems (Nobel Biocare and BioHorizons).39 The two external irrigated drill systems prepared the bone osteotomy at lower bone temperatures than the two internal drill systems. The difference in the bone temperatures between the four systems ranged from 1° to 3° C (depending upon the drill diameter). This study did not use the same drill design when comparing internal versus external irrigation. Therefore, the difference in bone temperature elevation may be related more to drill design than to the method of irrigation. Benington et al. tested internal and external irrigation systems on bovine bone. At a constant load of 1.7 kg, no difference was found between the two designs.43
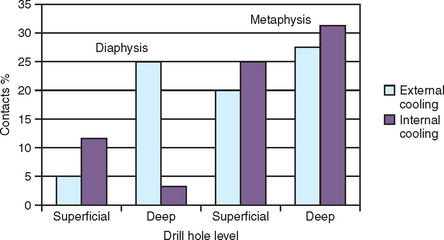
Internal irrigation of drills may present several disadvantages. The portal of the internal-cooled drill that exits at the drill apex often becomes clogged once the drill is in the bone deeper than 5 mm.57 As a result, no irrigant escapes the portal and the drilling must be repeatedly stopped to remove debris. The pressure required during drilling dense bone also may completely prevent saline from flowing out of the drill in deeper preparations, with bone debris obturating the portal of the irrigation chamber. In a histologic study by Watzek et al., the BIC percentages between internal and external irrigated drill systems in cortical and trabecular bone were compared 4 weeks after implantation. In cortical bone, the BIC was highest in internal irrigated drills when the osteotomy was deep. In trabecular bone or less deep cortical sites, the external by irrigated dills recorded greater BIC values45 (Figure 29-10).
Complete cleaning of the internal chamber of the internal irrigated drill is virtually impossible, and the drill usually retains organic contaminants in the chamber from a previous surgery57 (Figure 29-11). Although these organic remnants may be sterilized as the drills are autoclaved after each surgery, it seems unwise to allow organic debris to be transmitted from one patient to another. The external irrigated drill may be sterilized for a following surgery. In addition, the internally cooled drill fabrication in smaller diameters poses technical problems and may cause fracture during use in more dense bone. The externally irrigated drill is also less expensive to fabricate and can be made in smaller diameters.
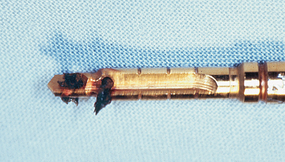
Figure 29-11 Organic debris from a previous surgery may be retained in the chamber of an internally irrigated drill.
The externally irrigated drill also presents disadvantages. The external irrigant may not be applied at the bone-cutting surface, but inadvertently on the shank of the drill or on the external aspects of the bone. Some external irrigated systems require a surgical assistant to spray the surgical site while the dental surgeon prepares the osteotomy. It is beneficial when the irrigation portal is attached to the head of the hand piece. The irrigation may not adequately flood the surgical site. As the depth of the osteotomy increases, the risk of the inadequate irrigation increases.30,45 Either internal or external irrigating drilling techniques (or a combination of the two) may be used satisfactorily, with understanding of the limitations. Irrigation, drill design, rpm, and drill sizing are paramount to reduce heat, not whether internal or external irrigation is used.
Stay updated, free dental videos. Join our Telegram channel
VIDEdental - Online dental courses


