Chapter 20
Non-surgical retreatment
Introduction
In terms of treatment objectives there are no differences between the primary treatment of the infected root canal system and a retreatment, i.e. microorganisms should be eliminated and the space hermetically sealed with a biocompatible filling material. However, retreatment cases are often technically complicated and require high-level skills of the dentist. Because endodontically treated teeth are frequently prosthodontically restored, canals regularly have to be re-entered through crowns. The canals might be obstructed by posts, insoluble filling materials or separated instruments. Furthermore, during the previous treatment a variety of procedural errors such as canal blockage, ledging, apical transportation and root perforation may have occurred.
Indications
Clinical outcome studies have failed to show any systematic difference between a surgical and non-surgical approach to retreatment (1, 17). Consequently the selection of retreatment procedures primarily has to be based on case-specific factors such as the technical quality of the root filling and the personal evaluation of risks and monetary costs.
The typical indication for non-surgical retreatment is a case classified as a “failure” in which the canals are poorly sealed. As soon as it is possible to improve on the quality of the previous instrumentation and filling, the non-surgical approach should be considered as the primary choice. However, an orthograde route may be contraindicated subjectively if the patient regards the costs or risks of the procedures to be unacceptably high. The monetary costs will increase if crowns, bridges and posts have to be removed and later replaced. In certain situations access openings through the crowns of abutment teeth and removal of posts might increase the risk of bridges loosening and roots fracturing.
Non-surgical retreatment might also be indicated for preventive reasons. In conjunction with the placement of new crowns or posts, the root filling seal inevitably will be challenged by oral microorganisms. A poor fill might not resist such provocation and thus allow microorganisms to invade the root canal. Therefore the replacement of defective root fillings should always be considered when new prosthodontic restorations are to be carried out.
Core concept 20.1 summarizes the critical steps in non-surgical retreatment, and these are discussed in more detail below.
Access to the root canal
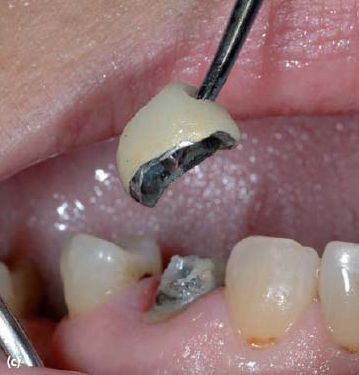
Because defective restorations might allow oral microorganisms to invade the root canal system, amalgam and composite fillings frequently have to be removed completely prior to retreatment. Sometimes crowns and bridges have to be disassembled. Dismantling enables the clinician to assess the actual axis of the tooth and the remaining coronal structure, excavate recurrent or hidden caries and look for cracks, missed or additional canals. The decision to retain a restoration may be taken only when the latter is well fitting and fulfills esthetic, functional and periodontal requirements, and if the access preparation will not seriously damage it. In the case of an access cavity via a metallic restoration, care should be taken to make the occlusal outline wide enough at the start to allow for controlled manipulation of the endodontic instruments without interfering with or scraping the cavity walls. Metal chips may be shaved off the walls and forced into the canal to create irreversible blockage, especially in mandibular teeth. Owing to their own weight, the shavings will not stay in suspension in the irrigating solution (Fig. 20.1).
- Access to the root canal:
- Access to the apical area:
- Reshaping the root canal
- Antimicrobial treatment
Removing crowns and bridges
Disassembling involves the use of a transmetal bur (Clinical procedure 20.1) to cut off the crown while preserving at best the underlying tooth structure, instead of using “tapping off” techniques with crown removers in order to break the luting cement (Advanced concept 20.1). The latter techniques are too aggressive and dangerous for the tooth structure. They are unpleasant and painful for the patient and a crown or tooth fracture may often ensue.
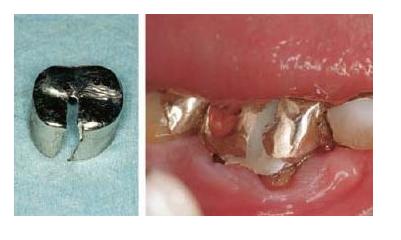
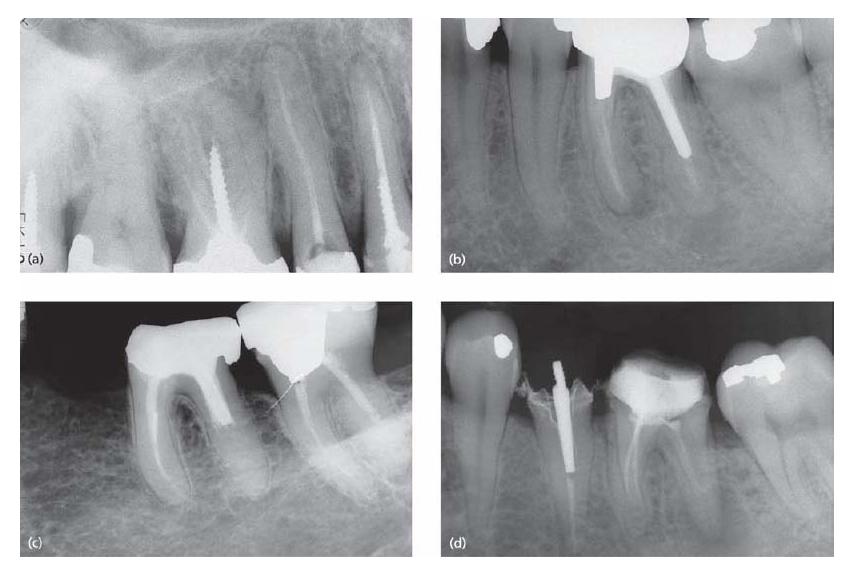
Fig. 20.1 (a) Access cavity was prepared through an amalgam filling. During instrumentation of the root canal (b) amalgam shavings were packed apically (c). (d) A 2-year follow-up radiograph indicates periapical healing.
- The WAM Key technique is a safe and efficient way to remove both metallic and porcelain crowns. Step one: create a horizontal slot with a transmetal bur on the buccal aspect of the crown. If the crown is covered with porcelain a round diamond bur is used to perforate the porcelain. To protect the porcelain margins during crown removal the preparation should be tapered (a). Step two: inside the slot a transmetal bur is used to perforate the metal and create a trench. Step three: insert the WAM Key in the slot and gently rotate it to elevate the crown along its own axis (b, c).
- The Metalift Crown Removal System is recommended to gently remove individual crowns because the procedure is simple and highly efficient with minimal damage to the prosthetic crown (a tiny hole is created on the occlusal surface) and tooth structure. A self-tapping instrument threads the metal on the occlusal surface, pushes against the dentin, breaks the cement layer and results in a loosening and lifting of the restoration.
- Coronaflex forceps may be used when maintenance of the crown integrity is mandatory. The forceps are placed at the margins of the crown, then the Coronaflex handpiece is positioned against the forceps arch to ensure an axial pulling direction, and several impulses are delivered to lift off the crown.
- To remove permanently or temporarily cemented bridges without any damage, the parachute technique should always be used in conjunction with air-driven pneumatic crown removers such as the Kavo Coronaflex or the Easy Pneumatic Crown and Bridge Remover from Dentco. The technique allows the removal of bridges in an axial pulling direction. The parachute technique uses metallic wires placed through two or more embrasures of the bridge in order to create loops acting as a rest for a metal rod. The pneumatic handpiece delivers a lot of energy via a curved insert, in an axial pulling direction, that breaks the cement bond.
Removing cores and posts
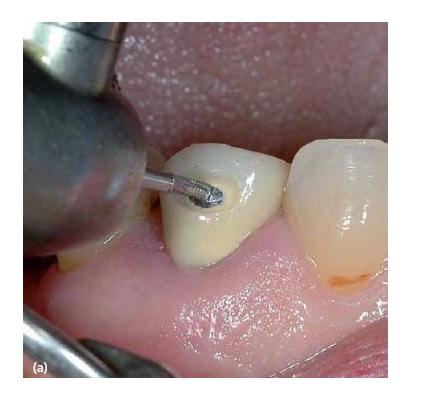
Composite and amalgam cores are easily removed with a high-speed handpiece bur. When a post is present, care must be taken not to damage the protruding head in the pulp chamber. In the case of a composite core, the difference in color between the metallic post and the filling material acts as a guide and makes the procedure easy. Amalgam cores should be drilled in a concentric fashion, starting from the outline of the cavity and moving closer and closer to the post. In both cases, with good illumination and magnification, an ultrasonic tip placed in a piezoelectric ultrasonic unit is well suited to remove residual pieces of restorative material from around the post and the pulp chamber floor.
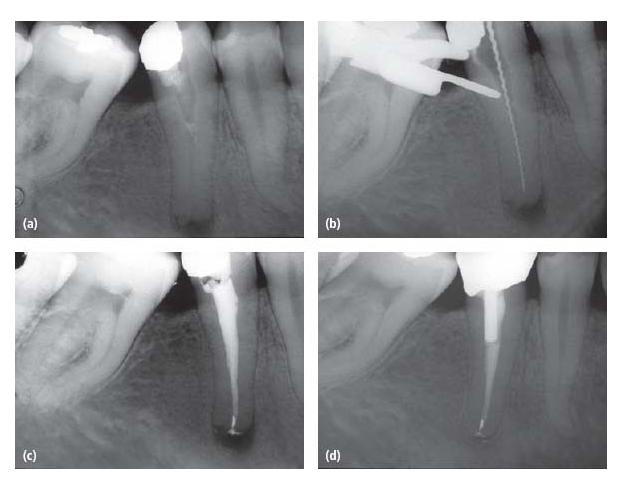
To remove a cast post and core in one piece from a single-rooted supporting tooth, the “parachute” technique works well (Fig. 20.2). First the metallic core has to be pierced right through with a transmetal bur. A metallic wire is then passed through the hole and tied with a knot to create a loop, acting as a rest for the Coronaflex or the Pneumatic Crown Remover (see Advanced concept 20.1). Depending upon the number of posts present, cast cores should be separated into two or more pieces with transmetal burs to isolate each post. Utmost care is needed when reaching the pulp chamber floor, especially in the case of a very hard core such as those fabricated of NiCr. In many instances, the huge amount of vibration delivered during the drilling of the core, coupled with the use of ultrasonics, is sufficient to loosen the post.
When considering post removal it is essential to make a careful assessment of the root anatomy and the type, length and width of the post (Fig. 20.3). Screw posts or threaded posts should usually be unscrewed after sufficient ultrasonic vibration with a piezoelectric unit. A 10 min session of ultrasonics is considered to be the minimum amount of time needed to expect efficacy.
Passive conical or parallel posts along with cast posts are good indications for using a post-removal system. Either the Gonon or the Ruddle Post Removal System may be used. Both devices are safe, efficient and predictable. Their use is similar and based on the principle of a corkscrew: one force is applied on the tooth structure, providing the fulcrum, while the pulling force is placed on the post (21).
When a post is broken deep inside the canal, the Masserann kit should be the preferred post-removal device because it is more conservative for the root structure. Alternately, the post may be troughed with one of the suborifice ultrasonic tips in a dry operating field. While grooving around the post, the ultrasonic energy will vibrate the post and loosen it. The surgical microscope (7), which provides coaxial light and magnification, has made these procedures easier and allows them to be conducted in a controlled manner (see Chapter 10).
Fig. 20.2 The “parachute” technique may be used to remove a cast post and core in one piece.

After post removal, some residual luting cement may have been left in the canal beyond the apical tip of the post. This can be removed easily with the use of a suborifice tip or an ultrasonic file.
Access to the apical area
Before attempting to reach the apical portion of the canal, the material that obstructs the space has to be removed. In order to avoid the risk of definitive canal blockage or pushing and extruding debris into the periapical tissues, a pronounced crown-down instrumentation procedure should be used (see Chapter 11). As a complicating factor, root canal instruments might have fractured and been left in the canal; in a retreatment situation they have to be removed or at least passed.
Removing gutta-percha
Gutta-percha is quite easy to remove but an organic solvent is often a necessary adjunct, especially in the case of densely filled or curved canals. Chloroform is the best solvent for gutta-percha but great concern exists as to its potential carcinogenicity and mutagenicity. McDonald and Vire (22) reported that there were no negative health effects to the dentist or assistant and air vapor levels were well below mandated maximum levels when chloroform was used in common endodontic treatment procedures. The report concluded that with careful and controlled use, chloroform can be a useful adjunct in the practice of dentistry. Several alternatives to chloroform have been suggested, such as eucalyptol, methyl chloroform, halothane and rectified white turpentine, but all solvents are toxic and, whenever possible, retreatment should be carried out without using solvents (2).
When gutta-percha-filled canals demonstrate some degree of taper, a rotary nickel–titanium instrument is used at 1200 rpm. This will generate sufficient heat to soften the gutta-percha, which is evacuated in a coronal direction owing to the fluted design of the instrument (5). Care should be taken to use a light pecking motion with the instrument and always visualize the presence of the filling materials on the apical flutes. If resistance to progression is felt, go to hand H-files and proceed as described in Clinical procedure 20.2.
Fig. 20.3 Radiographs showing (a) screwposts, (b) cast posts, (c) Para post and (d) carbon-fiber post (distal canal in first molar).
The “wicking technique” – flushing the canal with solvent followed by drying it with paper points – helps to remove any residual gutta-percha and sealer and gives the irrigation solution access to the canal walls during subsequent cleaning and shaping procedures (28) (see Advanced concept 20.2).
Removal of sealers, cements and pastes
It is critical that any residual sealer is eliminated from the canal walls because bacteria may be harbored in the interface (40). Moreover, successful removal will allow irrigation of the contaminated walls during the canal reinstrumentation (10). This step in the retreatment procedure is difficult and is often overlooked.
Removing silver cones
Silver cones were introduced in endodontics by Jasper (15) 75 years ago to simplify the obturation of curved and narrow canals. Their widespread use has led to numerous endodontic failures. Often canals with silver cones are underprepared and, with a defective seal, coronal and apical leakage will bring about metallic corrosion. Today, silver cones are considered outdated.
Stay updated, free dental videos. Join our Telegram channel
VIDEdental - Online dental courses


