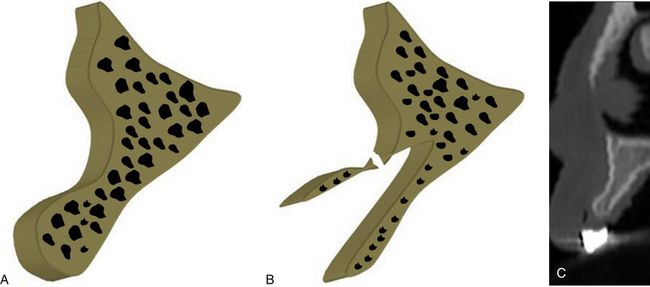
Fig 16.1 Author’s classification for the edentulous ridge morphology of the anterior maxilla. (A) Abundant bony ridge for ideal implant insertion without any bone augmentation (class 1). (B) Bony ridge deficient at the crest, needs bone augmentation with or prior to implant placement (class 2). (C) Bony ridge with facial concavity at the middle one-third, needs bone augmentation with or prior to implant insertion (class 3). (D) Bony ridge with the combination of crestal bone deficiency and facial concavity, needs bone augmentation with or prior to implant insertion (class 4).
Class 2 – Deficient ridge crest
Deficient ridge width at the crest needs ridge expansion or lateral bone grafting at the crestal region for ideal diameter implant placement (< ?xml:namespace prefix = "mbp" />
Class 3 – Adequate ridge at crest but with severe facial concavity
This condition does not require any ridge modification or grafting at the crestal region but the facial concavity needs to be grafted before implant placement (
Class 4 – Deficient ridge crest with severe facial concavity
Deficient ridge crest with severe undercuts along the facial aspect, needs to be grafted along with ridge splitting and expansion (
Management for ideal implant insertion
1. Lateral bone augmentation and delayed implant insertion
2. Ridge splitting with mid-crestal horizontal and two vertical cuts on facial plate and simultaneous implant insertion with bone augmentation to fill the large spaces between expanded cortical plates
3. Ridge splitting to expand the crestal one-third followed by implant insertion and lateral bone augmentation over the undercut, preferably by tunnelling technique.
Indications
Compromised bone width for ideal implant placement
Ridge splitting and expansion are performed to widen the thin ridge and the implant is immediately inserted between two expanded cortical plates (
Porous cortical and coarse/fine trabecular bone (D3/D4 bone)
Bone splitting can be performed with a greater rate of success in the bone with medium density (e.g. maxillary bone). Ridge splitting in the hard bone (e.g. mandible) often leads to sudden and complete splitting/fracture of the cortical plate during its expansion. But with the newer protocols described later in this chapter, one can manage to perform ridge splitting in the high density bone as well.
Presence of both cortical plates with observable interposed cancellous bone
Ridge splitting should not be performed in cases where any of the cortical plate is missing or if there are large osseous defects in the bone.
Absence of severe undercuts
Severe undercut along the ridge morphology may result in sudden fracture of the cortical plate at the undercut area during its expansion (
Improvement of facial profile is a necessity to improve the aesthetics
Often the available bone width is adequate to insert adequate diameter implant but the concavity in the ridge morphology, especially in the aesthetic region, needs to be improved with lateral bone augmentation or ridge expansion to improve the facial aesthetics along with the implant restoration (
Contraindications
1. Presence of dense cortical bone (D1 bone)
2. Compromised buccal cortical plate
3. Absence of cancellous bone between two cortical plates
4. Presence of severe undercuts
5. Inadequate ridge width (<3 mm) to perform ridge splitting
6. Insufficient mesiodistal space of edentulous area (<7 mm) – if mesiodistal dimension of the edentulous ridge area is less than 7 mm, ridge splitting with two vertical cuts should not be performed as either of these cuts can harm the roots of adjacent teeth, or because there is inadequate bone between two cuts, which is often very difficult to expand.
Comparative features of block grafting versus ridge splitting procedures
If performed with the proper case selection, treatment planning, and skilled approach, ridge splitting offers several advantages over the conventional block grafting procedure (
Table 16.1 Comparison between block grafting and ridge splitting
| BLOCK GRAFTING | RIDGE SPLITTING |
|---|---|
| Takes more time | Takes less time |
| More invasive | Less invasive |
| More technique-sensitive | Less technique-sensitive |
| Needs another site to harvest autogenous bone block | Not required |
| More surgical steps | Fewer surgical steps |
| Simultaneous implant insertion is not possible | Simultaneous implant insertion is possible |
| Takes a long span of time to complete the treatment | Takes shorter time span to complete the treatment |
Advantages
1. It can be performed as an alternative to the block grafting in selected cases.
2. Simultaneous implant placement is done.
3. It does not usually require expensive armamentarium; can be performed using ridge splitters.
4. Implant with adequate diameter can be placed.
5. It enhances hard and soft tissue profile.
6. Bone density around implants is increased.
7. Interposed graft receives rich blood supply for maturation.
Disadvantages
1. Crestal bone resorption: The ‘bounce back’ pressure of the expanded resilient cortical plate against the implant platform may lead to its resorption.
2. Sudden fracture of cortical plate may occur during expansion.
3. It cannot be performed if one of the two cortical plates is missing.
4. It may require graft materials and membranes to fill the voids/spaces.
5. Skilled approach is required to obtain the desired results.
Materials and instruments required for ridge splitting (
1. Razor sharp osseous splitters
2. Bone spreading osteotomes (D-shaped)
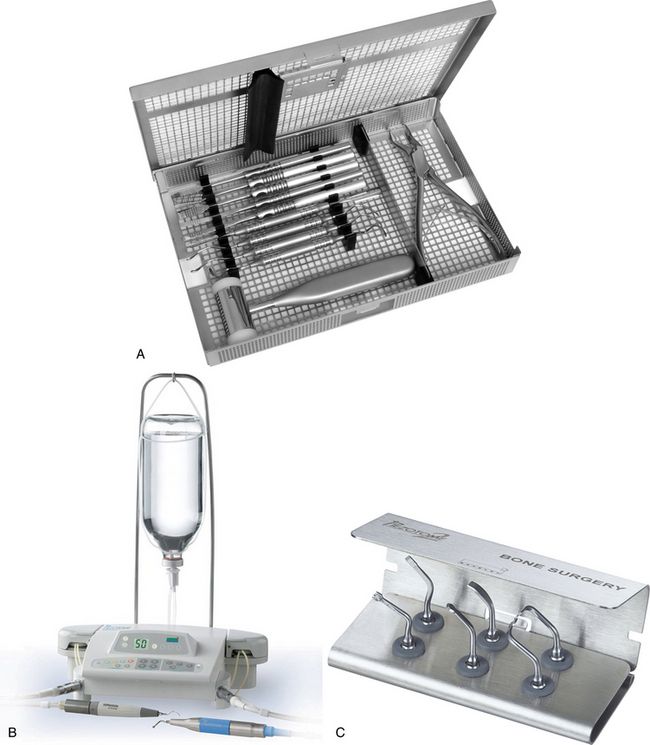
Fig 16.5 (A) Palti’s ridge splitting kit containing various types of ridge splitters and accessories required to perform ridge splitting procedures, (B) piezotome saw along with (C) bone surgery kit (from Satelec, France) can be used to prepare horizontal and vertical osteotomies more precisely than rotary burs, before ridge splitting and expansion using splitters.
Conventional technique of ridge splitting
Step by step diagrammatic presentation of ridge-splitting technique is shown in
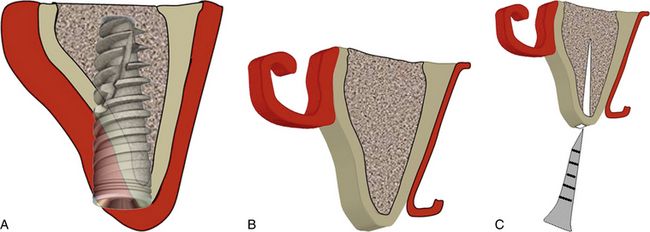
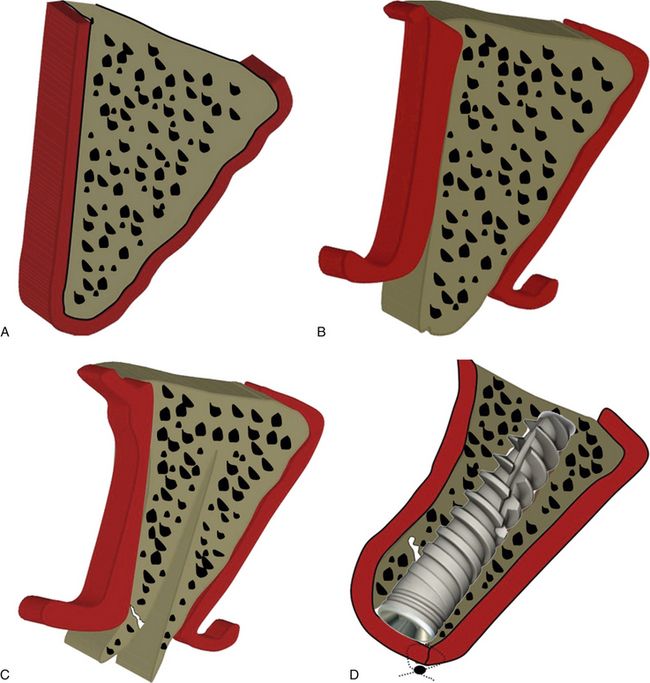
Fig 16.6 Cross-sectional 3D view of the maxillary anterior edentulous ridge showing narrow ridge crest. (A) Any attempt to place the implant may result in dehiscence at the crestal region. (B) The mid-crestal incision is made and mucoperiosteal flaps are elevated to expose the ridge crest as well as the facial cortical bone. (C) A mid-crestal horizontal cut is made and deepened several millimetres, using sharp chisel/piezo saw/straight fissure bur.
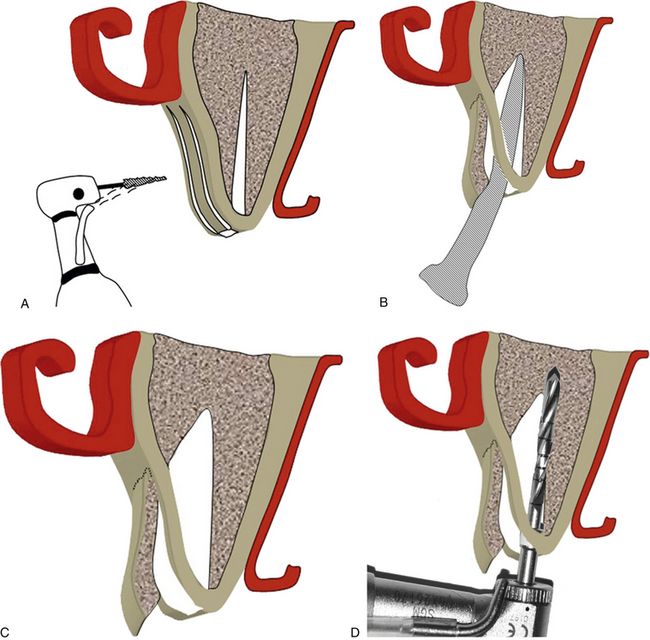
Fig 16.7 (A) A thin long straight fissure bur/piezo saw/osseous splitters are used to make two vertical cuts deep enough to reach the underlying cancellous bone and apically to reach beyond the narrow bone or facial undercut, if present. (B) Different sized osseous splitters are then sequentially used to widen the seam and pry apart the two cortical plates. The facial plate should be supported with the finger or any appropriate instrument during its expansion to counteract the expansion forces and to prevent its sudden fracture. (C) Fully spread cortical plates with a large degree of separation can be seen. The implant osteotomy is prepared in usual fashion. Drills should be used in contact with hard and stable palatal plate far away from the spread facial plate and deeper to reach at least 3–4 mm. (D) Apical to the split ridge, to achieve adequate implant stability at its apex.
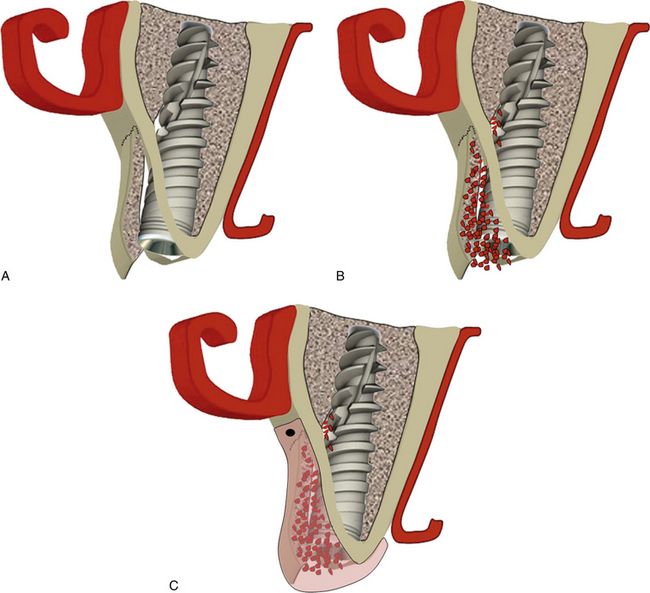
Fig 16.8 (A) Implant is inserted at the correct position; implant should preferably be submerged 1.0 mm apical to the ridge crest. (B) All the spaces between the implant and expanded cortical plates should be grafted using bone graft. (C) The grafted site should be covered using barrier collagen membrane, which can be immobilized using bone tacks.
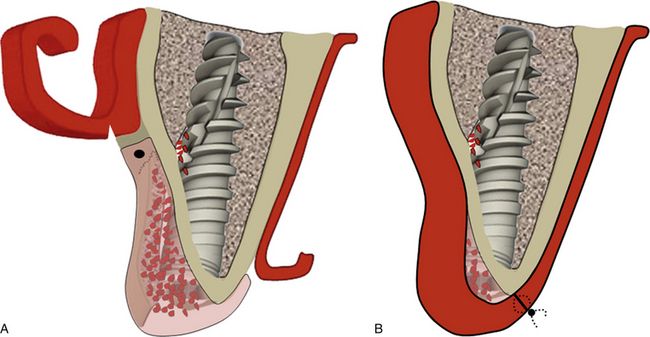
Fig 16.9 (A) Releasing incisions are made into the periosteum underneath the facial flap and (B) the flap is sutured back with primary closure. Implant should be uncovered only after a minimum of 4 months.

CASE REPORT-1
Ridge splitting with simultaneous implant placement to restore maxillary central incisors (
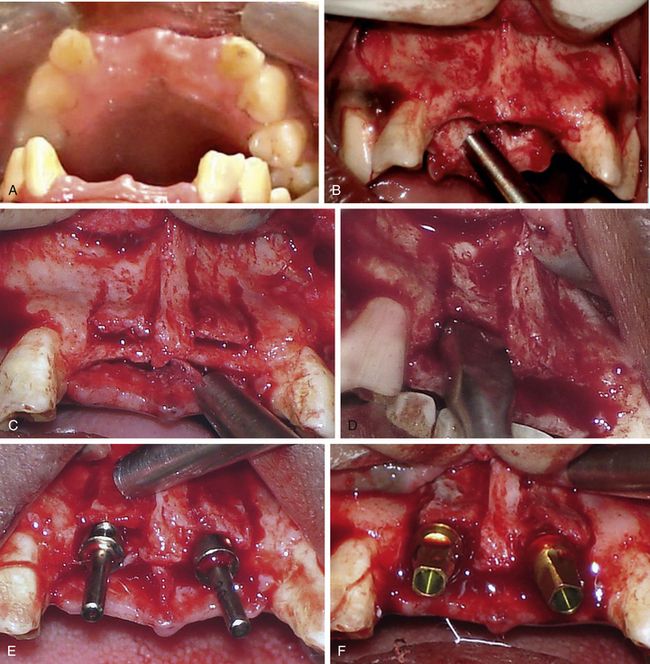
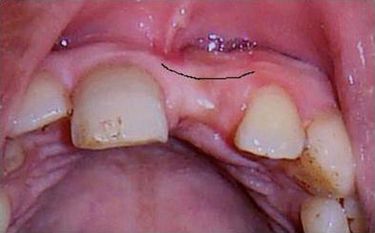
Fig 16.10 (A) Edentulous site of the missing maxillary central incisors show a labial concavity in ridge morphology, which is indicative of the possibility of inadequate bone width. (B) As can be seen after flap elevation, any attempt to place implant would result in dehiscence at the osteotomy opening or the fenestration at the facial concavity. A thin long straight fissure bur is used to make a mid-crestal horizontal cut to resect the bony trabeculae and deepen the seam. Seam should come within 2 mm of adjacent teeth, but no closer. Further, two vertical cuts are made on the labial cortical plate using sharp osseous splitters or the same bur. All cuts should be deep enough to reach the underlying cancellous bone. (C) The vertical cuts should be extended apical to the concavity at the facial bone to achieve maximum expansion without sudden fracture of the labial plate from the concavity. (D) The bone expenders used to widen the seam and pry the plates apart. (E) The osteotomy is prepared using pilot drill and parallel guide pins inserted to check the parallelism. (F) The further expansion and osteotomy preparation is done using bone spreaders and implants (3.5 x 12 mm) are inserted with adequate initial stability.
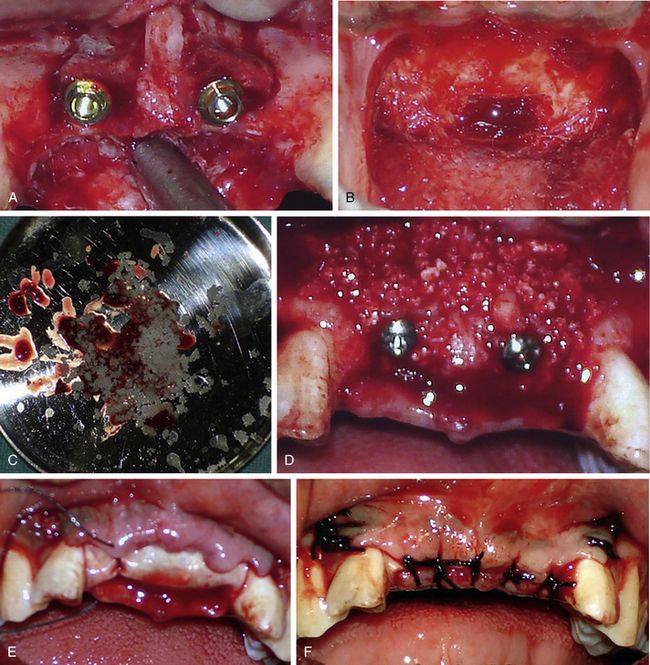
Fig 16.11 (A) The peri-implant spaces can be seen between two fully spread cortical plates which need to be grafted. (B and C) Autogenous bone is harvested from the mandibular symphysis, crushed and mixed with bovine bone material (Bio-Oss). (D) The site is grafted to fill the spaces and to reinforce the thin facial cortical plate. (E) A collagen barrier membrane is used to cover the graft. (F) Periosteum is released and the flap is sutured with primary closure.
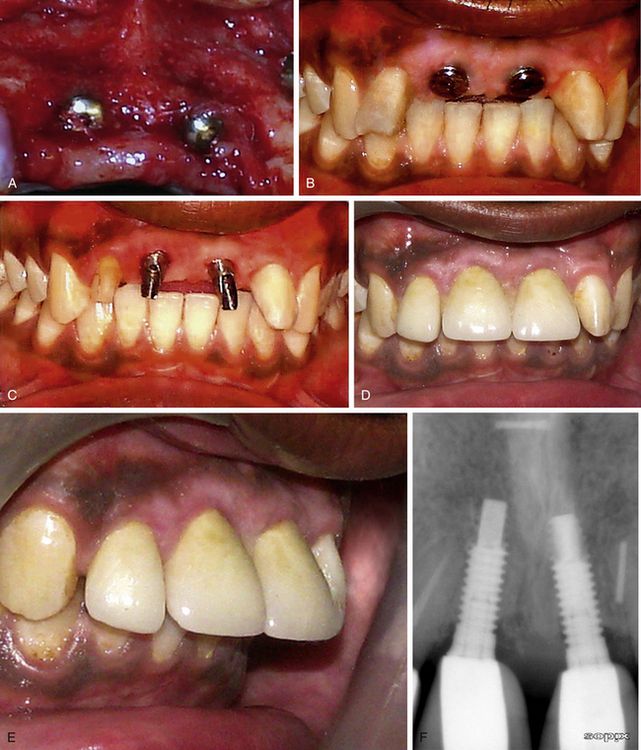
Fig 16.12 (A) Site uncovered after 4 months shows complete bone regeneration. (B) The gingival formers are in place. (C) The final abutments are in place. (D and E) Final prosthesis fixed over the implants shows adequate soft tissue aesthetics around the prosthesis. (F) The follow-up radiograph after 3 years shows stable crestal bone around the implants.

Minimal incision techniques for ridge splitting and expansion
Minimal incision techniques for ridge splitting and expansion can be performed in selective cases using appropriate armamentarium and skills.
Ridge splitting in the ridge with class 2 ridge morphology (thin ridge crest without any facial concavity)
The ridge with the class 2 ridge morphology is the most appropriate ridge for the ridge splitting procedure because

CASE REPORT-2
Ridge splitting and expansion of class 2 ridge using piezotome and ridge splitters (
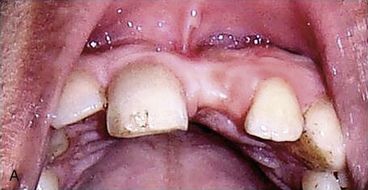
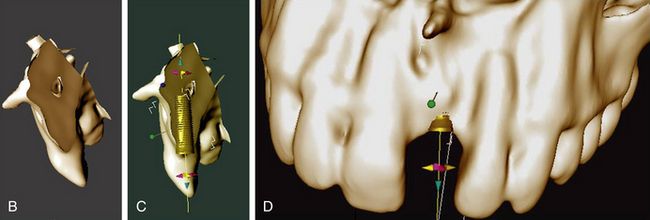
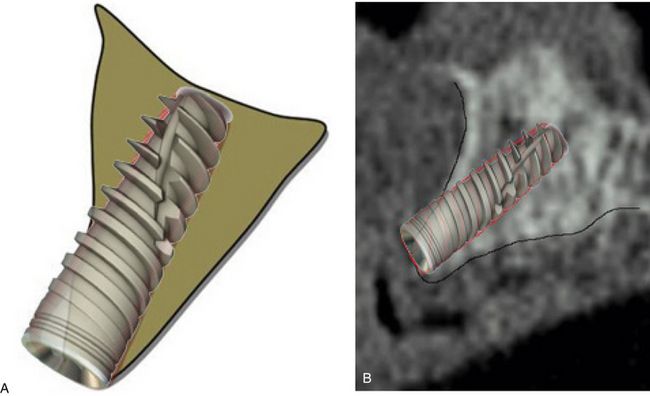
Fig 16.14 (A) Preoperative clinical view of missing tooth number 21 shows the narrow ridge crest. (B) Cross-sectional 3D view of dental CT scan showing inadequate bone width at the ridge crest. (C and D) Implant insertion without ridge splitting or lateral bone augmentation procedure may result in dehiscence at the crestal region and subsequent implant thread exposure.
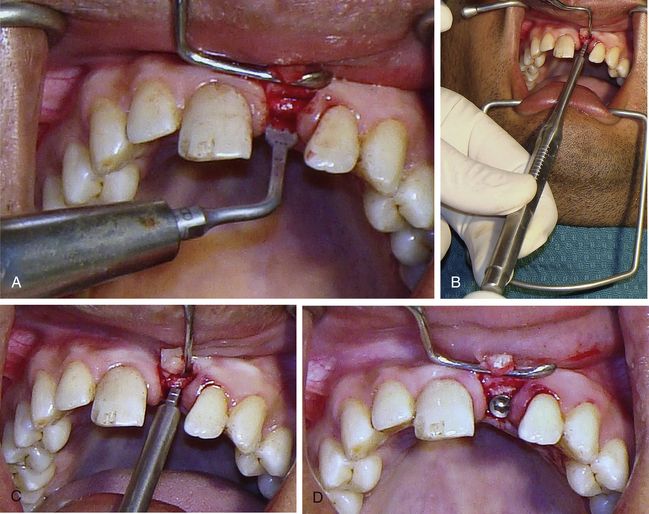
Fig 16.15 The papilla preservation incision is made and a small flap is elevated only to expose the ridge crest. (A) A mid-crestal cut is made and deepened to several millimetres using the piezo saw. (B and C) The ridge splitters are then used to split and expand the narrow ridge crest. (D) Once the narrow ridge crest has been expanded, the osteotomy is prepared using drills and the implant is inserted.
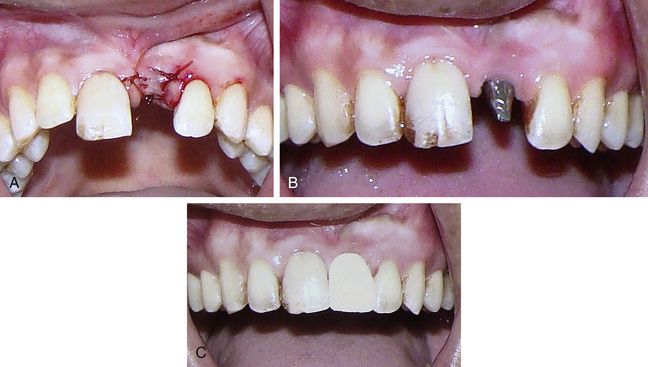
Fig 16.16 (A) As there were no peri-implant spaces to graft, the flap is sutured back without using any graft and membrane. (B and C) Implant is uncovered and restored after 3 months.

the ridge widens faciopalatally as it proceeds apically. This results in minimum chances of ridge perforation during implant drilling or sudden fracture of the facial plate during the ridge splitting and expansion procedure. Thus, minimum flap elevation is required if ridge expansion is being performed without vertical cuts along the facial cortical plate. Only the crestal part of the ridge is expanded in such cases to accommodate the implant platform within the ridge crest dimensions and in most of such cases bone grafting is not required (
Stay updated, free dental videos. Join our Telegram channel
VIDEdental - Online dental courses


