![]() For additional ancillary materials related to this chapter, please visit thePoint.
For additional ancillary materials related to this chapter, please visit thePoint.
Objectives
After studying this chapter, the student will be able to do the following:
1. Identify various dental tissues and restorative materials on a radiograph.
2. Explain, radiographically, why dental tissues and materials appear radiopaque or radiolucent.
3. Integrate the radiographic appearance of dental tissues and materials with clinical information to assess the patient’s status of health or disease.
Key Words/Phrases
attenuation
electromagnetic radiation
radiographic contrast
radiolucent
radiopaque
retrofill
Introduction
Oral radiographs are useful supplements for use in assessing the patient’s present oral and dental status. Although many adjunct assessment tools can assist in determining the diagnosis and prognosis of a specific dental disease or condition, the dental radiograph remains an important component of total patient care. The radiograph provides the diagnostician/practitioner with critical information that cannot be collected by any other method. Dental radiographs are also used to compare and identify patients after death, especially victims of disasters. The unique characteristics of a person’s dentition reveal reliable and accurate information.
I. Essentials for Radiographic Interpretation
It is essential that the dental hygienist be competent in radiographic techniques, patient safety regarding radiation, and proper handling and processing of radiographs. It is also imperative that the dental hygienist has a basic knowledge in both general and dental anatomy, periodontics, pathology, and dental materials so that he or she can interpret the radiographs.
II. Rationale for Integrating Dental Radiology in a Dental Materials Text
To distinguish dental tissues from dental materials, health from disease, and normal aspects from abnormal aspects, it is essential that dental hygienists competently recognize what is “within normal limits” both clinically and radiographically. When viewing radiographs, the “mind’s eye” scans each radiograph looking for normal anatomy, landmarks, and typical restorations. When an unexpected or uncommon area is identified, the dental hygienist’s past knowledge and experience assist in the identification and naming of the material, object, or anatomical landmark. The ability to analyze critically what is seen or not seen in regard to oral anatomical structures, dental materials, and objects is essential for an accurate interpretation and/or diagnosis. While it is not legally permissible for the dental hygienist to prescribe radiographs or diagnose dental disease, this information is used not only to educate the patient but also to provide the dentist with accurate data for diagnosis, treatment planning, and treatment.
III. Producing the Radiographic Image
X-rays are a form of electromagnetic radiation. Electromagnetic radiation occurs as waves of photons that vary in wavelength, frequency, and energy. Because electromagnetic radiation may have biologic cellular effects, it is important that the dental hygienist understand the correct use and consequences of radiation.
The primary beam of radiation encounters and passes through hard and soft tissue before it reaches the X-ray sensor. Hard tissues include tooth tissues (enamel, dentin, and cementum) and bone. Soft tissues such as epithelium, muscles, nerves, glands, pulp, and blood vessels also occur in the oral cavity. Tissues and dental materials absorb the X-ray beam according to their thickness and density. As a result, the radiograph consists of “darks,” “lights,” and varying shades of gray (radiographic contrast).
This process of reducing the energy of the primary beam as it passes through the differing objects/materials is called attenuation. Attenuation results in the respective levels of blacks, whites, and grays on the processed radiograph that assist in distinguishing normal radiographic findings. The thickness and composition (object density) of the tissues and materials contribute to determining the overall appearance of the radiograph. These subtle variations of light (radiopacities) and dark (radiolucencies) can aid in the diagnosis and interpretation of patient information.
IV. Restorative Materials Categorized by Radiographic Appearance
A. Radiopaque Restorative Materials
Restorative materials that are clearly radiopaque include amalgam, cast gold, cohesive gold, nonprecious alloys, and the metal portion of a porcelain-fused-to-metal crown. Two large amalgam restorations including metallic retentive pins are shown in Figure 15.1. Retentive pins are used in several ways and with various materials to increase retention where natural tooth structure is not available. The metal of the ceramometal restorations, as seen in Figure 15.2, is depicted by the white areas. The darker shadows on the incisal surface of these teeth depict the porcelain portion of the crowns. Stainless steel and aluminum temporary crowns may be radiopaque depending on the thickness of the material.

FIGURE 15.1. The amalgam restorations on teeth #14 and #19 include retentive pins (arrows) that enhance the resistance and retention of the restorative material.
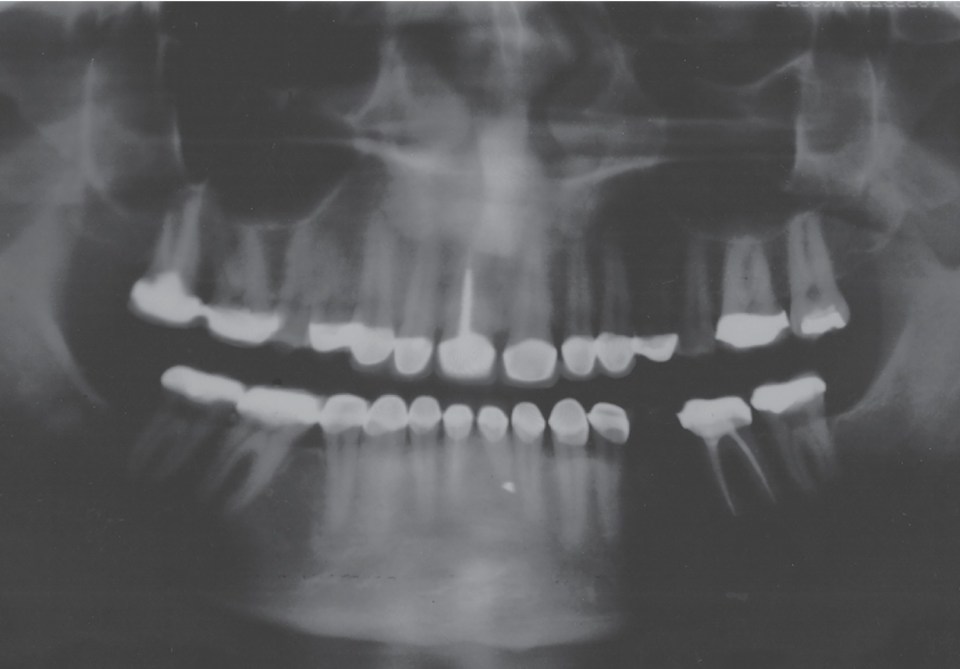
FIGURE 15.2. Numerous porcelain-fused-to-metal crowns are visible on the maxillary and mandibular arches on this panoramic radiograph. The radiolucent shadow at the incisal (#6–#11) and occlusal (#2, #3, #14) surfaces is the radiolucent porcelain.
B. Radiolucent/Radiopaque Restorative Materials
Other restorative materials may also appear as varying degrees of gray (dark and light or radiographic contrast). These materials include composite resins, sealants, cements, bases, and porcelain. Depending on the material, some of these products may appear more radiolucent than opaque, and vice versa. Look at the anterior porcelain and metal restorations shown in Figure 15.2. Depending on the type and amount of the material, varying degrees of radiolucencies and radiopacities are present. Refer to Table 15.1 to recognize the comparative radiographic characteristics of dental materials. Because of varying compositions, cements used for luting and bases may appear darker (radiolucent) or lighter (radiopaque) than the overlying restorations. Radiolucent bases under a metal restoration, particularly amalgam, and excessive adhesive materials under composites may imitate a carious lesion on the radiograph. For example, see Figure 1.9D, which shows a base under an existing amalgam restoration (tooth #3).
TABLE 15.1. Radiographic Appearance of Dental Materialsa

aCertain categories have some products that are radiolucent and other products that are radiopaque.
Modified from Krouse M, Gladwin SG. Identification and management of restorative dental materials during patient prophylaxis. Dent Hyg. 1984;58:456, with permission.
A dental sealant may be visualized on a radiograph depending on the type and amount of filler in its composition. A posterior composite restoration may also be visualized on a radiograph depending on the type of restorative material and the amount of filler in its composition. In both cases, the radiographic appearance would be radiopaque. Figure 15.3 demonstrates a composite restoration on the occlusal of tooth #28. Although the restoration is opaque, it is less opaque than a metal restoration would appear.

FIGURE 15.3. Note the composite resin restoration on the occlusal surface of tooth #28. Although it is radiopaque, its radiographic appearance is not as opaque as a metal restoration. Also note the retentive pins in tooth #31 (arrows) and the root canal therapy in tooth #2.
C. Radiolucent Restorative Materials
Some restorative materials may appear more radiolucent because of the lack of fillers or density. These materials include temporary crowns and/or bridges made of acrylic or plastic tooth-colored materials, such as resins and porcelain. Again, refer to Table 15.1 for the radiographic characteristics of the various dental materials. Figure 15.4 demonstrates an older composite resin that is radiolucent. The mesial of tooth #6 shown in Figure 15.4 is not a carious lesion; it is a resin that does not contain radiopaque fillers and therefore appears lucent. The distal of tooth #7 in Figure 15.4 has a radiopaque composite restoration compared to a more radiolucent composite in the mesial of tooth #6.

FIGURE 15.4. A radiolucent area is present on the mesial surface of tooth #6. This is not dental decay; it is a composite that appears radiolucent. The distinct outline differentiates it from caries, which would have a more diffuse outline. Root canal therapy is evident in tooth #5. The root canal filling material is gutta-percha.
V. Radiographic Descriptions of Dental Tissues, Disease, and Materials
A. Radiographic Description of Tissues and Disease
Radiographically, a variety of dental materials are similar to the natural tooth structure, and others are quite different. Illustrations and a comparative table in this chapter assist you in distinguishing the radiographic “looks” that are associated with tooth tissue and dental materials.
1. Soft Tissues
Soft tissues are not dense (compact and hard) and do not greatly attenuate the X-ray beam (the beam passes through nearly undiminished). Soft tissues appear black or dark on the processed radiograph and are called radiolucent. Therefore, soft tissue is not generally visible on a radiograph.
Figure 15.5 illustrates soft tissue radiolucency. The interdental papilla and pulp canal are both radiolucent. The less dense the tissue or material, the less radiation it absorbs. Therefore, when the primary beam of radiation strikes the receptor, it is translated into a dark or radiolucent area on the radiograph.

FIGURE 15.5. The radiolucent interdental papillary areas are located between adjacent teeth on this bitewing radiograph. Note the pulp chambers in the crown and root areas. Soft tissue is not visible radiographically and appears radiolucent. Caries are present in the distal of tooth #30 and the mesial of tooth #31 (arrows).
Some dental materials are radiolucent and are not visible on the radiograph. Such materials transmit the primary beam of radiation so that they are not clearly distinguishable on the radiograph. Examples are acrylic resin, porcelain, and most impression materials.
Figure 15.2 illustrates maxillary and mandibular porcelain-fused-to-metal crowns. On this radiograph, the porcelain is a shadow at the incisal and occlusal surfaces of the teeth. Also, note the numerous areas of radiopacities, which denote the metal of the crowns.
2. Hard Tissues
The enamel of the tooth is a very compact tissue. In fact, it is the densest tissue of the body, and it significantly attenuates the X-ray beam. In comparison, bone is slightly less dense than enamel and similarly absorbs the X-ray beam. On the other hand, dentin and cementum are considerably less dense than enamel or bone, and the X-ray beam can penetrate these tissues much more readily. The more dense the tissue or material, the more radiation is absorbed and fewer photons reach the X-ray sensor. This translates into light or radiopaque areas on the radiograph. As a result, the radiographic appearance of tooth enamel is light. The dentin is less dense and less radiopaque than the enamel. The dental pulp appears dark or radiolucent.
Figure 15.6 illustrates varying hard tissue radiopacities. Figure 15.2 also depicts numerous areas of radiopacities denoting the metal of porcelain-fused-to-metal crowns.

FIGURE 15.6. Radiographically, carious lesions appear radiolucent. The proximal carious lesions on this radiograph are noticeable (mesial of tooth #3, mesial and distal of tooth #4, mesial and distal of tooth #5, distal of tooth #29, and possibly under the large amalgam restoration on tooth #30). The enamel outline is radiopaque because of its density, and the dentin is comparably less opaque than the enamel (more gray). (Courtesy of Dr. Thomas F. Razmus, Department of Diagnostic Sciences, West Virginia University School of Dentistry.)
Stay updated, free dental videos. Join our Telegram channel
VIDEdental - Online dental courses


