Practical and Predictable Class II and III Direct Composite Restorations

Direct composite restorations can be either predictable or a source of many problems.
Introduction
The most common procedures in restorative dentistry are direct composite restorations. Having a reliable, predictable, simple and efficient technique for direct composite restorations is paramount to a successful and happy professional life as a restorative dentist. If restorative dentists are not comfortable with these techniques or find them too time consuming and unprofitable, they will undoubtedly rely too much on indirect restorations. Many find direct composites to be complicated, unpredictable and sometimes unprofitable techniques. Since third-party compensation is in decline and clinicians contend with extreme fee competition, a time efficient, predictable and reproducible technique is a must. Supragingival minimally invasive adhesive techniques are the answer.
A Complicated and Unprofitable Technique
Most clinicians complain that direct composite restorations are considerably more time consuming and complicated than older techniques such as amalgam. This is often caused by a combination of incorrect techniques and some misunderstanding of the restorative material requirements. One major reason why the direct composite restoration procedure can be overcomplicated is the fact that traditional GV Black-based techniques of preparations are most often being used, followed by a resin-based composite filling. Clearly, the mechanically retentive, geometric GV Black-style preparation was designed for different materials and before adhesion became available (Figure 10.1). Bonded composite uses completely different materials with special characteristics, which require a completely different preparation (Figure 10.2). Supragingival minimally invasive adhesive preparations should be less complicated and time consuming than traditional preparations. The increase in time to perform an exacting traditional geometric preparation is not the only problem. In fact, a larger problem is that a traditional preparation makes the bonded restoration more complicated, time consuming and unpredictable. A proper preparation leads to an easier filling procedure.

Figure 10.1 Geometric amalgam preparation.

Figure 10.2 External outline of a traditional geometric preparation compared with the more tooth-preserving outline of a bonded composite preparation.
The primary reason that direct composite preparations should be more widely used are:
- Composite does not require bulk for strength as does amalgam, so traditional preparations with external and internal outlines with minimum width and depth are unnecessary (Figure 10.3).
- Bonded composite reinforces tooth structure, including the enamel, so removal of a slightly undermined tooth is unnecessary [1,2].
- Bonded composites do not need mechanical retention, as they rely on adhesive.
- All of the abovementioned points lead to the all-encompassing fact that direct composites are and should be more minimally invasive than traditional restorations.
- Resin-based composite is intolerant of contamination, subgingival margins are undesirable and lead to higher chances for complications. A supragingival protocol is important. Supragingival protocols also simplify and shorten the preparation time. They simplify and make the filling procure time more predictable. Implementing the five principles of supragingival dentistry (Box 10.1) is equally important during direct restoration procedures as it is with indirect procedures (Figure 10.4).

Figure 10.3 Tooth-conserving composite preparation compared with a traditional occlusal outline (dove tail) for amalgam preparation.

Figure 10.4 Deep subgingival caries deeply complicates the restorative procedure.
Multicenter studies have reported excellent durability of direct composites [3]. One study looked at the 5-year durability of composites, and showed a 93% success rate, which is almost equal to the 95.4% durability success of amalgam [4]. Although very durable, the literature shows that very large direct composite restorations fail faster and have shorter durability [5]. With improvements in techniques, the composite durability can be expected to increase.
Some clinicians who still desire the esthetic component for their patient but have difficulty in trusting direct composites default to diagnosing indirect inlays for durability’s sake. Multiple studies fail to prove the superiority of indirect restorations. In fact, some studies suggest that direct composite outperforms indirect inlays (both composite and porcelain) [2,6,7]. Indirect restoration should be performed only when there is a large amount of damage to the tooth, which includes a missing or badly undermined cusp.
It is in the best interest of both clinician and patient that the clinician uses the proper techniques for direct composite. Every dentist should be able to perform this most common procedure with confidence, predictability and most importantly efficiency. In addition to the fact that indirect inlays are no more successful or durable than direct composites, they require less cutting of the tooth. As soon as an inlay is chosen, a taper is needed, requiring more aggressive tooth removal.
Universal Principles for Supragingival Minimally Invasive Preparation
Traditional GV Black-inspired preparation rules, such as extensions for prevention, no enamel without dentin support, geometric shape preparations and creating gingival clearance by dropping the box, do not apply to direct composite techniques. Understanding the specific requirements and characteristics of bonded composite allows for the development of more appropriate preparations for direct bonded composite restorations. The primary goals and universal rules for bonded composite preparations are as follows:
- No specific outline, minimally invasive.
- Caries removal should be performed using the most minimally invasive techniques available (supragingival principle 1).
- No boxes or any unnecessary mechanical retention.
- No need for unnecessary clearance.
- Beveling.
No Specific Outline, Minimally Invasive
GV Black-inspired preparations, external or internal, serve to create geometric shapes which allow for the proper thickness of restorative material, sufficient access in to the cavity for instruments (condensers), or mechanical retentive features needed (e.g. preparation for amalgams). With direct composite, outlines are unnecessary, because composite does not require certain bulk for strength, condensation by instrument or mechanical retentive features. The primary goal of a direct composite preparation is the removal of caries and damaged old restoration, in the most minimally invasive form and to allow for the simple placement of the matrix band. It is acceptable for the access cavity in a proximal caries to be smaller than the internal cavity and to have an irregular shape (Figure 10.5). An internal outline can be irregular and only follow the shape created by the caries removal effort. The traditional need for bases to create a flat pulpal floor or forming geometric shapes is clearly unnecessary. Slightly undermined cusps can be preserved because bonded composite will reinforce the tooth structure (Figure 10.6).

Figure 10.5 Class III preparation showing an internal outline larger than the external outline.

Figure 10.6 Cusps with an undercut and some unsupported enamel can be restored to close to their original strength, thanks to the reinforcement effect of adhesion.
Caries Removal Should be Performed Using the Most Minimally Invasive Techniques Available
Supragingival principle two indicates that when caries removal reaches close to the gingiva, extreme attention must be paid during caries and old restorative material removal. Clearly infected enamel and dentin must be eradicated from the tooth. Nevertheless, the traditional approach based on color and hardness and the effort to remove all discolored dentin should be questioned, as it may be too destructive and may lead to a higher number of pulp exposures or subgingival margins [8]. Discolored dentin should not always be fully removed, as it has been well demonstrated that dentin caries has two layers [9], the superficial layer which is infected, not remineralizable and necrotic, and the deeper layer which is affected and stained but not infected, and is remineralizable and vital (Figure 10.7). With this understanding, preserving the stained but uninfected dentin can be a tooth- and pulp-saving procedure. Thorough and appropriate caries removal is indispensable, and the use of caries indicators has been demonstrated to be a great adjunct to catching hidden caries (Figure 10.8). At the same time, caries stains are also a method of detecting these two layers of carious dentin, as first described by Fusayama, followed by Nakajima [10].

Figure 10.7 Scanning electron microscopy showing adhesive interfaces: slide B is an adhesive interface to normal dentin; slide C is an adhesive interface to caries-affected dentin (courtesy of Dr Masatoshi Nakajima).

Figure 10.8 Areas where caries stain can uncover hidden caries.
Propylene glycol-based caries stains are often used. The outer infected carious dentin will be stained dark red. This dentin is removed. The inner affected dentin is stained very light pink, and is often referred to as a “pink haze” (Figure 10.9a–c). The concept of the peripheral seal is important, and special attention should be paid to ensuring healthy bondable enamel or dentin at the restorative margins and around the pulp [11]. The inner affected dentin is not removed since it will remineralize. Affected dentin is bondable, although not as strongly as normal dentin, and research has shown that caries-affected dentin will remineralize [12,13].

Figure 10.9 (a) Caries layers showing how they stain with red caries detector (courtesy of Dr Shigehisa Inokoshi). (b) Dentin stained red is carious and must be removed, pink staining shows non-infected tooth, which should be left, anterior. (c) Caries indicator used to uncover caries on a posterior tooth.
The use of a base near the pulp is controversial. Currently, applying a self-etch bonding system directly onto deep or very deep dentin after cavity disinfection or, better still, using a self-etch bonding system with strong disinfectant characteristics, such as Clearfil™ SE Protect (Kuraray) is the treatment of choice and will provide excellent results [14].
The literature and clinical experience show that enamel margins are preferable and tend to be longer lasting [15]. Additionally, placing a matrix band and wedge when the margin goes considerably subgingival is more difficult. For this reason, the same care taken during caries removal should be taken during removal of caries on the cervical margin. To avoid subgingival margins, supragingival principles two and three must be considered, and enamel preservation techniques should be used [16] (the technique is discussed in detail in Chapter 3).
No Boxes or any Unnecessary Mechanical Retention
Intentionally cutting mechanical retentive features after caries is counterproductive and leads to unnecessary tooth removal, increased proximity to the pulp and subgingival margins. Traditional proximal boxes and dropping the gingival box for clearance are extremely undesirable. Interestingly enough, the difference between stopping after caries removal and continuing to drop the box is usually only a matter of one or two millimeters. However, that is all that prevents pulp exposure and subgingival margins or health and simplicity (Figure 10.10a–c).

Figure 10.10 (a) Interproximal caries. (b) After careful caries removal, the margin is in contact and supragingival. (c) After traditional cervical contact breaking, the margin ends subgingivally.
No Need for Unnecessary Clearance
Mesial, distal and gingival clearances were mandatory with older less flowable materials like amalgam, which required strong packing to seal margins, and margin visibility was needed for margin seal confirmation (Figure 10.11a,b) Bonding systems and flowable composite can be used to seal margins reliably. Large clearances are unnecessary. Supragingival principle two suggests creating clearance by using other more conservative means such as metal strips or a mosquito bur (Figure 10.11a,b). This is necessary for placing of the matrix band, but only minor separation is needed. Alternatively, wedging can allow for matrix placing. The use of a matrix retaining ring will cause tooth separation easily sufficient to compensate for the thickness of a matrix band.

Figure 10.11 (a,b) The finished preparation with minor beveling.
Beveling
Research shows that when enamel is cut at an angle of 45 degrees, more rods are exposed, giving enhanced adhesion. Some studies suggest that this enhances the marginal seal [17] while others suggest minor benefits and that etching enamel can be sufficient preparation without beveling [18,19]. Some suggest convoluted beveling techniques that require special instrumentation. A meta-analysis has shown that a roughened surface seems to be sufficient to achieve excellent adhesion, while the adhesive system seems to have a large influence on lack of cervical leakage [20]. It is clinically impractical to create a perfectly even bevel. The few megapascals gained do not outweigh the additional time spent in creating such a bevel. Simply removing the sharp external cavosurface margin is sufficient and more practical. To complete this step, all that is necessary is to pass a diamond briefly along the cavosurface margin, just to purge any uneven enamel. No specific bevel or thickness of bevel is necessary. The exception, where longer bevels are needed, is when esthetic blending of the composite with the tooth is desirable, for example class III and VI with facial surface involvement. A 2–3 mm 45-degree bevel on the enamel will accomplish satisfactory blending when a composite with appropriate translucency is used.
Step by Step Preparation for Class II Caries
- Enter the tooth through the occlusal surface using a small rotatory instrument to find the caries. A number 2 carbide round bur or number 1556 carbide will be suitable, depending on the size of the cavity. Maintain a small external outline while attempting to remove the occlusal and proximal caries. The size of the external outline needs to be appropriate to allow for visualization of the caries. No specific shape or outline is necessary, but the external outline needs to be on sound enamel or dentin. Decalcified enamel must be removed, as well as any old restorative material, which will expand the size of the external outline (Figure 10.12a).
- Expand internally for initial removal of gross caries. Apply a caries finder for 10 seconds, and rinse. Remove caries until all infected dentin has been removed.
- When breaking the proximal wall it is desirable to use a wedge guard or a metal matrix to protect the adjacent tooth. The external fluoride-rich layer should be protected to avoid the increased possibility of caries. Full interproximal clearance, which is needed for GV Black-influenced design of cavities, is not mandatory (Figure 10.12b).
- A lack of proximal clearance may make it difficult to insert a matrix band. A margin separation technique using a “mosquito” bur through the contact can simplify matrix band insertion and will also work for minor interproximal beveling (Figure 10.12c). Using a wedge guard will protect the adjacent tooth. Placing a wedge to separate the tooth and a matrix band may be all that is necessary. Another possibility is to pre-separate the teeth by placing a ring in advance of the cavity preparation. The longer the ring is in place, the greater the separation. Danville’s Mega-Ring is possibly the most powerful separator ring (Figure 10.12d).
- When caries approaches the gingival margin, the supragingival protocol should be employed. Minimally invasive removal of caries and old restorations and enamel preservation techniques will make restoring easier, more predictable and healthier for the periodontium (see Chapter 3; Figure 10.12e).
- Remove the sharp external cavosurface margin throughout, to remove loose enamel rods and enhance adhesion using a flame diamond (Figure 10.12f).

Figure 10.12 (a) External outline (preparation class II). (b) Wedge guard used to avoid nicking the adjacent tooth. (c) Using the mosquito bur is necessary to create clearance. (d) Mega Ring (Danville). (e) The enamel margin preservation procedure. (f) The finished preparation with minor bevels.
Step by Step Preparation for Class III Caries
- Enter the tooth though the lingual surface using a small rotatory instrument to find the caries. A number 2carbide round bur or number 1556 carbide will be suitable, depending on the size of the cavity. Maintain a small external outline while attempting to remove the proximal caries. The size of the external outline has to be appropriate to allow for visualization of the caries. No specific shape or outline is necessary, but the external outline needs to be on sound enamel or dentin. Decalcified enamel must be removed, as well as any old restorative material, which will expand the size of the external outline (Figure 10.13a).
- Expand internally for the initial removal of gross caries. Apply a caries finder for 10 seconds and rinse. Remove dark red stained caries until all infected dentin has been removed, leaving a pink haze. Preservation of gingival dentin and enamel, even if unsupported, will simplify the restorative procedure.
- When breaking the proximal wall, it is desirable to use a wedge guard to protect the adjacent tooth, as the external fluoride-rich layer should be protected to avoid the increase possibility of caries. Full interproximal clearance, which is needed with the GV Black-influenced design of cavities, is not mandatory (Figure 10.13b).
- Lack of proximal clearance may make it difficult to insert a matrix band. Placing a wedge or torqueing apart with a hand instrument to separate the tooth will usually allow a matrix band to be placed.
- When caries approaches the gingival margin, use the supragingival protocol. Minimally invasive removal of caries and old restorations, and enamel preservation techniques will make restoring easier, more predictable and healthier for the periodontium (see Chapter 3;Figure 10.13c).
- Remove the sharp external cavosurface margin throughout, to remove loose enamel rods and enhance adhesion, using a flame diamond.

Figure 10.13 (a) Decalcified enamel appears white and must be removed (preparation class III). (b) Preparation finishing in contact with the adjacent tooth. (c) Dentin caries is more apical than enamel. Enamel preservation will allow for a more simple supragingival procedure.
Margins on Dentin and the Acid–Base Resistant Zone (or Super Dentin)
Knowing that enamel margins can improve marginal seal, concern may be raised when the margins end in dentin. Newer understanding and the use of some self-etch bonding systems can help to mitigate such concerns. Current research is showing that, with proper conditioning and the use of some self-etch bonding systems with fluoride release abilities, such as Clearfil SE Protect, an acid–base resistant zone can form on the dentin (Figure 10.14) [21]. This zone may resist acid challenge, giving rise to the ability to resist demineralization and prevent secondary caries development. This layer is only encountered in self-etch adhesives [22]. The ultimate clinical effect of this layer remains to be understood and studied.

Figure 10.14 Super dentin (courtesy of Dr Jungi Tagami).
When the gingival margin is on the dentin, it is important to understand the concept of how composite will shrink toward the direction of the best bonded surface [15,23,24]. When shrinkage is correctly managed, this will in fact enhance the marginal seal. Incorrectly managed, it could lead to the exact opposite. After a bonding agent is cured, an effort should be made to build up the cervical margin with a thin layer of flowable composite, keeping it in contact with the dentin gingival floor alone (Figure 10.15a,b). Contact with the enamel walls could pull the composite in that direction and increase the chances of a gap forming at the gingival margin. The ideal flowable composite is one with excellent radiopacity.

Figure 10.15 (a) The gingival floor is fully in the dentin and cementum, no enamel. (b) Placing the first increment only on the dentin gingival floor will enhance adaptation and avoid microgap.
Isolation
Correct isolation and uncontaminated surfaces when performing adhesive dentistry are essential. Contrary to many clinicians’ vehement insistence, however, rubber dam isolation is not the only method for clinical success. Clinical studies have shown that rubber dam isolation or a correctly employed cotton roll isolation technique will give equal clinical success [25,26,27]. This is not to say that there is anything wrong with using the rubber dam method; it works perfectly well, if used correctly. It is known, however, that over 90% of dentists do not use rubber dam routinely, and making the use of a rubber dam mandatory for adhesive dentistry is not based on good evidence and is also clinically burdensome. Such dogmatic requirements can easily dissuade the quality clinician from using adhesive techniques. I have performed thousands of successful adhesive restorations for over 20 years, mostly without the use of a rubber dam.
Practice and efficient clinical techniques must be used to avoid compromising isolation. Lengthy and convoluted techniques require long periods of strict isolation and this may be one reason why it appears to be mandatory. The use of self-etch bonding systems, which are less technique and humidity sensitive is also desirable [28].
In addition to correctly performed cotton roll isolation, other options for isolation include an OptraGate® (Ivoclar), which is useful for anterior restorations (Figure 10.16), and PropGard® (Ultradent), which retracts the tongue as well, or DryShield® (Figure 10.17). Whichever method is used, it is imperative to remember with adhesive dentistry that correct isolation is critical for clinical success. The slightest amount of blood, saliva, or crevicular fluid creates contamination, and a failed restoration.

Figure 10.16 Isolation using OptraGate® (Ivoclar).

Figure 10.17 Isolation using PropGard® (Ultradent).
Matrices and Wedges
The correct selection and use of matrix bands is of great importance. Traditional tofflemire (universal) retainers are not optimal, because they have flat surfaces, giving a restoration with flat proximal edges, with contact only at the very top of the tooth. The ideal matrix bands for class II bonded composites are rings and sectional matrices (Figure 10.18). The best type of matrix bands specifically for adhesive dentistry are Teflon-coated matrix bands (SlickBands™, Garrison), as most modern bonding systems can adhere to most surfaces including metal (Figure 10.19). Teflon-coated matrix bands prevent the bonding system from adhering to it, preventing small pieces of the proximal composite from being removed along with the matrix.

Figure 10.18 Garrison ring and matrix placed and ready to fill.

Figure 10.19 Teflon-coated matrix bands.
In reference to rings, the specific type used is up to the preference of the dentist. Any product with wider tines is highly recommended, similar to the Contact Matrix™ (Danville) sectional matrix system. The reason for this is that there is a wide separation between the cavosurface margin and the adjacent tooth. If smaller traditional tines (Figure 10.20) are used, they may invade the preparation, leading to a misshapen tooth. Wider tines also embrace the tooth and the adjacent tooth, which increases the adaptation of the matrix band. Increased adaptation to the adjacent tooth means less flash, and less cleanup afterwards, making the procedure much easier. While back-to back composite direct composite fillings cannot be done at the same time, it is possible, to do a mesial-occlusal-distal restoration on the same tooth using two rings.

Figure 10.20 Large interproximal separation.
There are a great variety of wedges on the market to choose from (Figure 10.21). Wooden wedges continue to work very well. Some more modern options offer curved wedges (such as those made by VOCO). These have the intention of better sealing the margin. The direction, either right or left, is important when using curved wedges, so care must be taken in choosing the correct one for each procedure.

Figure 10.21 Many wedges are available, including Curvy wedges (VOCO).
Bonding
The bonding procedure is of great importance. Refer to Chapter 4 for full details of choice of materials and desirable techniques.
The Effects of Polymerization Shrinkage and Stress
Polymerization shrinkage of resin-based composite is unavoidable and the rate of shrinkage is between 1% and 3%. Research has shown that the force of this shrinkage is enough to break the adhesive bond between the composite and the tooth (microgap), and can even cause the thinner cusp to deflect [29,30]. Postoperative sensitivity, marginal leakage and recurring caries can be the consequences of shrinkage, which make this issue very clinically relevant (Figure 10.22). Some researchers have found the strategies used to minimize polymerization shrinkage and stress of restorative and flowable materials in relation to marginal microleakage to be less relevant than the bonding material used [31]. There are a number of available strategies to minimize polymerization shrinkage and stress. The incremental layering of composite, including specific layering protocols, while helpful, is of questionable efficacy [32]. Fibers and glass inserts have also been used [33]. Research has shown that after each composite increment is initially polymerized, the polymerization forces will stress the bonded surfaces, and the stress will continue for an extended period of time. Thus, cumulative polymerization stress to the bonded surface and the tooth is of concern. Other strategies used are liners or restorative materials with higher elasticity, as the elasticity or stiffness of the restorative material does play a large role in managing polymerization stress [34], in addition to stress-reducing curing protocols. A combination of such techniques is clinically reasonable.
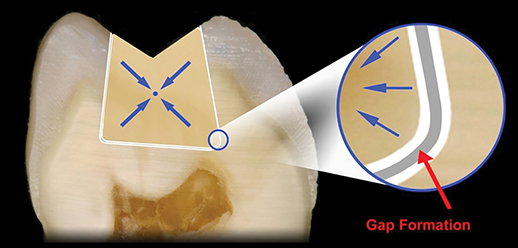
Figure 10.22 Microgap caused by polymerization shrinkage (reproduced with kind permission of Compendium of Continuing Education in Dentistry).
Managing the Effects of Polymerization Shrinkage by the Use of Materials with Low Modulus of Elasticity
The desire to have the perfect liner or restorative composite which would minimize or eliminate the effects of polymerization shrinkage and stress is ever present in dentistry. While the perfect material has yet to be designed, some materials are available in dentistry which have been used as stress relievers to polymerization shrinkage.
Resin-modified glass ionomer (RMGI) has a low modulus of elasticity, and is considerably more elastic than resin-based composites, including flowable materials (Table 10.1) [35,36]. One study showed that the effect of polymerization shrinkage was decreased by close to 50% by the use of a 0.5 mm layer of RMGI liner (Vitrebond™, 3M) [37]. It is believed that when the composite shrinks, the high elasticity of freshly cured RMGI serves as a buffer, minimizing the effect of shrinkage and decreasing chances of a microgap. While many have reported excellent results with RMGI extended to the external part of the tooth [38,39,40], some have found it to increase failure [41].
Table 10.1 Modulus of elasticity of resin-modified glass ionomer and resin-based composite.
| Source | Modulus of elasticity (GPa) | Volumetric shrinkage (%) | |
| Low-viscosity resin (Revolution, Kerr) |
Labella R, Lambrechts P, Van Meerbeek B, Vanherle G. Polymerization shrinkage and elasticity of flowable composites and filled adhesives. Dental Materials, 1999; 15(2): 128–137. |
7.7 | 5.5 |
| Resin-modified glass ionomer (Vitrebond™, 3M ESPE) |
Tam LE, McComb D, Pulver F. Physical properties of proprietary light-cured lining materials. Operative Dentistry, 1991; 16(6): 210–217. |
1.1 | 2.3 |
RMGI internal liners are recommended for direct restorations deeper than 3 mm and with high configuration factors. An easy way of measuring the depth of a preparation is with a carbide bur, as the cutting blades of the bur are usually 4 mm in length. If the cavity is deeper than 4 mm, a liner could be considered (Figure 10.23). The liner should be thin – 0.5 mm. Some studies have shown superior results in dispersing stress using RMGI compared with flowable liners [42]. Controversy exists with this material, though, as some have found it to increase failure. Failures may relate to incorrect use, often the use of too thick a liner layer or placing the liner unnecessarily in cavities that are not sufficiently deep [41].

Figure 10.23 A liner can be used on very deep cavities (deeper than 4 mm), and placed thinly (reproduced with kind permission of Compendium of Continuing Education in Dentistry).
Bulk fill restorative composites are a newer and very promising approach to managing the effects of polymerization shrinkage and polymerization stress in particular. Bulk fill composites have a low modulus of elasticity and thus are intended to allow bulk filling of a cavity without the same amount of polymerization stress. The literature shows conflicting results. While some studies show a decrease in polymerization shrinkage and better marginal seal [43,44], others have found the amount of shrinkage and gap formation to be either the same or in some cases worse than traditional incremental filling [45,46]. As with most research, variations in results can be caused by technique, including over-bulking or using an inappropriate curing protocol [47].
Flowable composites have a slightly lower modulus of elasticity than a restorative composite, because of the lower fill content. While the use of flowable composite has been documented to improve margin adaptation and seal [48], the ability of flowable materials as liners to decrease the effects of polymerization shrinkage is questionable [49]. Incremental filling of the cavity is desirable for multiple reasons, a good protocol which includes understanding the effects of curing and layering is desirable to decrease polymerization shrinkage.
Managing the Effects of Polymerization Shrinkage by Layering and Curing: The Filling Procedure
A common approach to managing polymerization shrinkage and stress is to perform multiple increments (Figure 10.24). Multiple increments alone have been shown to have limited success and may not provide the complete answer [50]. The understanding that polymerization stress starts when composite is first cured and continues after curing, and that its effects are equally as important as polymerization shrinkages [51] has led to the use of a number of different filling and curing protocols, which combine low light intensity and periods of rest to allow for the stress in the composite to dissipate, such as soft start [52] and pulse cure [53], among others [54]. As for incremental filling of the cavity, there are benefits to managing stress, but the true extent of the clinical relevance has yet to be determined and studies are contradictory [54,55,56,57].

Figure 10.24 Multiple increments.
Curing speed, however, has been shown by some researchers not to be clinically relevant [55]. Ferracane has suggested that “while these results may be directly attributable to the generation of contraction stresses in dental composite restorations, and they provide a rationale for closely following a structured placement technique to minimize their effects, no direct clinical evidence currently exists to support a cause and effect relationship between contraction stress and clinical failure or longevity for these materials” [58]. Christensen showed no significant difference in composite properties when using either fast, slow or ramped curing speeds. A light with a 3-second cure has rendered much success for me over the years. It is also understood that the formulation of the restorative materials may have a greater influence in stress than the light-curing protocol [59].
In light of our knowledge, a realistic, practical and reasonable technique for minimizing the effects of polymerization shrinkage and stress, while understanding clinical reality, would include the reasonable use of each of the variables that can alter the effect of shrinkage and stress: the choice of materials, reasonable incremental filling, and a reasonable curing protocol. Always curing the bonding layer before filling provides a buffer layer, especially when using a thick bonding system such as Clearfil SE Protect. For practical reasons, a process with fewer increments is desirable, especially with the knowledge that increments alone do not decrease stress. Each increment should be no thicker than 2 mm and at no point should increments involve both dentin and enamel at the same time, as the stiffness and strength of adhesion are very different and will lead to increased stress, and possible microgaps. The first increment should be a thin layer of elastic liner, usually flowable composite. After each increment, a half-cycle of cure should be applied at a distance 10 mm from the composite to decrease light intensity, as research shows that distance decreases intensity [60]. After curing each increment, begin layering the next increment. It is desirable to allow 2 minutes to elapse before curing the next increment, to allow for the greatest amount of stress to dissipate from the previous increment. This will usually happen by default when the increment is layered carefully. Nevertheless, it is a good idea to keep track of time and not cure the next increment too quickly (Box 10.2).
VIDEdental - Online dental courses


