http://evolve.elsevier.com/Hatrick/materials.
In dentistry, an impression material is used primarily to reproduce the form of teeth, including existing restorations and preparations made for restorative treatments, as well as the form of other oral hard and soft tissues for removable prostheses. Impression materials are also used by maxillofacial prosthodontists to make molds of facial defects resulting from cancer and trauma, so that they can construct facial prostheses to restore facial form. Many different types of impression materials have been developed over the years, allowing the dentist to select materials according to the demands of the treatment and the oral environment. Participation in the making of impressions is one of the most frequently performed patient contact functions of the dental assistant and is performed increasingly by the dental hygienist. It is important that both have an understanding of the clinical applications, handling characteristics, physical properties, and limitations of these materials. They must also know proper techniques and materials for disinfecting the impressions. In some states, dental assistants and hygienists can be licensed in expanded functions that include making final impressions for crown and bridge, implant, and partial denture procedures.
Overview of Impressions
Making impressions of oral structures is an almost everyday occurrence in a busy dental practice. Selection of the impression material will be influenced by what the impression will be used for. To replicate oral structures, the impression materials must be in a moldable or plastic state that can adapt to the teeth and tissues. Usually, the impression material in its plastic state is loaded into a tray for carrying it to the mouth and supporting it so that it does not slump and distort. Within a specified period of time, the impression material must set to a semisolid, elastic, or rigid state. Elastic impression materials are used more extensively than rigid materials, because elastic materials flex from tissue undercuts when removed from the mouth, whereas rigid materials cannot. The completed impression forms a negative reproduction of the teeth and tissues. When plaster or stone is poured into the impression and hardened, the replica that is formed is a positive reproduction of the teeth and tissues (see Chapter 16 [Gypsum and Wax Products]). The replica is called a cast or model. In the initial diagnosis and treatment planning phase, the dentist may request that the dental assistant or hygienist make impressions of the teeth and surrounding structures, so that diagnostic casts, commonly called study models, can be made for further study when the patient is no longer present. When an impression is made of a tooth that has been prepared for a restoration, the replica of the prepared tooth is called a die and is used for fabrication of the restoration in the dental laboratory. Figure 15-1 shows an impression and the mold and die made from that impression. Use of the die allows the dentist or laboratory technician to perform the procedure by the indirect technique. With the indirect technique, the restoration is not made directly on the tooth, as with the direct placement of amalgam, but is constructed in the laboratory (indirectly) and later is cemented on the tooth.
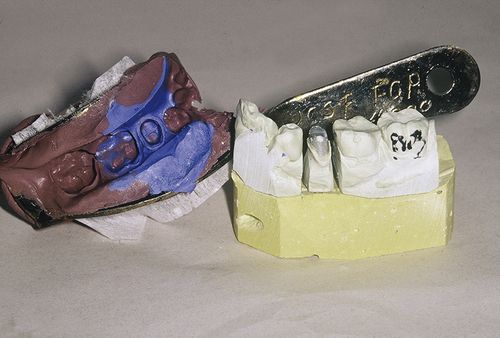
FIGURE 15-1 A double-bite impression (see Procedure 15-2) and the cast from the impression with a die of the crown preparation that can be removed by the technician to facilitate the creation of a wax pattern.
Types of Impressions
Dental impressions can be categorized into three basic types based on how they will be used. These types include the following:
1. Preliminary impressions
2. Final impressions
3. Bite registration (occlusal) impressions
While the dentist has a wide variety of materials to choose from to make these impressions, in the modern practice the choice will likely be alginate, silicone rubber (polyvinyl siloxane), or polyether. It is possible that no impression material will be used; instead, a digital image of the oral structures may be used. Digital impressions are discussed separately (see “Digital Impressions,” below).
Preliminary Impressions
Preliminary impressions, as the name implies, are made as a precursor to other treatment. Casts made from them are often used for planning purposes such as for diagnostic casts (study models). Preliminary impressions may be used to make working casts from which custom trays or provisional restorations can be made or to create casts for pre- and post-treatment records. On occasion, what starts out to be a preliminary impression can also be used as the final impression. For example, a cast made from an alginate impression to design a removable orthodontic appliance may be accurate enough to send to the laboratory for fabrication of the appliance. Alginate is a useful, inexpensive material that is excellent for preliminary impressions but lacks the detail and accuracy to be used for a crown impression.
Final Impressions
Final impressions are impressions that are more accurate in their replication of the oral structures. To provide a good fit and marginal integrity for a crown, bridge, or implant a very detailed and accurate impression of the preparation and surrounding structures is needed. A detailed replication of the oral tissues is needed to fabricate well-fitting partial and complete dentures as well. Polyvinyl siloxane and polyether are the two most commonly used materials for final impressions.
Bite Registration
A replication of the patient’s bite is needed to establish the proper relation between a restoration or prosthesis and the opposing teeth. An impression is made that captures this relationship (see Procedure 15-3), so it can be used in the office or sent to the dental laboratory where the restoration will be fabricated. Bite registrations are also used to help mount diagnostic casts in their proper relationship (often used in conjunction with a facebow) on an articulator. Although wax has been used for bite registration for decades, polyvinyl siloxane is currently more popular for this purpose. A wax bite registration is easily distorted.
Types of Impression Materials
Impression materials can be categorized into two major groups:
1. Elastic materials
2. Inelastic materials
Elastic impression materials include the hydrocolloids (agar and alginate), polysulfides, silicone rubber materials (condensation and addition; e.g., polyvinyl siloxane), polyethers, and a hybrid of polyether and polyvinyl siloxane. Of the elastic materials agar hydrocolloids, polysulfides, and condensation silicone rubbers are not used much anymore. Alginate, polyvinyl siloxane (PVS), and polyether are the most commonly used elastic impression materials. Alginate is used extensively for preliminary impression whereas PVS and polyether are used primarily for final impressions.
Inelastic materials are the older impression materials and include dental compound, impression plaster, zinc oxide eugenol, and impression wax. Because of the superior properties of the elastic materials, inelastic materials are seldom used in dentistry today (although some dentists still use stick compound for border molding custom trays for denture impressions).
Key Properties
Although impression materials must have a degree of strength, their key properties are as follows:
Accuracy: When the impression is made the impression material must closely adapt to and flow over the surface of the tooth preparation and tissues to record the minute details in order to be accurate. The material will tend to flow if it has low viscosity and there is pressure on the material as the tray is seated.
Tear resistance: After the impression material sets, it must have good tear resistance to prevent tearing during removal from the mouth. With a crown impression the material in the gingival sulcus is very thin and would tear if the tear resistance was poor.
Dimensional stability: After the impression is removed the set material must remain dimensionally stable; otherwise, casts and dies poured from it would be inaccurate.
Impression Trays
Impression trays are used to carry the impression material to the mouth and to support it until it sets, is removed from the mouth, and is poured into dental plaster or stone. They should be rigid to prevent distortion of the impression. They can be made for arches with teeth or for edentulous ridges.
Stock Trays
Impression trays can be premanufactured trays, called stock trays, which are purchased in a variety of sizes (small, medium, large, and extra large) for both adults and children (Figure 15-2). Stock trays can be metal or plastic, and each of these can be solid or perforated. Perforated trays have holes in their sides and bottom to help retain impression material as it extrudes through the holes and locks into place. Solid trays often have raised borders on the internal surfaces that help lock in the impression material. These are called “rim-lock” trays. Materials used in solid trays require the application of an adhesive to further retain them and prevent distortion of the impression if they should partially pull out of the tray. Plastic trays are inexpensive and disposable, whereas metal trays are more expensive and must be cleaned and sterilized between uses.
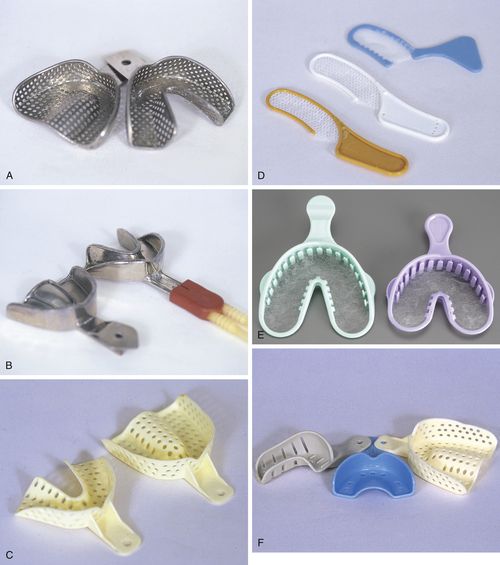
FIGURE 15-2 Variety of metal and plastic stock impression trays.
A, Full arch metal perforated trays. B, Rim-lock metal tray with option for water cooling (tray on the right has water hose attached). C, Disposable plastic perforated trays. D, Bite registration trays. E, Triple trays take impression of prepared teeth, opposing teeth, and bite. F, Quadrant (left), anterior section (middle), and full arch (right) trays. (From Bird DL, Robinson DS: Modern Dental Assisting, ed 11, Philadelphia, 2014, Elsevier.)
Because of the wide variation in size and shape of patients’ arches, stock trays may not fit some patients well. Ideally, the tray should conform to the length, size, and height of the arch, depth of the palatal vault, and position of the teeth. One stock tray manufacturer has made thermoplastic moldable, full arch trays (HeatWave; Clinician’s Choice Dental Products) that can be molded to fit the patient’s arch. The trays come in four upper and lower anatomical shapes. The tray material softens after 1 minute in a water bath that is 71 °C (160 °F) and can be adapted to an existing cast or shaped by hand to fit the patient’s arch. Molding the tray will adapt better, providing many of the benefits of a custom tray; use less impression material; and provide more accurate impressions.
Custom Trays
Impression trays can also be custom made. Custom trays are usually constructed in the laboratory with chemical-cured, light-cured, or thermoplastic resins on casts of the teeth (see Chapter 17 [Polymers for Prosthetic Dentistry]). They are custom fit to the mouth of the individual. They can also be made by lining a stock tray with a putty material that is adapted to the dental arch of the individual, and then an impression is made in this arch-adapted custom tray.
Both stock trays and custom trays can be made for full arch impressions or for sectional impressions for part of an arch. The triple tray (also called double-bite, dual-arch, or check-bite tray) is a stock sectional tray that is used to make an impression of the teeth being treated and the opposing teeth at the same time and, if used properly, will capture the correct centric occlusion (bite) of the patient. Quadrant trays will fit a quadrant of the mouth or one-half an arch.
Bite Registration Trays
Bite registration trays are typically U-shaped plastic frames with a thin fiber mesh stretched between the sides of the frame. The mesh retains the impression material (called bite registration material) and is thin enough so as not to interfere with closure of the upper and lower teeth in proper bite relationship. Bite registration material is placed on both sides of the mesh, the frame is positioned over the teeth to be recorded, and the patient closes into the normal bite relationship until the material sets (see Figures 15-33 through 15-36 in Procedure 15-3).
Hydrocolloids
A colloid is a glue-like material composed of two or more substances in which one substance does not go into solution but is suspended within another substance. Hydrocolloids are water-based colloids that function as elastic impression materials. The two hydrocolloids used in dentistry are agar hydrocolloid (or reversible hydrocolloid) and alginate hydrocolloid (or irreversible hydrocolloid). Much like gelatin, when agar powder is mixed with water, it forms a glue-like suspension that entraps the water, making a colloidal suspension called a sol. Heating it will disperse the agar in the water faster. When the agar sol is chilled, it will gel, becoming semisolid or jelly-like (like Jell-O). When the agar gel is heated, it will reverse its state back into a liquid suspension (sol). Therefore, it is a reversible hydrocolloid. Alginate powder will also form a sol that gels. However, with alginate, a chemical reaction occurs that prevents it from reversing back to a gel when heated. Therefore, it is an irreversible hydrocolloid.
Reversible Hydrocolloid (Agar)
Reversible hydrocolloid was introduced into dentistry in 1925 and was the first elastic material to gain popularity. It overcame many of the problems with inelastic materials (see the section “Inelastic Impression Materials,” below) in that it could take accurate impressions of teeth and arches with tissue undercuts and could be removed from the mouth without injuring the patient or breaking. Its main clinical use is for impressions of operative and crown and bridge procedures. It also has uses in the laboratory for the duplication of casts (models). Its use has declined over the years as elastic (rubber) impression materials have been introduced. Detailed information about reversible (agar) hydrocolloid can be found on the Evolve website at www.evolve.elsevier.com/Hatrick/materials.
Irreversible Hydrocolloid (Alginate)
Alginate, also called alginate hydrocolloid or irreversible hydrocolloid, is by far the most widely used impression material. It is inexpensive, easy to manipulate, requires no special equipment, and is reasonably accurate for many dental procedures. Alginate is used for making impressions for diagnostic casts, partial denture frameworks, and repairs of broken partial or complete dentures, as well as for fabrication of provisional restorations, fluoride and bleaching trays, sports protectors, preliminary impressions for edentulous arches, removable orthodontic appliances, and a multitude of other uses. However, it is not accurate enough for the final impressions for inlay, onlay, crown, and bridge preparations. It does not capture the fine detail of the preparation needed for a precise fit of such restorations. Also, it is thick and does not flow well into embrasures or occlusal surfaces. Final impressions are made with more accurate materials such as one of the elastomers (polyvinyl siloxane or polyether). Final impressions are used to make detailed replicas of the prepared teeth. It is from these detailed replicas that precisely fitting restorations will be made.
Composition and Setting Reaction
The main active ingredient in alginate is potassium or sodium alginate, which makes up 15% to 20% of the powder. Proportions of ingredients vary from manufacturer to manufacturer and with fast-, regular-, and slow-set materials. It is produced from derivatives of seaweed. See Table 15-1 for the components of alginate and their functions. The “dustless” alginate powders have organic glycols or glycerin added to keep powder from becoming airborne when it is dispensed. The dust contains silica particles, and they are a potential health hazard if inhaled.
When alginate powder is mixed with water, calcium sulfate dihydrate reacts with sodium alginate to form calcium alginate. Calcium alginate is insoluble and causes the sol of mixed powder and water to gel. Because this occurs by a chemical reaction, it cannot be reversed back to the sol state as can agar hydrocolloid. It is a fairly rapid chemical reaction, so trisodium phosphate is added as a retarder to delay the reaction. The amount of retarder that is added will control the time of the set and will differentiate between fast- and regular-set alginates. Diatomaceous earth is added as a filler to increase stiffness and strength and to prevent the surface from being sticky. Potassium sulfate is added to keep the alginate from interfering with the set of the gypsum products used to pour the impression. Some manufacturers have added chemicals to the alginate that change color as the chemical reaction progresses to indicate when it is time to insert the impression, and the color changes again when it is time to remove the impression.
Working Time
Regular-set alginates have a working time (from start of mix to seating in the mouth) of 2 to 3 minutes, and fast-set alginate has a working time of 1.25 to 2 minutes (American Dental Association [ADA] specification no. 18 sets the minimum at 1.25 minutes). The longer the time used to mix the alginate, the faster it must be loaded into the tray and seated in the mouth.
Setting Time
Regular-set alginates set in 2 to 5 minutes, and fast-set alginates set in 1 to 2 minutes. Setting time can be lengthened by using cold water or shortened by using warm water. Adjusting the powder-to-water ratio can affect the set but also adversely affects the physical and mechanical properties and therefore is not recommended. It is advisable to leave the impression in the mouth for an additional minute after it appears set, because the tear strength and the ability to rebound from undercuts without permanent deformation increase during this time.
 Clinical Tip
For patients with sensitive teeth, alginate mixed with cool water can be painful. Use regular-set alginate with warm water. The working and setting times will be shortened, but the patient will be more comfortable.
Permanent Deformation
Alginate will be compressed when it is removed from undercuts in the mouth. The greater the compression, the more likely it is that the alginate will be permanently deformed to some degree. A certain thickness of alginate (2 to 4 mm) is needed between the impression tray and the teeth or tissue undercut; alginate that is too thin will deform more and will tear more easily. As with reversible hydrocolloid, when an alginate impression is removed it should be done with a rapid “snap” to prevent the deformation of critical surfaces. If 8 to 10 minutes are allowed to elapse from the time an alginate impression is removed from the mouth until pouring the model, some recovery or rebound will occur from the deformation. That deformation which does not recover is the permanent deformation, and it will be recorded in the poured gypsum cast as a distortion. As long as the distortion is small, it may not be clinically significant. Usually, the time needed for disinfecting the impression is at least 10 minutes, and most of the rebound will have occurred by then.
Dimensional Stability
Alginate is very sensitive to moisture loss and will shrink as a result. Once the impression is removed from the mouth, it should be rinsed and disinfected (Procedure 15-4), wrapped in a damp (not dripping wet) paper towel, and sealed in a zippered plastic bag. (An alternative to wrapping in a damp paper towel would be to put a few drops of water in the plastic bag. Alginate could imbibe water from the towel and swell.) Enclosing the impression this way will create an environment with 100% humidity to minimize water loss from the alginate. Some moisture will be lost from the impression even in 100% humidity from syneresis. Syneresis occurs when many gels are left standing, whereby they contract and some of the liquid is squeezed out of the gel, forming an exudate on the surface. This loss of water changes the properties of the material. Ideally, the impression is poured after it is disinfected. If the impression must be stored until it can be poured a few hours later, it must be kept at 100% humidity (as with the zippered plastic bag and a few drops of water). The longer the delay in pouring the alginate impression, the more likely that some distortion will occur.
Tear Strength
The tear strength of alginate is more important than its compressive strength, because most commercial alginates far exceed the minimal allowable value for compressive strength. Alginate mixed with too much water will be weaker and more likely to tear on removal from the mouth. Thin sections of alginate are also prone to tearing. In addition, slow removal of the alginate from the mouth will contribute to tearing. If the impression can be left in the mouth for an additional minute beyond the point when it is set, it will increase in tear strength. When properly handled, alginate has adequate tear strength for most purposes for which it is used. Some alginates have silicone polymers added to increase the strength.
Making Alginate Impressions
Objective
The objective of impression making is to reproduce the oral structures with acceptable accuracy while practicing good infection control and maintaining patient comfort. The dental assistant and the dental hygienist can make alginate impressions. They will need to prepare the patient for the impressions and to dispense, mix, and load alginate into trays. After removal of the impression, the assistant or the hygienist disinfects and properly handles the impression until it is poured with the appropriate gypsum material. The assistant or hygienist also may be responsible for clearing residual alginate from the mouth and face of the patient.
Tray Selection
Stock trays work well with alginate, because they leave plenty of room for an adequate thickness of alginate. Alginate must be tightly adapted to the tray to be accurate. If the alginate pulls loose from the tray, a distortion will occur. If a tray is set on the bench top, unsupported alginate extending from the back of the tray may lift a portion of the impression and dislodge it from the tray. A perforated tray can be used because the alginate oozes through the perforations and locks into place. A solid tray can also be used if an adhesive made for alginate is applied to the inside of the tray before the alginate is loaded. Solid rim-lock trays should also have adhesive applied because alginate will occasionally pull free from the rim-lock on removal of the impression. If disposable plastic trays are used, they should be rigid. Flexible plastic trays have the potential to distort under the weight of the wet gypsum during pouring or when used in areas of undercuts in the mouth.
A properly selected full arch tray will cover all of the teeth and will extend into the facial and lingual vestibules without impinging on the tissues. It will extend posteriorly to include the retromolar area for a mandibular tray and the hamular notch area for a maxillary tray. It will be deep enough to provide at least 2 mm of space for alginate beyond the incisal and occlusal surfaces of the teeth. On occasion, standard stock trays will not cover all of the desired areas for the impression and must be modified with utility wax to create appropriate extensions of the tray and support the alginate. A common area for this to occur is the third molar area of an individual with large jaws. Wax may also be added to the midpalatal area of the tray to support the alginate when the patient has a very deep palatal vault (see Figure 15-18 in Procedure 15-1). Usually, the patient is asked to rinse the mouth to remove loose debris and thick saliva before the impression is made. An antimicrobial rinse may be used to reduce the number of oral pathogens.
Dispensing
Manufacturers supply measures for powder and water for their alginates. Use the appropriate ones and adhere to the recommended proportions of powder and water to maintain the desired physical properties of the alginate. Powder measures (also called scoops) will vary among manufacturers, so do not interchange them with other manufacturers’ scoops. The same principle applies to water measures.
 Clinical Tip
Water and powder measures can vary in size among manufacturers. If your office uses more than one brand of alginate, color-code the measures so they are not intermixed.
During shipping or prolonged periods of sitting, the powder may pack tightly and some of the ingredients may settle out, so that they are not evenly distributed throughout the powder. The measure of powder taken will be greater than the manufacturer intended when developing the measuring scoop. When the compacted powder is incorporated into the recommended volume of water, the resulting mix will be too thick and will often set too rapidly. To prevent this from happening, containers of alginate such as cans or plastic containers should be turned end-over-end a few times to decompress (fluff) the powder and mix the ingredients. Some alginates are supplied in premeasured, watertight packages with a quantity suitable for a medium-sized arch (equivalent to two scoops with most manufacturers). This packaging is more expensive, but some practitioners find it to be convenient, to provide a more consistent mix, and to minimize cross-contamination.
 Caution
Be sure to wear a mask while dispensing and mixing alginate. Alginate dust is potentially hazardous to inhale because it contains silicon dioxide in the diatomaceous earth fillers, as well as other chemicals. Using dustless alginate will minimize but not eliminate this risk.
Mixing
For a moderate to large upper adult arch, three scoops of alginate powder are usually required; a small upper arch requires two scoops. Most adult lower arches require two scoops. One unit of water is required per scoop. Typical water measures are marked to indicate up to three units. Room temperature tap water is placed in the rubber bowl, and the powder is added to it. Cold water retards the set, and warm water accelerates it. The powder is stirred into the water so that the powder becomes wet. Next, the wet powder is aggressively mixed against the sides of the bowl with a wide-bladed spatula. Some operators prefer to rotate the bowl in one hand while mixing with the other. Some offices use mechanical mixing machines for rapid mixing, ease of use, and a consistent mix. The rubber bowl is attached to the mechanical mixer that spins the bowl. With both mechanical and hand-mixing, the water-powder mixture is forced against the sides of the bowl to further incorporate the powder into the water and to force out entrapped air. Mixing should be completed within 45 seconds for regular-set alginate and within 30 seconds for fast-set alginate. The completed mix should have a creamy consistency (see Figure 15-19 in Procedure 15-1). If it appears grainy, it has not been mixed thoroughly.
Loading the Tray
Mixed alginate is picked up on the spatula and pushed into the depth of the tray. This action forces out air, thus preventing large voids in the impression. The alginate should be loaded in large increments as quickly as possible. The greater the number of small increments added to the tray, the greater is the chance for entrapped air. The tray should be loaded until the alginate is even with the tops of the sides of the tray. A wet, gloved finger is used to smooth the surface of the alginate and to create a shallow trough over the ridge area of the alginate (see Figure 15-20 in Procedure 15-1) that reduces the chance for entrapped air and helps to orient the tray over the teeth when it is seated.
Seating the Tray
Once the tray is loaded, the operator should take some alginate from the bowl on the gloved index finger and wipe it on the occlusal surfaces and embrasures of the teeth to force air out from the grooves and embrasure spaces. If regular-set alginate has a 2-minute working time and the alginate was mixed for 45 seconds, the operator has 75 seconds to load the tray, wipe the alginate on the teeth, and seat the tray. For fast-set alginate, the operator has about 45 seconds for the same process after mixing for 30 seconds. On warm days, the tap water may be warmer than usual and may accelerate the set. Conversely, on cold days, cooler tap water may retard the set.
For the lower impression, the operator is usually standing in front of the patient to one side at approximately the 7 o’clock position. The right side of the tray is used to retract the left corner of the mouth, and a finger or mouth mirror retracts the right corner (see Figure 15-21 in Procedure 15-1). The tray is rotated into the mouth, aligned over the teeth with the tray handle in the midline, and seated in the posterior first. The tray is then seated in the anterior, and as it is being seated over the incisors, the lower lip is pulled out of the way to allow alginate to flow into the anterior vestibule. The patient is asked to lift the tongue to the roof of the mouth momentarily and then to relax it. This tongue motion allows alginate to flow into the lingual vestibule and defines the lingual frenum attachment. The tray is stabilized by the index and middle fingers of the right hand over the right and left sides of the arch. (All of these procedures should be appropriately repositioned for a left-handed operator.)
The procedure is similar for the upper arch with the following modifications. The operator stands just behind the patient at the 11 o’clock position and retracts the right corner of the mouth with the side of the tray while retracting the left corner of the mouth with the mirror or index finger of the other hand. The tray is rotated into position, aligned over the teeth, centered with the midline, seated in the posterior first, and gently seated toward the anterior to allow alginate to flow forward and not back into the palate. Trays can also be placed while the patient is in the supine position. A right-handed operator can seat the lower tray from the 8 o’clock position and the upper tray from the 11 or 12 o’clock position, and left-handed operators from comparable positions on the opposite side (4 o’clock for lower and 12 or 1 o’clock for upper). The patient should be seated upright after the tray is placed to minimize the collection of saliva and alginate at the back of the throat. For both upper and lower impressions, the posterior aspect of the tray should be inspected for proper seating and for excess alginate. Excess alginate should be swept away quickly with the mouth mirror or a cotton swab to prevent a gagging or breathing problem for the patient.
 Clinical Tip
Controlling the gag reflex:
1. Place topical anesthetic on a cotton swab, and put it on the back of the tongue for 1 to 2 minutes, or spray the back of the mouth with anesthetic spray.
2. Place utility wax on the posterior extent of the upper tray to help contain the material.
3. Use fast-set alginate. Accelerate the set with warm water, if you can work fast enough to load and seat the tray.
4. Properly proportion the water and powder so that the mix is not too runny.
5. Do not overfill the tray.
6. Seat the tray in the posterior first, then anterior. Look at the palatal area and clear excess material with a quick sweep of the mouth mirror.
7. Position the patient’s head forward slightly so that saliva will not pool in the back of the throat, and use a saliva ejector to keep the mouth clear.
8. Use distraction (e.g., have the patient lift one leg during the impression and hold it up, and breathe slowly and deeply through the nose).
Removing the Tray
Alginate left in the mixing bowl can be checked for completeness of set. The impression should be left in the mouth for approximately 1 minute after the set, because it gains in tear strength during this time. This may not be possible with patients who gag easily. When you are ready to remove the tray, use a finger at the side of the tray to apply pressure to break the seal while pulling the tray quickly away from the teeth with a snap. Protect the teeth in the opposing arch with fingers placed on top of the tray.
Handling the Impression
The impression should be rinsed thoroughly under running water to remove adherent saliva. Next, it should be evaluated to determine whether the impression is acceptable for its anticipated use. If determined to be acceptable, the impression is held in a plastic bag (to prevent the inhalation of disinfectant spray) and sprayed with a suitable disinfecting solution. An alternative to spraying the impression is to immerse it for 10 minutes in a suitable disinfectant. Immersion for up to 30 minutes in 1% sodium hypochlorite or 2% glutaraldehyde has been shown not to significantly affect the dimensions (by swelling) or surface detail of alginate.
A laboratory knife is used to remove excess, unsupported alginate from the back of the tray. Any pooled fluid is drained or shaken off, because the alginate can imbibe moisture and swell. It is placed into a zippered plastic bag with a few drops of water or a damp paper towel marked with the patient’s name until ready to pour. Ideally, the impression should be poured within an hour, because it is not dimensionally stable.
Criteria for Clinically Acceptable Alginate Impressions
Alginate impressions should be evaluated immediately after they are removed from the mouth and rinsed. The determination should be made at this point as to whether or not the impression should be repeated, so it can be done while the patient is still seated and the operatory is set up for it. An acceptable impression will cover all areas of interest (teeth, ridge form, muscle attachments, palate, etc.). The structures should be recorded with sufficient detail to be clearly identified and should not have a grainy surface, which is usually the result of inadequate mixing. There should be minimal voids caused by entrapped air, especially in areas critical to the use of the impression (e.g., occlusal surfaces if a night guard will be made). The alginate should be fully seated in the tray and should not have pulled free or distorted. The impression should be free of debris. Table 15-2 lists criteria used to assess an alginate impression for clinical acceptability. When problems are found with an impression, refer to Table 15-3 for a troubleshooting guide that suggests possible causes and solutions for a variety of problems.
TABLE 15-2
Criteria for an Acceptable Alginate Impression
Both Maxillary and Mandibular Impressions
All teeth and alveolar processes recorded
Peripheral roll and frenums included
No large voids and few small bubbles present
Good reproduction of detail
Free of debris
No distortion
Alginate firmly attached to tray
Peripheral roll and frenums included
No large voids and few small bubbles present
Good reproduction of detail
Free of debris
No distortion
Alginate firmly attached to tray
Maxillary Impression
Palatal vault recorded
Hamular notch area included
Hamular notch area included
Mandibular Impression
Retromolar areas included
Lingual extensions recorded
Lingual extensions recorded
Elastomers
Elastomers are highly accurate elastic impression materials that have qualities similar to rubber and, hence, are often called rubber materials. They are used extensively in restorative dentistry for construction of metal castings, ceramic restorations, bridges, implant restorations, partial denture frameworks, and complete dentures. The four types of elastomers are as follows:
• Polysulfides
• Polyethers
• Condensation silicones
• Addition silicones (polyvinyl siloxane)
The two most widely used elastomers are polyvinyl siloxane (PVS) and polyether. More recently a hybrid material, vinyl polyether, has been introduced that combines the best properties of polyethers and polyvinyl siloxane.
The elastomers share a general formulation that includes a flexible matrix that contains filler to reduce the effects during setting that polymerization shrinkage has on dimensional stability and accuracy. They also have in common a polymerization reaction that involves formation of long-chain polymers and cross-linking of chains. Because they are not water based, they are not as sensitive as the hydrocolloids to water loss or imbibition (water uptake). The shelf life is typically 12 to 18 months. Storage of these materials in a refrigerator will lengthen the shelf life. Stored materials should be allowed to return to room temperature before use unless an extended working time is needed.
TABLE 15-3
Troubleshooting Alginate Impressions
| Problem | Cause | Solution |
| Premature set | Too much powder in mix Prolonged mixing/loading time Water or room too warm |
Fluff powder in container; use correct measures for powder and water Use timer to gauge working time Use cool water to slow the set |
| Slow set | Water too cold Too much water |
Use warmer water Use correct water/powder measures |
| Grainy, lack of surface detail | Incomplete mix of powder and water | Wet all of powder, and mix to creamy consistency |
| Incomplete coverage of teeth or tissues | Tray too small or too short for arch Tray incompletely seated |
Select larger tray or extend borders with rope wax Use a mouth mirror to check for complete seating of the tray |
| Voids on occlusal surfaces | Trapped air when tray is seated | Wipe alginate on occlusal surfaces before seating tray |
| Large voids at vestibule or midpalate | Trapped air Not enough alginate in tray Improper seating of tray Lip in the way |
Place alginate in vestibule or palate before seating tray Use adequate amount of alginate Seat tray in posterior first, allow alginate to flow forward into vestibule, seat tray in anterior Pull lip out to create room for alginate |
| Small voids throughout | Air trapped in mix during spatulation | Press alginate against sides of bowl when mixing with wide-blade spatula to force out air |
| Distortion or double imprint | Impression removed too soon Tray moved while alginate was setting |
Check residual alginate in bowl for set; let stand an additional 1 min Hold the tray steady until set; do not have patient hold the tray |
| Torn alginate | Impression removed too slowly Thin mix |
Remove impression quickly with a snap Use proper proportions of water and powder |
| Excess alginate at back of tray | Tray seated in anterior first, then posterior, forcing alginate out the back Tray overfilled with alginate |
Seat tray in posterior first, forcing alginate anteriorly Load tray level with sides Create shallow trough for teeth Remove excess alginate from the back of the tray |
Use of Adhesive
The rubbery nature of elastomers means that they do not adhere well to solid metal or custom acrylic impression trays. An adhesive is placed in the tray to prevent the material from separating from the tray and causing distortion. Each type of elastomer has its own adhesive with which it is compatible; therefore adhesives should not be interchanged among different types of materials. The tray adhesive should be applied in a thin layer and allowed to dry. If the adhesive is not applied well in advance of use of the tray, then an air syringe can be used to accelerate the drying process.
Elastic Recovery
Because of their rubbery nature, elastomers have a certain amount of elastic recovery, or “rebound,” from deformation. Rebound reduces distortion in the cast that is poured from the impression. PVS impression material has the best elastic recovery of the elastomers.
Wettability
Elastomers generally are not wet well by water (and are therefore called hydrophobic), because water forms a high contact angle with them (see Figure 5-1 in Chapter 5 [Principles of Bonding]). In other words, water beads on their surface much like raindrops on a newly waxed car. Of the elastomers, the polyethers are the most hydrophilic, or wettable. Wettability can be seen clinically when impression materials are able to capture the detail of a tooth preparation when the surface is moist (but not submerged in water or saliva). It also means that wet gypsum materials will flow better into the fine details of the preparation when the impression is poured.
 Clinical Tip
Each type of impression material has its own specific tray adhesive. Do not use an alginate tray adhesive for an elastomer. Likewise, do not interchange polysulfide adhesive with an adhesive for polyvinyl siloxane or polyether material.
Polysulfides
Polysulfides are the oldest of the elastomers and are commonly referred to as “rubber base.” They are more dimensionally stable and have greater tear strength than alginate or agar hydrocolloids. They are more accurate than alginate but not as accurate as the other elastomers. Polysulfides have been used successfully for crown and bridge impressions and for partial and complete denture impressions. They cannot be used in automixing cartridges and must be hand mixed. They are messy and have an unpleasant sulfur odor. When polyethers and polyvinyl siloxanes came on the market most practitioners abandoned the polysulfides for these more accurate, dimensionally stable, and pleasant materials. Polysulfides are still used by some for impressions for complete dentures. Detailed information for the polysulfides can be found at the Evolve website at www.evolve.elsevier.com/Hatrick/materials.
 Clinical Tip
Alginate can be used in a moist field, because it is hydrophilic. For the most part, elastomers are hydrophobic. Polyethers are the most hydrophilic and are more forgiving of a little moisture, but not to the degree of the hydrocolloids. A well-isolated field is essential.
Silicone Rubber Impression Materials
Two types of silicone impression materials have been developed and are named according to the type of polymerization reaction they undergo during setting. Condensation silicones were introduced in the 1960s and were useful for crown and bridge procedures. Addition silicone in the form of polyvinyl siloxane was introduced in the 1970s and because of its superior properties it soon replaced condensation silicone.
Condensation Silicone
Condensation silicone was developed as an alternative to the messy, smelly polysulfide and was first used in the 1960s. It has more desirable characteristics than polysulfide, such as ease of mixing, pleasant taste, no odor, and shorter working and setting times. The material sets through a condensation reaction that produces ethyl alcohol as a by-product. The ethyl alcohol is rapidly lost by evaporation, leading to a relatively high dimensional instability from shrinkage. Condensation silicones have been replaced by the more accurate and stable addition silicones.
Addition Silicone
The addition silicone impression materials are an improvement over the condensation silicone materials. Their properties provide greater dimensional stability and accuracy. They are clean and easy to use, with no foul odor or taste. As a result of these improvements, they have become the most popular materials for crown and bridge procedures. They are also among the most expensive of the impression materials.
Polyvinyl Siloxane (Vinyl Polysiloxane)
Addition silicone impression material, commonly known as polyvinyl siloxane (PVS) or vinyl polysiloxane (VPS), undergoes a polymerization reaction of chain lengthening (called an addition reaction) and cross-linking with reactive vinyl groups that produces a stable silicone rubber. The addition reaction does not produce a by-product that can evaporate and cause shrinkage as with the condensation silicones. PVS has the smallest dimensional change (0.05%) on setting of the elastomers and hydrocolloids. PVS materials have high elastic recovery after removal from undercuts, and they resist tearing (high tear strength).
Some PVS materials produce hydrogen gas through a secondary reaction. If the impression is poured during the first 2 hours when the hydrogen is being released, the cast that results will have a very porous surface and will be unsuitable for most procedures. To counter the release of hydrogen, manufacturers have incorporated scavengers such as palladium powder, to absorb the hydrogen before it gets to the surface. PVS impressions can be poured in stone several times and are dimensionally stable for a least a week without distortion. For this reason, many practitioners will send the impression with a prescription to the dental laboratory, where the impression may be poured several days later. The PVS materials exhibit little flow (deformation when subjected to a load after setting). This accounts for their accuracy even after repouring.
Hydrophobic Nature
PVS impression materials are hydrophobic by nature and must be used in a dry field. A little moisture on the prepared tooth will result in loss of surface detail in the impression, because the impression material cannot displace the moisture and establish close contact with the surface (it has a high contact angle and low wetting of the surface).
Some materials are called hydrophilic, but in actuality they are hydrophobic materials to which a wetting agent (a soaplike surfactant) has been added, so that they can tolerate the presence of a small amount of moisture. In a newly placed impression it takes several seconds for the surfactant to move to the surface. Initially, the material is not hydrophilic when it first contacts the teeth and tissues but becomes more moisture tolerant as the surfactant rises to the surface. This delay in the emergence of the surfactant means that the preparation needs to be dry when the wash material is placed. However, the set impression will be more receptive to pouring with die stone.
Viscosities of the Material
PVS is manufactured in light, extra light, regular (or monophase), and heavy viscosities. A monophase viscosity is available from most manufacturers that is used as both a tray material and a syringe material. It is not as viscous as the tray material and is thicker than the light body material, yet it flows well enough to be used in a syringe to be injected around a tooth preparation. Some PVS materials are also available in putty form, consisting of base and catalyst putty. Powdered silica is added as a filler to give thickness to the base or catalyst pastes or putties.
Surface Detail
The accuracy of an impression material is measured by how well it captures the surface detail of a structure. To capture the surface detail the material must wet (have a low contact angle) and flow over the surface well. Low-viscosity materials (wash/syringe materials) wet and flow better than high-viscosity (tray/heavy body) materials and, therefore, capture more detail.
Dispensing System
The most popular dispensing system for the light, extra light, regular, monophase, and heavy materials involves a cartridge with two chambers—one with base and one with catalyst. A mixing tip fits on the end of the cartridge (Figure 15-3). A hand-operated gun-type dispenser or a motor-driven dispenser (see Figure 15-6) pushes both the base and the catalyst through the mixing tip at the same time. They pass through an intertwined spiral that mixes appropriate amounts of each material together thoroughly by the time they exit the end of the tip. These mixing devices ensure the proper ratio of the two materials without the creation of bubbles or voids, which are common with hand-mixing. It is important for the operator to make certain that the orifices of the cartridges are cleaned of any residual set material that might block the flow of base or catalyst before applying the mixing tip. Otherwise, proper proportions of base and catalyst may not be mixed.
One manufacturer (Dentsply Caulk/Dentsply International) packages the wash material in a small unit dose called a digit (see Figure 15-3). The digit has enough material for a single unit restoration and has a shorter, smaller mixing tip to minimize waste. The digit is mounted in a palm-sized syringe and the material is delivered directly to the preparation. There is also a larger digit available with enough material for about three preparations.
 Clinical Tip
Before placing the automixing tip on the impression cartridge, express a small amount of the material to make sure the openings for the two chambers are not blocked by set material.
Working and Setting Time
Because of the popularity of the PVS materials, manufacturers have put much effort into improving their properties to make their products more appealing than those of their competitors. The working time of elastomers (from start of mix until it can no longer flow) is approximately 2 minutes. The setting time is the time measured from the start of mix to the time the material is hard and can be removed from the mouth. Setting times have been adjusted so that the practitioner has an assortment of materials with fast or regular set. Setting times vary among manufacturers and range from approximately 2 minutes (fast set) to 6 minutes (regular set). The working and setting times are affected by temperature. On a warm day the materials may set faster. Working and setting times can be increased by refrigerating the material before use.
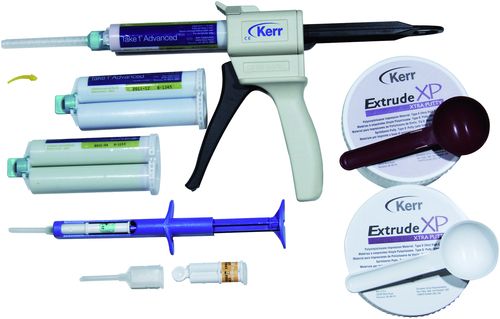
FIGURE 15-3 Polyvinyl siloxane impression material in a variety of viscosities (light, regular, heavy body) in cartridges with mixing tip and mixing gun (top left) with unit-dose impression material (digit; Dentsply Caulk/Dentsply International) in a delivery syringe (bottom left) and putty (base and catalyst) in plastic jars (right).
A newer material (Imprint 4 VPS Super Quick; 3M ESPE) has been introduced with a setting time of 75 seconds. To achieve this fast set a chemical reaction occurs after the working time has passed that warms the material quickly to body temperature, which accelerates the set.
Putty/Wash Techniques
Stay updated, free dental videos. Join our Telegram channel
VIDEdental - Online dental courses


