(1)
Department of Endodontics, Nova Southeastern University College of Dental Medicine, Fort Lauderdale, FL, USA
Access Preparation
The endodontic access is a convenient, direct preparation used to locate and enter all root canals. The access position and design are determined by the size of the pulp chamber, the age of the tooth, the previous restorative efforts, the long axis of the tooth, and the root curvature. In the past, access cavities tended to be standardized depending on tooth type; however, with modern endodontic techniques, a dental operating microscope, and loupes providing magnification and better illumination, an access cavity is now mostly dictated by the individual pulp chamber morphology of the tooth being treated (Fig. 5.1).
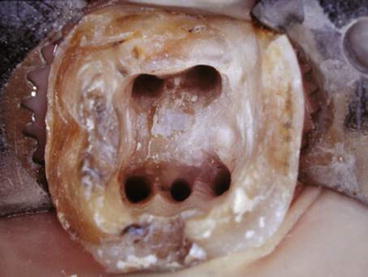
Fig. 5.1
A straight-line access preparation into the root canals
A well-executed access is necessary for proper endodontic therapy to uncover and locate all canals, biomechanically remove infected tissues, disinfect the remaining tooth structure, and completely obturate and also seal the root canals. Unless the access preparation to the canal orifices and the apical foramina is sized and positioned properly, achieving the goals of high-quality endodontic treatment will be difficult and time-consuming. Achieving adequate access to the root canal is the key to accomplishing endodontic success [1].
Criteria for the Root Canal Access Preparation
The completed access should demonstrate all the eight characteristics described in Table 5.1.
Table 5.1
Root canal access preparation
|
1
|
All defective restorations and caries should have been removed to solid tooth structure
|
|
2
|
The surface of the root canal should be visible, and all canal orifices should be identifiable
|
|
3
|
The root canal should be totally cleared of all overhanging enamel and dentin. The root canal chamber should blend continuously with each canal orifice
|
|
4
|
The access preparation should provide as direct an approach as possible all the way through to the apical foramen of the root canal
|
|
5
|
Weak, unsupported cusps should be relieved from occlusion to reduce the possibility of accidental fractures accompanying the consequent change in tooth measurement to reduce pain from hyper-occlusion
|
|
6
|
The access design may also be modified during root canal preparation to minimize instrument torque or root perforation and stripping.
|
|
7
|
A severely curved root may require that the access be relocated in the opposite direction to facilitate anti-curvature filing
|
|
8
|
In calcified teeth, the pulp chamber diameter is usually minimal, and the canal orifices are difficult to locate. To reduce the danger of root perforation, remove the rubber dam for better orientation. A radiograph may also be helpful at this point to check the progress of the access preparation
|
Aging of the Dental Pulp
The odontoblast cells within dental pulp create the roots of the teeth through a process of dentinogenesis during tooth development [2]. The dental pulp initially occupies the root canal space within each root of a tooth. The root canal space containing dental pulp reduces in volume throughout life, because of dentinogenesis, which is the continual calcification and mineralization process of odontoblasts [3]. As a patient gets older, their root canals become more calcified and narrower, and in old age the root canals of teeth can be completely calcified with no apparent dental pulp remaining [4]. The changes that occur in vital teeth between the ages of 10–30 years and 51–60 years are a reduction in root pulp width by 75 %, and increase in root dentin thickness by 46 % is shown in Table 5.2.
Table 5.2
Age-related changes in vital teeth
|
Variable
|
Premolar aspect
|
10–30 years mean
|
51–60 years mean
|
Percentage change (%)
|
|---|---|---|---|---|
|
Dentin thickness (mm)
|
Crown
|
1.3
|
1.7
|
+31
|
|
Root
|
1.1
|
1.6
|
+46
|
|
|
Pulp width (mm)
|
Crown
|
2.1
|
0.9
|
−57
|
|
Root
|
1.6
|
0.4
|
−75
|
|
|
Pulp area (mm2)
|
Crown and root
|
14.2
|
9.9
|
−30
|
|
Pulp cells (odontoblasts per mm pulp dentin border)
|
Crown
|
253
|
298
|
−16
|
|
Root
|
258
|
147
|
−43
|
Removal of the Dental Pulp
The cells of the dental pulp are not essential to the maintenance or survival of fully mature teeth or for the survival of immature teeth that are almost fully developed and which have strong roots [5]. Many teeth can be maintained for the lifetime of a patient without a dental pulp [6]. The dental pulp must be removed or be disinfected if it is painful, necrotic, infected with bacteria, and/or irreversibly inflamed [7]. Removal of the entire necrotic dental pulp requires adequate access to the root canal space. Removal of the dental pulp begins with an analysis of the anatomy of the tooth that needs endodontic treatment and the tooth-supporting tissues. In order to remove the dental pulp, the location of the coronal pulp chamber and the pulp within the roots must be visualized.
Identifying the Shape and Position of the Cement-Enamel Junction
Prior to accessing the root canal of the teeth, the physical identification of the shape and position of the cement-enamel junction (CEJ) should be determined. The circumference of the CEJ should be explored using a periodontal probe as shown in Fig. 5.2.
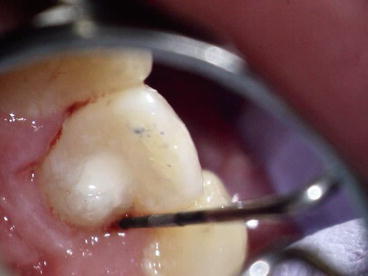
Fig. 5.2
Visualizing the CEJ by probing the margins of the tooth
After the CEJ has been visualized, an access penetration location on the occlusal surface can be selected which will give a straight-line access for instruments into the root canal(s) as seen in Fig. 5.3.
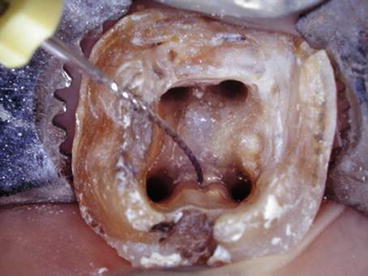
Fig. 5.3
An access that allows instruments straight-line access into the root canals
Caution is needed when a tooth has a prosthetic crown. This is because the crown center is not always centered over the CEJ.
To help visualize the location of the dental pulp, there are laws to be used to help position the access and find the orifices to root canals:
-
Root canal centrality
-
Root canal concentricity
-
Dentin color change
-
Symmetries 1 and 2
-
Orifice locations 1 and 2
Law of Root Canal Centrality
The law of root canal centrality means the root canal space containing dental pulp, or which once contained dental pulp, is located at the center of the tooth at the level of the cement-enamel junction (CEJ) [8]. The center location of the root canal space can be seen in Fig. 5.4.
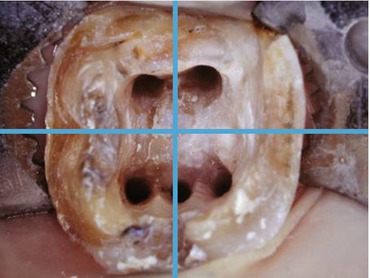
Fig. 5.4
The law of root canal centrality shown in a molar
The law of root canal centrality is a useful guide for positioning the bur and directing it toward the center of the CEJ when preparing the root canal access. Preparing the access can often mean ignoring the physical direction of the crown or restored crown of a tooth and checking radiographs and roots to aim for the imagined center of the CEJ [9]. Do not assume that oversized prosthetic crowns are centered over the CEJ, most are not, and this can distort the mental image of the location of the CEJ center [10].
Law of Root Canal Concentricity
The law of root canal concentricity states that the walls of the pulp chamber are concentric to the external outline of the tooth at the level of the CEJ [10] as shown in Fig. 5.5.
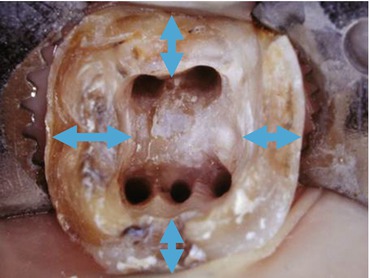
Fig. 5.5
The concentric walls of the root canal at the level of the CEJ. The double–sided arrows shows equal dentin thickness
The law of concentricity is useful to estimate the location and size of the root canal access preparation [11]. If there is an external bulge of the CEJ root surface, there will also be an internal bulge of the root canal that corresponds to the same direction as the bulge. A tooth which narrows externally will also have a narrow root canal internally corresponding to the same direction as shown in Fig. 5.6.
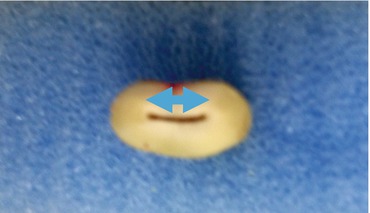
Fig. 5.6
The narrow concentric walls of the root canal at the level of the CEJ. The double–sided arrow show equal dentin thickness
Tooth Angulations
After deciding where the root canal access should be located to pass through the center of the CEJ, the next step is to determine the angulation of the tooth so that the surfaces of the canal are aligned with the access. The angulation of the tooth can be estimated from radiographs, CBCT, and less easily by clinical observation.
Distance from the Cusp Tip to the Floor of the Pulp Chamber
Prior to preparing the root canal access, the distance from the cusp tip to the pulp chamber floor should be measured from a radiograph as shown in Fig. 5.7. The bur for preparing the root canal access should be shorter than that distance to prevent the bur from causing a perforation in the furcation [12]. The perforation of the root canal is less likely if the bur is directed toward the center of the CEJ parallel to the long axis of the tooth.
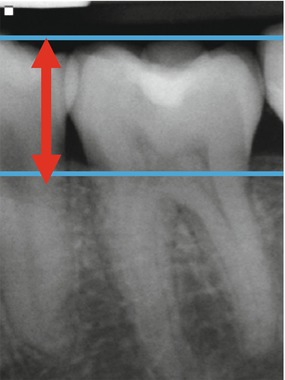
Fig. 5.7
Measurement of the distance between the cusp tip to the floor of the pulp chamber using a radiograph
Positioning the Root Canal Access
The starting position of the root canal access should only be decided after the CEJ perimeter, the angulation of the long access of the tooth, and the distance to the floor of the pulp chamber have been determined [13]. This is because the precise location of the root canal access on the occlusal surface of the tooth is dependent on all of these factors. Do not relocate the access location to a pit or fossa, as these are not necessarily helpful access locations.
Stay updated, free dental videos. Join our Telegram channel
VIDEdental - Online dental courses


