9
Bonding Problems Related to Adult Rehabilitated Dentitions
Introduction
Brackets
Metal brackets
Aesthetic brackets
Polycarbonate brackets
Ceramic brackets
Self-ligating brackets
Basics of bonding
Cleaning
Enamel conditioning
Sealing
Bonding
Light curing
Bonding to crowns and restorations
Debonding
Reconditioning of stainless steel attachments
Banding
Auxiliary attachments
References
Introduction
Contemporary fixed appliances are mostly variations of the edgewise appliance system developed by Edward Angle in 1928. They consist of an archwire that is inserted into the slots of the brackets, which are generally bonded directly to the teeth or soldered to steel bands. Usually, brackets have a rectangular slot which can engage either round or rectangular archwires. The only current fixed appliance which does not use rectangular archwires in a rectangular slot is the Begg appliance, which is closer in principle to the ribbon arch appliance.
With the advent of the acid etching technique and different adhesives, orthodontic bonding procedures began to change (Buonocore 1955). Today there are many adhesive systems, an array of bracket designs and light-curing devices available on the market and it can be difficult for the practising orthodontist to stay abreast of the latest developments. However, some important factors make the bonding of brackets efficient and trouble free. In the contemporary straightwire appliances the first-order (or in-out) bends, the second-order (or tip) bends and the third-order (or torque) bends are built into the base of the bracket itself with the goal of minimizing the number of archwire bends required to be made by the orthodontist (Andrews 1989). While the slot of the appliance will accommodate virtually any size or configuration of archwire, the proper selection and progression of archwires is most important in ensuring excellence in treatment results. Thus different brackets or tubes have been designed for each tooth and various prescriptions are available to suit individual preferences, thus making the clinical management considerably easier.
Brackets
Bondable brackets became available in the mid-1970s. They have several advantages over conventional bands (Graber and Vanarsdall 1994):
- They have no interproximal component; thus no separation is required before bonding
- They are easier to place and to remove
- They can be placed more precisely than bands
- They are more aesthetic and more hygienic
- They allow interproximal stripping or crown build-ups during treatment
- They can also be applied to partially erupted or fractured teeth.
Metal Brackets
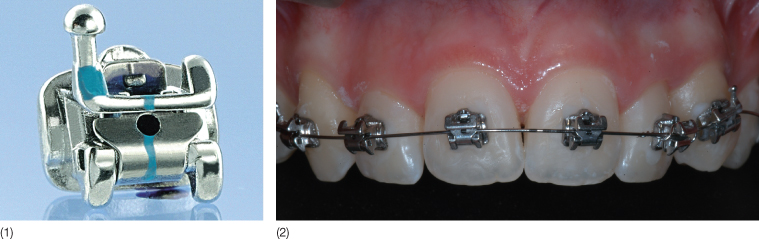
Although less aesthetic than ceramic and polycarbonate brackets, metal appliances still represent the system of choice among full-bonded orthodontic appliances (Fig. 9.1). Their adhesion is based on mechanical retention by means of a mesh base or a base with grooves/undercuts (Fig. 9.2). Their advantages include: relatively low levels of friction between archwire and the bracket slot, greater resistance to fracture, easier to debond, low risk of damage to the enamel surface during debonding, and accumulation of less plaque. However, they also present some disadvantages, such as corrosion, which can manifest as black or green spots around the margins of the brackets (Ceen and Gwinnett 1980; Maijer and Smith 1982). These stains may be due to the type of stainless steel alloy used, the bracket base design and construction, the oral environment, galvanic action and thermal recycling (Hixson et al. 1982).
Fig. 9.1 (1,2) Full-bonded metal brackets (Smart-Clip, Unitek/3M, Monrovia, California).
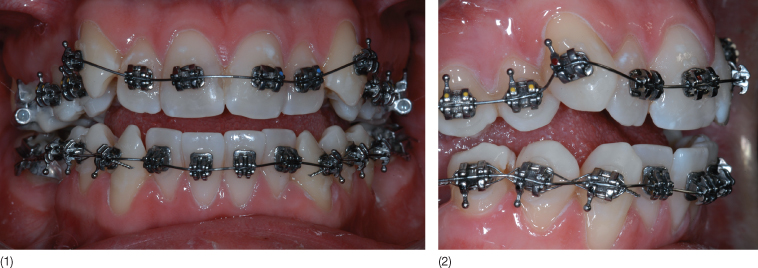
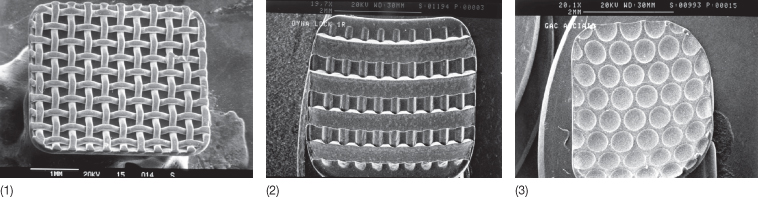
Fig. 9.2 Mechanical retention of metal brackets with a mesh (1) or grooves/undercuts (2,3).
Aesthetic Brackets
In order to improve the aesthetic appearance of the appliance, three possibilities have been attempted:
- Altering the appearance or reducing the size of the stainless steel brackets
- Positioning the appliance on the lingual surfaces of the teeth
- Changing the material from which brackets are made.
Early attempts to coat metal brackets with a tooth-coloured coating were unsuccessful due to failure of the coating to adhere to the bracket, and its translucence. Smaller brackets offer only limited aesthetic advantage over conventionally sized appliances. Lingual orthodontics satisfies aesthetic criteria by positioning the fixed appliance on the lingual surfaces of the teeth (Fig. 9.3). The same three-dimensional control of crown and root position should be present as on the labial surfaces. The underpinning principle of a rectangular wire in a rectangular slot remains, but the design of the brackets is quite different from that used when the attachments are placed on the facial surfaces of the teeth. The major problem is the small interbracket span between lingual attachments: thus, the use of nickel-titanium (Ni-Ti) wires is recommended for the initial phases of treatment, to reduce the number of appointments and archwire changes.
Fig. 9.3 Lingual orthodontic appliance (Incognito, Bad Essen, Germany).

Polycarbonate Brackets
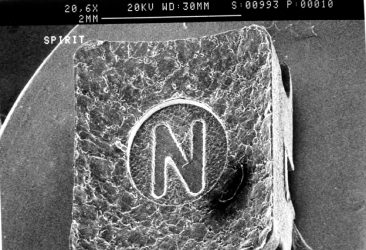
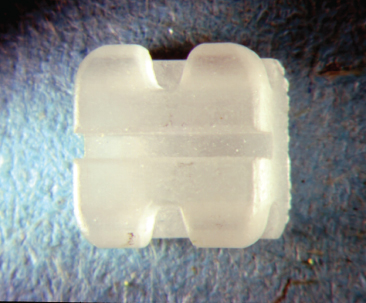
Early attempts to produce brackets of different materials included the use of polycarbonate. These brackets, while aesthetically satisfactory in the early stages of treatment (Fig. 9.4), deteriorate in appearance with time, are insufficiently strong to withstand long treatments, or to transmit torque, and lack strength to resist distortion and breakage (Miura et al. 1971; Reynolds 1975). Some manufacturers have attempted to produce polycarbonate brackets with metal slots, in order to reduce the friction between archwires and the slot, and allow a better torque transmission, while preserving their aesthetic appeal (Fig. 9.5) (Thorstenson and Kusy 2003). Polycarbonate brackets with metal slots show a lower degree of deformation under torque stress (Sadat-Khonsari et al. 2004). The bracket base bonds via chemical retention to the tooth surface (Fig. 9.6).
Fig. 9.4 Full bonding with polycarbonate brackets (Brillant®, Forestadent, Pforzheim, Germany).
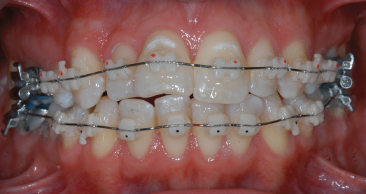
Fig. 9.5 (1,2) Polycarbonate brackets with a metal slot (Spirit, Ormco, Glendora, California).

Fig. 9.6 Scanning electron microscopic image of a polycarbonate bracket base with chemical retention (Spirit®, Ormco, Glendora, California).
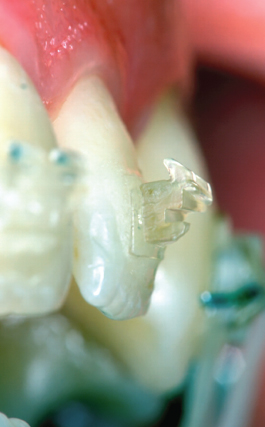
Ceramic Brackets
Ceramic brackets first became available in 1986 (Fig. 9.7). The ceramic material used in almost all orthodontic brackets is alumina, either in its polycrystalline (Fig. 9.8) or monocrystalline form. In theory, the monocrystalline form should offer greater strength, which is true until the bracket surface is scratched; at that point, even a small surface crack tends to spread, and fracture resistance is reduced to or below the level of the polycrystalline form (Flores et al. 1990). The need for a material with the aesthetic characteristics of ceramic and mechanical properties of metallic brackets led clinical and industrial research towards the development of zirconium brackets: these brackets show some interesting aesthetic and biomechanical qualities, such as hardness, resistance to abrasion, resistance to compression, reduced coefficient of friction during mechanical sliding, stability in a humid temperature and resistance to the aggression of oral fluids (Condo et al. 2005).
Fig. 9.7 Full bonding with ceramic brackets (Clarity™, Unitek/3M, Monrovia, California).
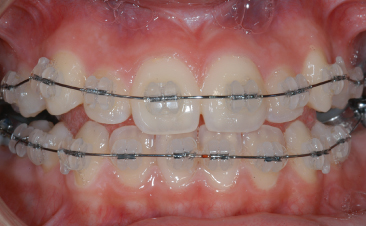
Fig. 9.8 Polycrystalline ceramic bracket (Transcend™ 6000, Unitek/3M, Monrovia, California).
Ceramic brackets bond to enamel by indentations and/or undercuts in the base (mechanical retention) (Fig. 9.9) and chemical bonding with a silane coupling agent (Fig. 9.10). Mechanical bonding is one way of making debonding of these attachments easier and safer. No-mix adhesives are not recommended for these types of attachments; most clinicians prefer to use light-cured adhesives (Swartz 1988; Odegaard and Segner 1990). The advantage of using alumina for orthodontic brackets is that its appearance is very good, its chemical resistance is excellent, and it is both hard and, in certain respects, very strong. The disadvantages are that it lacks ductility, and is difficult and expensive to manufacture (Swartz 1988). The mechanical properties of ceramic brackets which give rise to potential clinical problems are low fracture toughness, lack of ductility and hardness. The low fracture toughness leads to a higher rate of bracket breakage than with stainless steel brackets. Under stress metal brackets begin to deform under lower loads than those at which ceramic brackets fail, but the ceramic brackets break catastrophically at the point of failure, with no plastic deformation. Placement of additional torque in the archwires may cause tie-wing fractures (Scott 1988; Holt et al. 1991; Johnson et al. 2005) (Fig. 9.11). When an archwire is ligated into position, tensile forces are placed under the tie-wing, one of the most common areas of ceramic bracket fracture. For this reason, it may be necessary to use torquing auxiliaries to complete the final positioning of the incisors when ceramic brackets are employed.
Fig. 9.9 Mechanical retention of a ceramic bracket base.
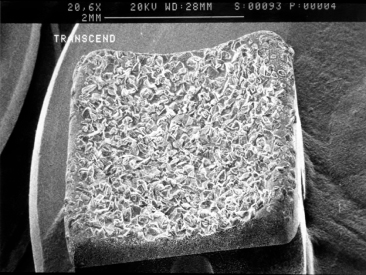
Fig. 9.10 Chemical retention of a ceramic bracket base.
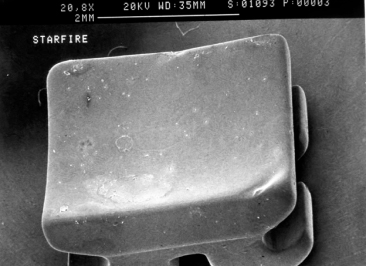
Fig. 9.11 Fracture of two tie-wings.
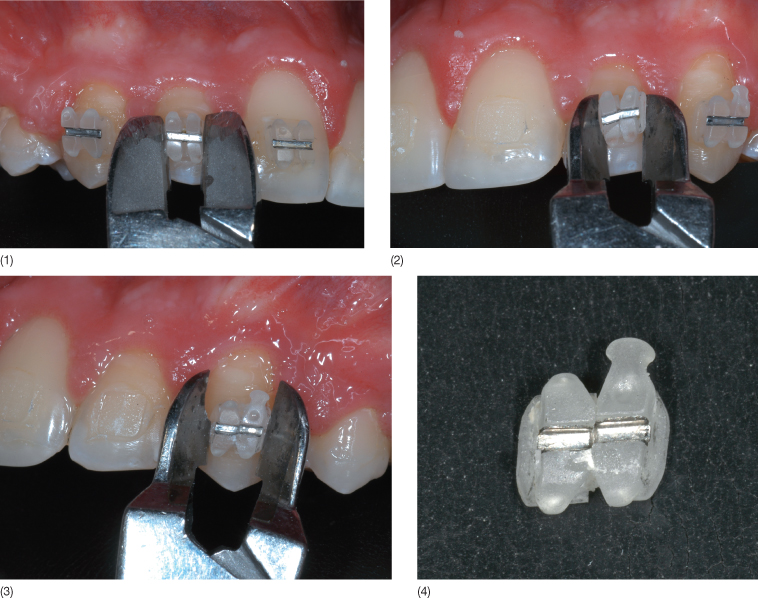
Ceramic brackets are much harder than enamel and can abrade enamel rapidly if occlusal interferences are present (Swartz 1988; Viazis 1989) (Fig. 9.12). This risk is largely avoided if ceramic brackets are placed only in the upper arch and steel brackets are used in the lower arch: most patients accept this arrangement, which in most circumstances is preferred. Moreover, ceramic brackets produce more friction than stainless steel brackets between the orthodontic wire and slot, so it is difficult to determine optimal force levels and anchorage control (Angolkar et al. 1990; Kusy and Whitley 1990; Pratten et al. 1990). The surface is more porous and rough than that of steel brackets (Fig. 9.13). Despite the smoother surface of the monocrystalline bracket, frictional resistance is similar to that of polycrystalline brackets. The bracket surface can abrade relatively the surface of the wire, especially β-titanium wires, so that small pieces of the wire are pulled out and adhere to the bracket, explaining the high resistance to sliding (Angolkar et al. 1990). In decreasing order, the β-titanium wires show the highest, statistically significant, frictional force value, followed by Ni-Ti and stainless steel archwires. The static and kinetic frictional force values are directly proportional to the increase in angulation between the bracket and the wire, and to the wire size (Cacciafesta et al. 2003; Nishio et al. 2004). More recently, ceramic brackets with metal slots were introduced on the market (Fig. 9.14). This design should reduce friction during sliding mechanics (Thorstenson and Kusy 2003). Another disadvantage of ceramic brackets is the risk of wing fractures and enamel damage during debonding. The very high bond strength can cause enamel cracks when removing those brackets at the end of treatment (Jeiroudi 1991; Winchester 1991) (Fig. 9.15). Most of the brackets when debonded with pliers recommended by the manufacturers fail at the bracket–adhesive interface: therefore, the safest method to remove ceramic brackets without the risk of enamel damage is to use the debonding technique specifically designed for each bracket design (Theodorakopoulou et al. 2004). The Clarity brackets can be safely removed by collapsing the bracket in the middle part (Fig. 9.16). However, as stated above, most clinicians still prefer the metal attachments for routine applications.
Fig. 9.12 (1,2) Enamel wear of maxillary incisors due to occlusal contact with the ceramic brackets on the lower incisors.
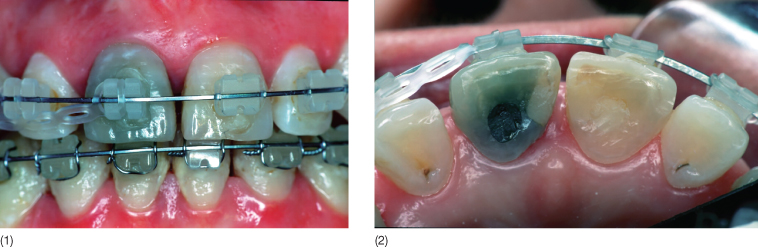
Fig. 9.13 Scanning electron microscopic image of the slot surface of a ceramic bracket.
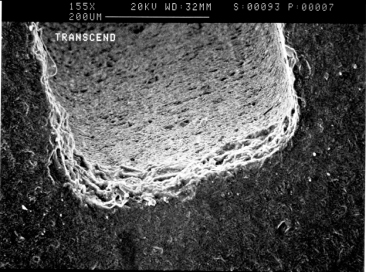
Fig. 9.14 (1,2) Ceramic brackets with metal slots (Clarity™, Unitek/3M, Monrovia, California).
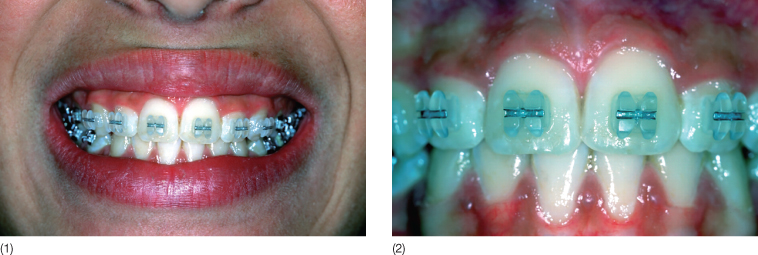
Fig. 9.15 Scanning electron microscopic image of an enamel crack after debonding of a ceramic bracket.
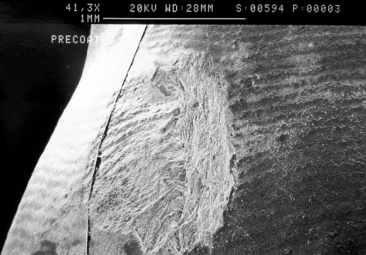
Fig. 9.16 (1–4) Debonding procedure using Clarity™ brackets: note that the bracket collapses in the middle part of the slot.
Self-Ligating Brackets
Although the first self-ligating bracket, the Russell attachment, was developed in the early 1930s (Stolzenberg 1935), the concept of self-ligating brackets fell more or less into obscurity until the early 1970s. During the past decades, several self-ligating systems have been introduced, including Edgelok (Wildman et al. 1972), Mobil-lock, SPEED (Hanson 1994) (Fig. 9.17), Activa (Fig. 9.18), Damon® SL, II (Fig. 9.19) and III (Damon 1998), Time (Heiser 1998), SmartClip™ (Fig. 9.20), and Quick (Fig. 9.21). These brackets are different in shape and function, but each, whether active or passive, uses the movable fourth wall (for example, a solid sliding cover or flexible spring clip or rigid arm or solid labial slider) of the bracket to convert the slot into a tube, thus eliminating the need for stainless steel or elastomeric ligatures.
Fig. 9.17 SPEED brackets (Strite Industries, Cambridge, Ontario).

Fig. 9.18 Activa bracket.
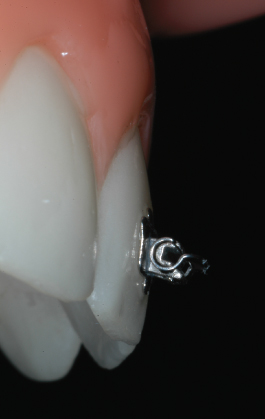
Fig. 9.19 Damon® II brackets (Ormco, Glendora, California).
Fig. 9.20 SmartClip™ brackets (Unitek/3M, Monrovia, California).
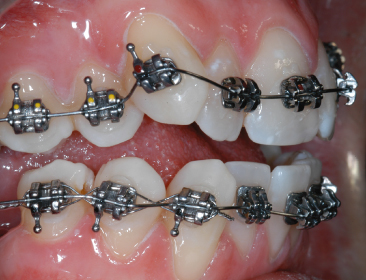
Fig. 9.21 (1,2) Quick brackets (Forestadent, Pforzheim, Germany).
Many studies have demonstrated a decrease in friction when using these attachments compared with conventional brackets (Read-Ward et al. 1997; Pizzoni et al. 1998; Cacciafesta et al. 2003). However, less frictional resistance to sliding is a disadvantage for frictionless space closure: these attachments may not hold a wire in place well enough to prevent tipping when closing loops are used. Self-ligating appliances permit the use of lighter forces, reduce treatment time by about 4 months, especially in extraction cases, allow efficient tooth translation, require fewer instruments during archwire changes, save significant chair-time when changing archwires (approximately 3–4 minutes per archwire change), improve the hygiene of all patients (by eliminating the ligatures as well as tie wings and other types of food traps) and reduce significantly the risk of percutaneous injury to the index finger or thumb during archwire changes among orthodontists or orthodontic assistants or hygienists (Maijer and Smith 1990; Bagramian et al. 1998; McNamara et al. 1999; Forsberg et al. 1991).
Basics of Bonding
Successful bonding requires careful attention to three essential components: the tooth surface and its preparation, the design of the bracket base, and the bonding agent. The steps to follow for optimal performance in bonding of orthodontic attachments (on facial or lingual surfaces) are:
1. Cleaning
2. Enamel conditioning
3. Sealing
4. Bonding
5. Light curing (if necessary).
Cleaning
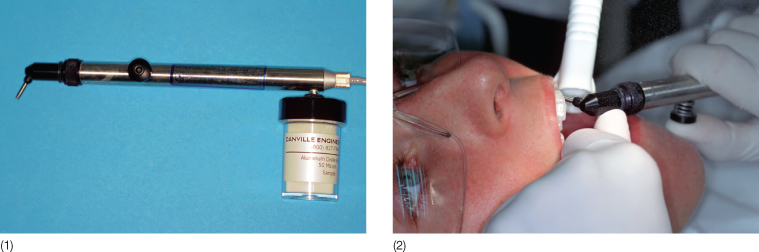
Before bonding brackets, it is essential to remove the organic pellicle that normally covers all teeth (Aboush et al. 1991). This is accomplished by cleaning the enamel surface using a mix of pumice and water, or prophylaxis paste, with a rubber cup or a polishing brush mounted on a low-speed rotary instrument (Fig. 9.22). The tooth is subsequently rinsed with water to remove any pumice debris, and thoroughly dried with a stream of oil-free air (Fig. 9.22). During this procedure, cheek and lip retractors, saliva ejectors and cotton or gauze rolls should be used. However, both in vitro (Lindauer et al. 1997) and clinical studies (Barry 1995; Ireland and Sherriff 2002) have demonstrated that prior pumicing of enamel has no significant effect on either bond strengths or failure rate of composites and glass ionomers. Thus, if there is a need to increase the bond strength, it is recommended to use the microetcher (sandblaster) on the enamel surface for 3 seconds (Fig. 9.23).
Fig. 9.22 (1,2) Initial prophylaxis with pumice.
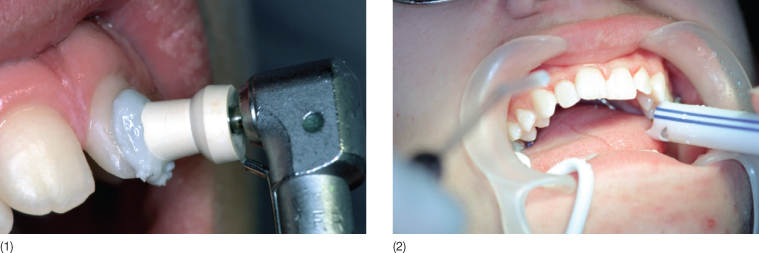
Fig. 9.23 (1) A sandblaster. (2) Using a sandblaster.
Enamel Conditioning
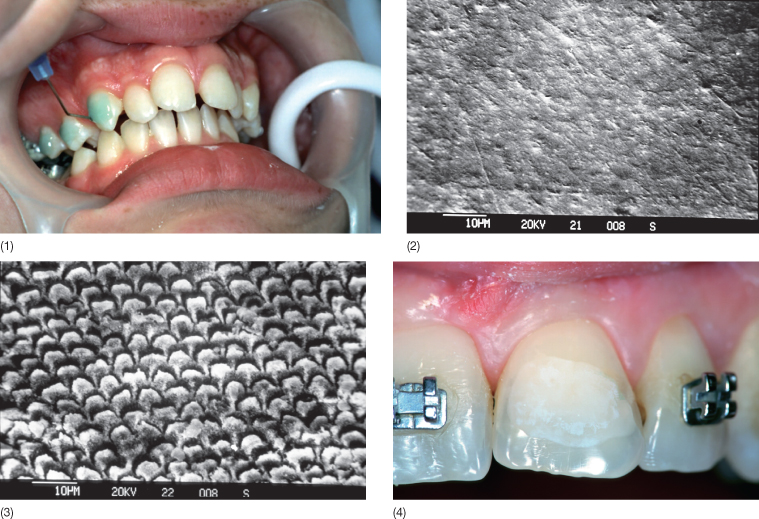
After moisture control, it is necessary to keep the working field completely dry and to create irregularities on the enamel surface. This is accomplished by covering the entire enamel surface with orthophosphoric acid for about 30 seconds (Fig. 9.24); longer etching periods provide not better but poorer retention because of the loss of the enamel surface structure. For increasing the simplicity of etching procedure, acid gels are preferable to acid solutions: gels provide better control of the acid and restriction of the working field to avoid insulting the gingival margin and initiating bleeding, although there is no apparent difference in the degree of surface irregularities (Brannstrom et al. 1982). A small amount of the softer interprismatic enamel is removed and pores are opened up between the enamel prisms, so the adhesive can penetrate into the tooth surface (Fig. 9.24). The enamel surface must not be contaminated with saliva, which promotes immediate remineralization, until bonding is completed; otherwise, re-etching is required (Zachrisson 1985). After rinsing the enamel again to remove the etching completely, the tooth surface must be dried with a moisture-and-oil-free source to obtain uniform and frosty white appearance (Fig. 9.24). Recent research also indicates that microetching is also essential for successful treatment (Fan 2005) (Fig. 9.23).
Fig. 9.24 (1) Etching the enamel surface with 37% orthophosphoric acid. (2) Scanning electron microscopy of untreated enamel and (3) etched enamel. (4) Note the frosty appearance of the etched enamel.
Sealing
A liquid resin is then applied with a small foam pellet or brush with a single gingivo-incisal stroke on each etched tooth (Fig. 9.25). The resin is able to penetrate into the irregularities created in the etched enamel surface, allowing the bonding material to mechanically interlock with the tooth surface. Self-etching primers (SEPs), in which both an etchant and a primer are combined into a single product, have simplified the orthodontic bonding process and save time during this procedure (F/>
Stay updated, free dental videos. Join our Telegram channel
VIDEdental - Online dental courses


