8
Implant Home Care Is Key!
Implant home care for the patient is even more critical than care of a natural tooth. The biological differences between an implant and a natural tooth make the implant more susceptible to inflammation and bone loss from bacterial plaque (1). It is true that dental implants do not decay, but the tissue that surrounds the implant can get infected (e.g., peri-implant disease). The peri-implant soft tissues should be the focus of the hygienist’s oral hygiene instruction with the goal of healthy keratinized tissue surrounding the implant(s). The absence of keratinized tissue has been documented to make the implant more susceptible to pathogenic bacteria, thus leaving the implant vulnerable to peri-implant disease (2).
To ensure optimal peri-implant health, the patient must maintain daily biofilm removal and maintain regular professional care. The negation of early microbial accumulation on the dental implant surfaces and the elimination of at least 85% of plaque biofilm by the patient with meticulous home care is crucial for long-term implant success (3).
Patients are concerned about what kind of maintenance their new teeth will require. Do they brush and floss their implants like regular teeth? Does food get underneath the fixed implant bridge? All of these oral hygiene questions need to be addressed and an individualized, easy-to-follow home care protocol needs to be recommended by the hygienist (Figure 8.1).
Figure 8.1 Keep it simple! Courtesy of Glidewell.
Good oral hygiene must take place before, during, and after placement of dental implants to ensure the success of the implant, but also the systemic health of the patient. Also, infection control lies at the heart of a successful implant home care protocol, along with regular assessment, monitoring, and proper implant maintenance. Follow the protocols listed in this chapter; develop new and innovative ways to help your patients achieve their goal of good implant oral hygiene home care!
Post-surgical home care
Home care begins immediately with post-surgical guidelines to maintain a healthy field and to initiate healing. Personal oral hygiene starts with a good post-surgical protocol for adjunctive regenerative procedures or after implant placement during the healing phase. Hygienists can prepare their patients by providing them with take-home recommendations based on their treatment case.
A soft or hard tissue adjunctive procedure is often needed prior to implant placement, or bone particulate may be added at time of implant placement. If bone loss has occurred, a bone graft or sinus lift may be needed to prepare the edentulous area for an implant. After these regenerative surgical procedures, the patient may also need a healing period prior to implant placement. The following protocols listed in Box 8.1 will help the patient with home care recommendations for post-regenerative procedures during the surgical healing period.
- Use an extra-soft toothbrush twice daily to clean the dentition of pre-existing teeth or other implants, being careful to avoid the surgical incision area. If patient uses an ultrasonic toothbrush, wait 1–2 weeks before using in the treated area based on the surgeon’s recommendation.
- Floss once a day throughout the entire mouth except at the surgical site
- Use an antimicrobial mouth rinse (if a prescribed rinse has not been given by the surgeon) twice daily.
- Avoid sharp chips, popcorn, and any other foods that have small seeds or could become attached, dislodge the sutures or flaps, or otherwise impinge on the surgical site.
- Avoid any undue pressure over the grafted extraction site while healing, approximately 3–6 weeks.
As a hygienist, encourage your patients to follow the surgeon’s recommendation; the surgeon may even recommend not to brush or floss the area for a specific time and prescribe a prescription antibiotic and/or a prescription mouth rinse. It is imperative that the patient keep the implant or graft site area and the oral cavity as clean as possible.
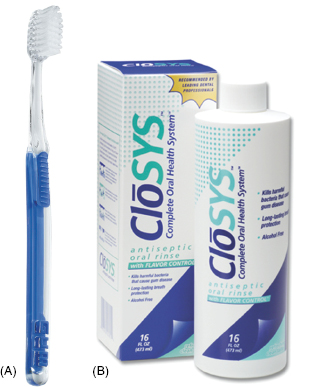
Post-surgically, the surgeon will instruct the patient on care of the surgical site for the first few days following adjunctive procedures and/or implant placement surgery. Remind the patient to follow the surgeon’s post-surgical recommendations, but if possible provide the patient with an extra soft toothbrush and post-surgical mouthrinse (Figure 8.2) along with an implant home care instruction sheet for their healing phase of 3–6 weeks; see Box 8.2.
Figure 8.2 (A) Post-surgical extra soft toothbrush. Courtesy of GUM™ Sunstar Americas, Inc. (B) Antimicrobial rinse. Courtesy of Rowpar Pharmaceuticals, Inc.
- For the first day, drink only clear liquids; a soft diet is recommended for the first few days following surgery.
- Take all prescribed antibiotics to prevent infection.
- Take prescribed pain medication as needed for pain.
- Use an extra-soft toothbrush twice daily to clean the dentition of pre-existing teeth or other implants, being careful to avoid the surgical incision area. If patient uses an ultrasonic toothbrush, he or she should wait 1–2 weeks before using based on the surgeon’s recommendation.
- Floss once a day throughout the entire mouth except at the surgical site
- Avoid wearing the temporary prosthesis provided or denture to let the gum tissue heal (if the implant was not immediately loaded).
- If recommended, use salt water rinses or nonalcohol antimicrobial mouth rinse two times daily.
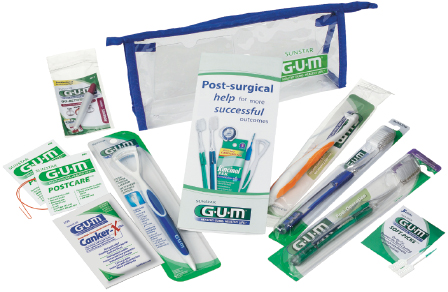
Your office can offer your patients an implant care kit, following the example pictured in Figure 8.3 or you can make your own kit with the home-care products your doctor recommends. Providing patients with the tools necessary for home care following implant surgery reinforces your relationship, gives the patient peace of mind, and sets your office apart by going that extra mile for your patients. Communicate to patients the importance of good oral hygiene and the risks of mucositis and/or implantitis. The key is patient awareness!
Figure 8.3 Implant care kit example. Courtesy of GUM™ Sunstar Americas, Inc.
After the implant is surgically placed based on location and quality of bone, time will be needed for the implant to integrate with the patient’s own bone, to osseointegrate. If the implant is placed in a two-stage procedure, it will be completely submerged under the gum tissue and no specific home care instruction is needed after the initial healing phase. If the implant is partially or completely above the gingival margin, as in a one-stage placement or immediate placement, have patients follow the early home care protocol listed in Box 8.3.
- Brush twice daily with soft manual or power toothbrush, Sulcabrush, or end-tuft toothbrush.
- Use a low-abrasive dentifrice with . less than or equal to 2.0% NaF, as close to neutral (7.0 on pH scale), and no less than 6.2 on pH scale (5). Rinse one to two times daily with nonalcohol antimicrobial mouth rinse or dip cotton-tipped applicator in antimicrobial and apply at the gum line of the abutment or temporary provisional restoration.
- Use rubber-tip stimulator or Soft-Picks to massage and/or stimulate healing of the gum tissue, if recommended.
Single, ball/Locator, mini, and bar-retained implants
Oral care for single-tooth implants involves a number of steps and needs to be individualized for the patient based on dexterity and type of implant. Basic protocol for single-tooth implants does not differ significantly from care for a natural tooth, but there are some notable differences (see Box 8.4). Home care for the ball, Locator, mini, or bar-retained implants is the same as for single-tooth implants.
- Brush twice daily with soft manual or power brush, Sulcabrush, end-tuft or Interdental/Proxabrush.
- Use a low-abrasive dentifrice with less than or equal to 2.0% NaF, as close to neutral (7.0 on pH scale), and no less than 6.2 on pH scale (5). Floss once daily with tape or specialized threaded floss; mesial/distal and facial/lingual crisscross in shoe-shine motion.
- Rinse one to two times daily with nonalcohol antimicrobial mouth rinse
- Use rubber-tip stimulator or Soft-Picks to massage and/or stimulate gum tissue, if recommended.
- If inflammation is present, use a nonalcohol antimicrobial rinse and/or water irrigation unit in 1:10 dilution.
The patient should brush the implant(s) two times daily with a low-abrasive dentifrice to remove bacterial plaque. Brushing an implant is similar to brushing a natural tooth with a crown; however, note that the patient needs to be aware of the type of dentifrice they chose to use on their implant. With single tooth implants, patients may not think they need to be that cautious about their choice of dentifrice. Using a low-abrasive dentifrice ensures that it will not scratch the surface, irritate the tissue cuff surrounding the implant (4), or corrode the titanium surface. Corrosion resistance of titanium was maintained in the 2.0% NaF (9048.8 ppm F) solution at pH higher than 6.2, but the titanium corroded in a solution at pH less than 6.2, indicating that the protective oxide film of the titanium was destroyed by the presence of F- ions (5).
The key component in evaluating a dentifrice for implant patients is to be sure it has low or no pumice content. Avoid baking soda, stain removers, smoker’s toothpastes, and anything that could abrade acrylic, the glaze on porcelain, or the titanium surface. If fluoride is included in the dentifrice, it must be less than or equal to 2.0% NaF, as close to neutral (7.0 on pH scale), and no less than 6.2 on pH scale (5). A fluoride with a low pH can cause etching or roughness on implants and their esthetic restorations. It should be noted that acidulated phosphate fluoride (APF) products are contraindicated for implants, as they may etch the surface of implants or cause roughness on their esthetic restorations, and make the titanium implant prone to corrosion (6).
High fluoride concentration and a low pH (high acidity) will remove the oxide layer on implants which, can make the titanium anticorrosive. Once this layer is removed, then the titanium implant is more prone to corrosion (5).
Companies are researching toothpastes that are effective yet safe for single implants, natural teeth, and completely edentulous implant patients (e.g., Colgate, Proctor & Gamble, and Rowpar). Colgate completed a 6-month implant study with 59 participants that concluded that brushing with Colgate Total® twice daily reduces bleeding on probing adjacent to implant sites better than a regular fluoride toothpaste with proven results of reducing plaque bacteria to help prevent peri-implant disease (7, 8).
Brushing implants
Patients should brush twice daily with modified bass technique using a low-abrasive dentifrice. Options for brushes include a manual compact soft-bristled toothbrush, electric or sonic battery toothbrush, Sulcabrush, or end-tuft brush. See Figure 8.4 and Table 8.1.
Figure 8.4 (A) Brushing implant. Courtesy of Dr. Peter Fritz. (B) Sulcabrush on implant. Courtesy of Dr. Peter Fritz. (C) End-tuft brush on implant. Courtesy of Dr. John Remien.
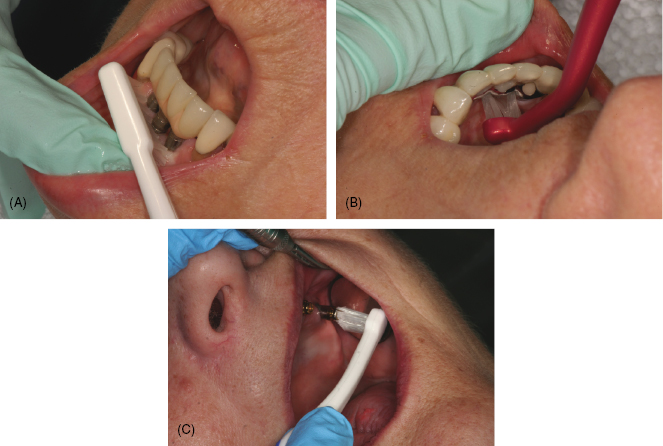
Table 8.1 Examples of brushes to use with implants.
| Brushes | Examples | Manufacturer |
|---|---|---|
| Manual | End-tuft or Sulcabrush Imtec™ Access Brush Soft/extra soft compact size |
Multiple manufacturers Imtec, 3M, Co. Multiple manufactures |
| Power/ultrasonic | Oral-B® Triumph Sonic Rota-dent® Sonicare® Waterpik®- Sensonic® |
Proctor & Gamble, Co. Zila, Inc. Phillips, N. America Corp. Waterpik, Inc. |
| Interdental brush | GUM™ Go-Between Proxabrush Oral-B® Interdental brush Proxytip® Soft Picks® Tapered or Thinline TePe Original and Angled |
Sunstar Americas Proctor & Gamble AIT/ Tess Oral Health Sunstar Americas, Inc. Multiple manufacturers TePe Oral Health Care |
Ultrasonic toothbrushes have been proven to remove plaque/biofilm more effectively than a manual brush (9). If an ultrasonic toothbrush is used, choose the smallest head, rotary, circular, or sonic design; set it on a lower setting; and clean around the tissue cuff surrounding the implant (see
Stay updated, free dental videos. Join our Telegram channel
VIDEdental - Online dental courses


