Chapter 7
Preserving the Healing Environment
Aim
To describe methods of preserving a healthy intracanal environment by obliteration with root canal filling material and coronal protection from the oral flora.
Outcome
After studying this chapter, readers should understand the role of the root filling and coronal seal in preserving a clean, health-compatible pulp space. They should also understand the practicalities of obturation with a variety of materials including cold and thermally softened gutta percha and sealer.
Why Fill Root Canals?
Canal preparation eliminates microorganisms and substrate and provides the necessary conditions for periapical health. Many have witnessed substantial healing following preparation alone and questioned whether root fillings are needed (Fig 1-8). Strictly, they are not, provided the internal environment of the tooth remains clean and microbe free. Faced with a similar challenge, a periodontist may recommend regular internal plaque control, irrigation and perhaps the installation of a sustained-release antimicrobial device. Regrettably, repeated entry for environment-preserving “maintenance therapy” is not possible in endodontics since root canal treated teeth must be restored. It is therefore difficult to imagine, in practical terms, how a clean canal system can be preserved without filling it.
The principal role of the filling is to provide a fluid and microbe-tight seal of all coronal, apical and lateral portals of exchange:
-
preventing new infection from the oral cavity and
-
imprisoning, denying nutrients and space to multiply for any organisms left after preparation.
The coronal restoration is as important as the root filling in achieving these goals; neither will deliver alone.
When Should Root Canals Be Filled?
-
When they have been cleaned as thoroughly as possible.
-
When they have been shaped for optimal seal.
-
When there is enough time to achieve a quality seal (depending on the method, this may not be very long).
For those practising multiple-visit treatment, reassuring signs of adequate preparation include:
-
the absence of pain
-
the disappearance of sinus tracts.
In single- and multiple-visit treatment, it must be possible to dry the canal.
Incorporating blood or serum:
-
compromises seal
-
provides rich nutrients and growing-space for microorganisms.
How Should a Root Canal System Be Filled?
The ideal system would introduce a:
-
perfectly biocompatible
-
perfectly sealing
-
permanently antimicrobial
-
non-deteriorating
material into every ramification of the root canal system without it ever escaping into surrounding tissues. Partial and total removal would be similarly simple and complete.
It is reassuring that whilst current methods fall short of this ideal; such stringent performance is not needed for predictable clinical success. In fact, excellent outcomes can be expected if all major root canals are prepared and densely filled with bland materials to within 2mm of root-end (Fig 7-1).
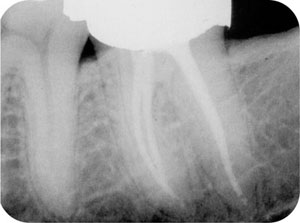
Fig 7-1 Not ideal, but a root filling likely to keep the canal system clean and win clinical success.
Currently, this almost universally involves cold or warm compaction of a rubber material (gutta percha) with a fluid sealer cement.
The Role of Filling Components
Gutta percha provides the bulk of a root filling. It is:
-
inexpensive, versatile and easy to handle
-
stable and non-deteriorating
-
adequately biocompatible
-
non-supportive of microbial growth
-
capable of adaptation with pressure, solvents and heat
-
simple to remove for post-space and re-treatment.
However, it does not seal well on its own and must always be used with a sealer.
Sealer cement acts as a gasket and provides the seal. During compaction, it flows to fill irregularities and provides a tight interface with canal walls. Sealers may also:
-
lubricate the glide-path of gutta percha into the canal
-
actively suppress microbial growth
-
promote hard-tissue repair at the root end.
Slow-setting materials are preferred which allow:
-
time for adequate gutta percha compaction, even in the presence of humidity and heat
-
continued flow during setting to counter shrinkage forces which might otherwise pull the material away from canal walls and break the seal.
Surprisingly little is known about the relative clinical performance of root canal sealers (Table 7-1), and no material has been convincingly shown to provide superior short- or long-term clinical outcomes. Selection is usually based on nothing more than ease of handling and personal preference.
| Category | Comments | Examples |
| Zinc oxide/ eugenol-based | The most widely used globally. Irritant to tissues in the unset state but resorbable and inert when set. Contains antimicrobial eugenol. | TubliSeal® extended working time (Kerr) Pulp Canal Sealer® extended working time (Kerr) |
| Calcium hydroxide-based | Biocompatible and may be osteoregenerative, but concerns over long-term solubility. | Apexit® (Ivoclar) Sealapex® (Kerr) |
| Resin-based | Popular in Europe, with long working times and easy to remove with solvents. Irritant until set and may resorb slowly if extruded. | AH Plus® (Dentsply) |
| Glass-ionomer-based | Early promise of enhanced seal and root reinforcement has not been realised. Pre-encapsulation leads to waste. Can be very difficult to remove for post-space and retreatment. | Ketac Endo® (ESPE) |
| Silicone-based | Promising early research supports their use. | ReokoSeal® (Reoko) |
The properties of gutta percha and sealer are generally held to be optimised by maximising the volume of rubber and minimising the volume of sealer (Fig 7-2). This can be achieved by cold compaction or after softening with heat.
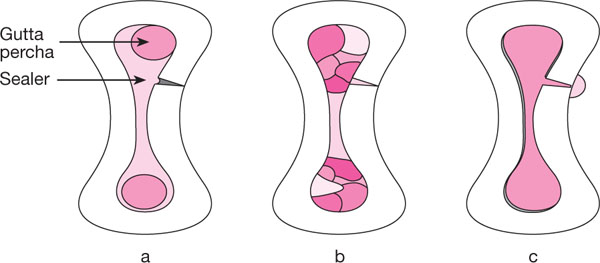
Fig 7-2 Optimising material properties by increasing the volume of rubber and reducing the volume of sealer: (a) Single cones in a large volume of sealer. (b) Multiple-point cold lateral condensation. (c) Thermoplastic obturation.
Cold Compaction of Gutta Percha with Sealer
1. Cold lateral condensation
Principles: Multiple cones of gutta percha compacted to form a dense core with thin interposing and surrounding films of sealer (Fig 7-2b).
Condensation is performed with a smooth, tapered “spreader” which acts like a wedge to squeeze the rubber laterally under vertical pressure (Fig 7-3), not by pushing it sideways like a root-splitting crow bar.
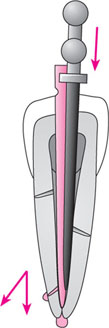
Fig 7-3 Cold lateral condensation generates lateral force by axial loading of a wedge-like spreader. The greater its taper, the greater the lateral component of force. There is always a vertical component of condensation which is increased if the spreader has a flat, rather than pointed tip.
Preparing to fill
All condensing tools (spreaders and pluggers) should be tried in the prepared canal to make sure they will be able to work at the required level. A correct spreader should pass to the root terminus if it is to compact the filling into the apical seat and throughout its length.
ISO or non-ISO spreaders?
This is a matter of personal preference. Highly tapered, non-ISO spreaders (e.g. medium-fine, fine-medium) generate greater lateral force than .02 tapered ISO instruments, but more dentine should not be removed to accommodate them.
Stainless steel or NiTi?
NiTi spreaders are especially useful in curved canals, penetrating deeper and placing less stress on canal walls.
Accessory cone selection
When a spreader is removed from the canal, it leaves a space of its own size and taper. Accessory cones should match or be slightly narrower than the spreader so they will bottom-out in the spreader track and avoid air voids.
Master cone fit
ISO or non-ISO cones can be fitted to the apical preparation. ISO cones usually size match the master apical file, but it should be noted that standardisation is not always as accurate as we would wish. Position of fit is more important than nominal size match. Non-ISO medium-fine or fine-medium cones are suitable for most conventionally prepared canals. They may traverse curved canals better than ISO cones which can sometimes buckle, and have less tendency to slide through the apex if apical resistance form is not ideal.
Tip diameter can be customised with a commercially available gauge and sharp scalpel (Fig 7-4). Master cones are tried in irrigant-moistened canals to lubricate their path in the same way as the sealer will. If a well-fitting spreader is available, the master cone should fit to within 0.5mm of the apical terminus.
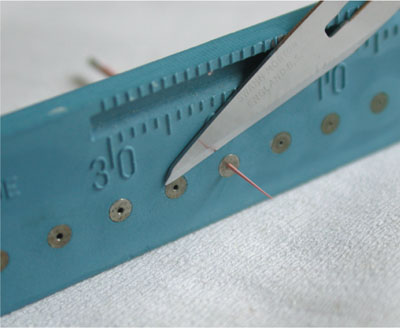
Fig 7-4 Customising gutta percha cone tip diameter with a gauge (Maillefer/Dentsply) and scalpel.
Short master cones may be due to
-
apical obstruction
-
tip-size incompatibility.
Apical obstruction with cutting debris is removed by irrigating and repeating the apical preparation with Balanced-Force motion, finishing with a quarter-clockwise turn before withdrawal to load the apical flutes of the file with debris “apical clearing”. Apical obstructions due to ledging usually require gentle canal filing to remove wall defects, or employing an overcurved GT hand file to bypass and plane away irregularities.
Tip size incompatibility is often overcome by trying another cone from the same pack, or re-trimming another non-ISO cone to a smaller tip size. Long master cones usually occur because of inadequate apical resistance form. This is usually a function of inaccurate working length determination, or of employing a clockwise-rotating file motion at root-end. The stop should be redefined at a shorter length, or a non-ISO cone trimmed and fitted which will have less risk of compaction beyond root-end.
Drying the canal
Final drying is done by aspiration with the irrigation needle and syringe, and wicking remaining moisture with paper points. Some finish the drying process with a final flush of absolute alcohol.
Sealer
Sealer can now be mixed in accordance with the manufacturer’s instructions and accessory cones arranged ready for use.
The filling process (Fig 7-5)
Seal/>
Stay updated, free dental videos. Join our Telegram channel
VIDEdental - Online dental courses


