5
Treatment of Teeth with Vital Pulp
Endodontic Aspects of Restorative Procedures
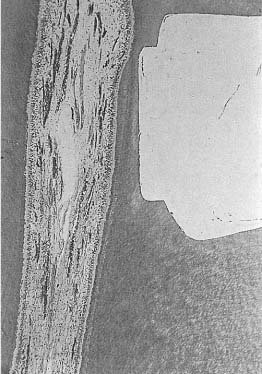
Fig. 5.1 Extremely deep cavity prepared with ultra-speed, low-torque equipment, a sharp bur, and an abundance of water. The cavity was restored with a calcium hydroxide base and amalgam. After 30 days, a healthy pulp and only the slightest amount of secondary dentin formation attest to the innocuousness and safety of the method.
As was discussed in the chapter on the etiology of pulpal inflammation (see p. 20), operative and restorative procedures may have harmful influences on the pulp. The pulpal changes may be irreversible and result in pulp necrosis. Milder iatrogenic irritation may cause symptoms of dental hyper-sensitivity which can be extremely troublesome for the patient for shorter or longer periods of time.
Postoperative discomfort can most often be prevented if accepted biological principles are adhered to during the treatment of the patient. The measures to prevent pulpal complications are simple and straightforward and can be easily incorporated into routine restorative techniques. In the following sections, simple guidelines are given.
Cavity and Crown Preparation
Cavity and crown preparation should be carried out with ultraspeed (> 200 000 rpm), low-torque equipment, sharp burs, and an abundance of water. This technique is amazingly safe and cavities may be prepared to the immediate vicinity of the pulp, virtually without any changes or reaction in the pulp tissue (Fig. 5.1). Remember that it is the use of an adequate water spray that is the key to the safety of the ultraspeed equipment since only water can prevent a dehydration of the dentin by the otherwise unavoidable friction heat generated during the preparation of the tooth (Fig. 5.2). Only at 3000 rpm or lower should a bur be used without water in a dry cavity. This is useful during excavation of soft carious dentin in deep cavities. For this purpose and at this speed it may also be practical to use a high-torque handpiece since, with this equipment, a bur will excavate the soft carious dentin rather than cut it as might be the case if used with a low-torque handpiece.
Other than for detail work at low speed, high-torque handpieces should preferably not be used in the preparation of cavities or crowns. The high torque inevitably leads to a certain vibration of the bur which again may cause internal bleeding in the pulp. The blood may even flow into the dentinal tubules, coloring part of the crown or the entire crown red (Fig. 5.3). It is not clear at this time whether such an injury is reversible or not. However, infection of the blood clot is a likely occurrence, and especially if the tooth in question is to serve as an abutment for a bridge, it is common clinical practice to perform a pulpectomy and root filling on the tooth before the bridge is cemented.
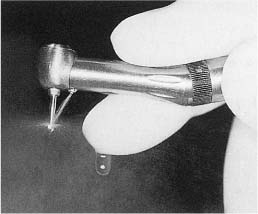
Fig. 5.2 Ultraspeed, low-torque handpiece with a bur running freely at full speed. The water is adjusted to hit the head of the bur. It is then dispersed by the rotation of the bur.
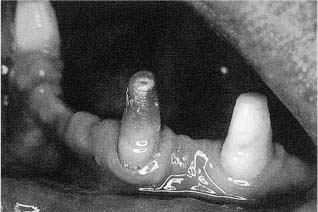
Fig. 5.3 Teeth being prepared as bridge abutments. In the middle tooth the coronal dentin is colored red due to intrapulpal bleeding.
Moreover, a bur may vibrate or rotate eccentrically if it has become bent. This happens quite often, for instance, if care is not taken when a bur is introduced into a friction-grip handpiece. Therefore, even with the use of low-torque equipment one has to check regularly that the bur runs concentrically. This is especially important during crown preparation when long, thin, diamond burs that easily bend are often used.
Cavity Cleansing and Drying
Before a cavity is filled or a crown cemented, the dentin surface should be thoroughly cleansed. An effective and biologically sound way to do this is with water or, as is normally done in practice, with a spray of water and air. In other words, the goal is not to disinfect the dentin, but to clean it and remove saliva, blood, possible rests of materials, and other extraneous matter.
The clean dentin surface should then be dried with minimal dehydration of the dentin. This can be achieved with blasts of air to remove water from the adjacent mucosa, gingiva, and sulcular area of the tooth. Most of the water in the cavity will also have been removed by this regional drying. The final drying of the cavity is then done carefully with a few short blasts of air and cotton pellets in an effort not to dehydrate the underlying dentin. It is important to develop a fast, effective, and biologically acceptable technique for the cleansing and drying of prepared dentin surfaces, since this clearly is one of the key factors in preventing patient discomfort and pain following treatment.
Surface bacteria which might survive the cleansing and drying procedures will die when the cavity is restored or the crown cemented. If bacteria are found in a gap between a restoration and the cavity wall at a later time, they are new bacteria and have come in from the oral cavity as a result of marginal leakage. It is, therefore, inappropriate to use antibacterial drugs for the cleansing of cavities and teeth prepared for crowns.
Impression Methods
As with cavity and crown preparation, the most important factor during the taking of an impression is the prevention of dehydration of the dentin and subsequent pulp reactions. With the modern elastic impression materials this is not a problem if the tooth is not unnecessarily dehydrated prior to the taking of the impression. Even thermoplastic materials may be used if care is taken. The prepared tooth is then sprayed liberally with water and dried off carefully with cotton or gauze, leaving a moist dentin surface. The impression material is heated only to such an extent that it can be manipulated with the fingers, although with some difficulty (i. e., to 50–60 °C). When applied to the tooth, usually in a copper ring, the material is cooled off with water and removed as quickly as the method allows. The tooth is then immediately sprayed liberally with water to counteract the certain amount of dehydration that unavoidably occurs with this method. Obviously, from a preventive–endodontic point of view, thermoplastic impression materials should not be used, and with the improvements in the accuracy of other biologically more acceptable methods its use should at least be restricted to certain infrequent situations where this method might still appear to give superior results.
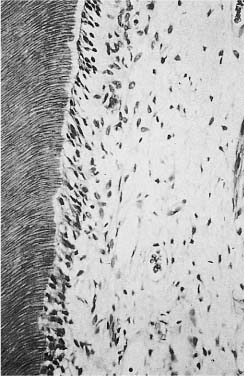
Fig. 5.4 Area of pulp under a cavity restored with a dry zinc oxide–eugenol paste. After 30 days, the pulp is normal. Note that secondary dentin has not formed (hematoxylin-eosin).
Pulp Protection
Materials with desirable biological properties, but which are too weak or otherwise not suitable to be used as restorative materials may be used as base materials in a cavity. There are two reasons for using a base material. The first reason is to protect the pulp from harmful components in a filling material and from marginal leakage. The second reason is to influence the repair processes in the pulp in a beneficial way to enhance healing. There are essentially two types of material available for cavity protection today: zinc oxide–eugenol and calcium hydroxide; most commercially available preparations are based on one of these materials.
A paste of zinc oxide and eugenol provides a bacteria-tight seal of the cavity. This is a very important characteristic of this material and is probably a main reason for its suitability as a base in a cavity. Also, eugenol is a local anesthetic with an especially good effect on the C-fibers of the pulp, so that when a paste of zinc oxide and eugenol is placed in a cavity, enough eugenol may penetrate to the pulp to temporarily inhibit intradental nerve activity. Zinc oxide–eugenol paste, therefore, has an excellent sedative effect. In addition, eugenol is an antiseptic and, when mixed with zinc oxide, gives the paste a definite antibacterial effect. Eugenol also interferes with prostaglandin production in the pulp, so that a zinc oxide–eugenol cement has an anti-inflammatory effect as well.
The material has a certain toxic effect when tested in vitro. However, when used in a cavity, it has no adverse effect on the pulp (Fig. 5.4). On the contrary, the biocompatibility of the material is so well established that it is the accepted material for negative controls in studies on the pulpal effect of dental materials. Thus, zinc oxide and eugenol is exceptionally well suited as a base material, a sedative dressing, a temporary restoration, etc. It is interesting to know that it has been used for such purposes since the time of the pharaohs in ancient Egypt.
Zinc oxide and eugenol may also be used for temporary or semipermanent cementation of crowns. When used for this purpose, it should be remembered that the setting reaction of zinc oxide and eugenol is hydrophilic, which means that the material has a strong affinity for water and needs water to set. A zinc oxide–eugenol cement, therefore, should be applied on a wet tooth. Otherwise the material will take up fluids from the dentinal tubules and the pulp, often causing severe hypersensitivity of the tooth.
The use of zinc oxide and eugenol is contraindicated under all resin materials since eugenol interferes with the polymerization of a resin. However, where maximum pulp protection is sought, zinc oxide and eugenol should always be used, at least in the deeper parts of the cavity. If a resin then is used to restore the tooth, the zinc oxide–eugenol material will have to be covered by a second base material which is compatible with the resin restoration.
Calcium hydroxide, when used in a base material, is well tolerated by the pulp (Fig. 5.1). It does not have the sedative effect of zinc oxide and eugenol, but has an excellent antibacterial effect, an anti-inflammatory effect, and can be used under all types of restorative materials. Calcium hydroxide cements will usually not provide a lasting bacteria-tight seal of the cavity. Although the materials have been shown to initially block the dentinal tubules quite effectively, it may gradually be washed out of a cavity when there is marginal leakage. Recently, light-cured calcium hydroxide–resin preparations have been brought on the market. These preparations appear to be tolerated by the pulp and are conceivably more stable than the two-component cements. However, the therapeutic effects of calcium hydroxide may be blocked by the cured resins of these products.
The use of resin-based dentin adhesives has presently become routine in operative dentistry. As a result, marginal leakage in conjunction with bonded restorations is greatly reduced. However, the use of adhesives has also to a great extent led to a discontinuation in the use of base materials under resin restorations. It is far from established that this is sound clinical practice. Patients commonly suffer from dental hypersensitivity following this type of treatment, and endodontists have noticed an increased number of teeth with resin restorations referred for endodontic treatment since the base materials were abolished. Therefore, it is questionable whether the well-established clinical practice of using a base under a resin restoration should be discontinued at this time. The classical rule that a base should be applied to the deepest part of a cavity if the cavity is deeper than what is needed for retention purposes still seems to be valid (Fig. 5.5). This approach leaves more than enough free enamel and dentin surfaces to be used for bonding a restoration to the tooth.

Fig. 5.5 Diagram illustrating a section through a class 2 cavity. The base material, when placed in the deepest part of the cavity, will protect the pulp, but not interfere with the placement of the restoration.
Marginal Leakage
True adhesive filling materials do not exist at present and marginal leakage is a clinical problem with all types of restorative materials. Marginal leakage cannot be prevented in conjunction with silicate or glass ionomer cement fillings (Fig. 1.38). However, the fluoride released from these materials has a good anticaries effect and secondary caries is generally not a problem with these materials.

Fig. 5.6
a Class 5 composite resin restoration placed without acid-etching of cavity walls. Marginal leakage with penetration of a dye to the pulp can be seen.
b Class 5 composite resin restoration placed after acid-etching of cavity walls. No marginal leakage is evident.
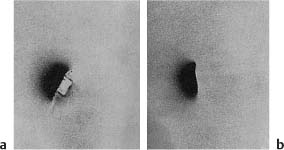
Fig. 5.7
a Class 5 amalgam restoration. Marginal leakage with penetration of a radioactive isotope around the restoration is seen.
b Class 5 amalgam restoration. A copal varnish was applied to the cavity walls before the amalgam was inserted. No marginal leakage is evident.
With early resin restorations, marginal discoloration and secondary caries were major problems, and clinical use of the composite resins was about to be discontinued when the acid-etch technique became available (Fig. 5.6). By using the acid-etch technique combined with a good resin-based adhesive system, the clinical problems with marginal leakage in conjunction with composite resin restorations have been largely overcome.
With amalgam restorations, initial marginal leakage can be prevented effectively by applying a layer of varnish in the cavity before the amalgam is inserted (Fig. 5.7). The cavity varnish will wash out gradually, but corrosion products from the amalgam will fill the gap between the restoration and the cavity walls, resulting in a well-sealed cavity. Since amalgam restorations are well tolerated by the pulp, the cavity varnish will provide adequate pulp protection as well in many instances. However, in deep cavities a base material is used in the deepest part, as discussed above, and the varnish is applied to the cavity on top of the base material in order to prevent marginal leakage. Thus, a cavity varnish should be used in conjunction with all amalgam restorations, in shallow and deep cavities, and in vital and nonvital teeth.
As can be seen from the above, biologically appropriate restorative treatment can be performed with simple, routine clinical methods. One only has to think in terms of prevention and pulp protection, and the number of cases with postoperative pain, iatrogenic pulpitis, and pulp necrosis will be dramatically reduced.
Pulp Capping
Treatment of the exposed pulp by pulp capping has a long clinical history. The purpose of the treatment is to keep the exposed pulp vital and functioning in the tooth. However, it soon became apparent that pulp wounds have a definite tendency to heal poorly, and that pulp necrosis usually develops in pulp-capped teeth. Thus, in the 1930s the thesis that “the exposed pulp is a lost organ” was generally accepted. Today, over 70 years later, pulp capping can still be a doubtful treatment form. On the other hand, a number of experimental studies have shown that pulp capping may have a success rate near 90% if specific clinical criteria are met and the treatment is performed correctly. Therefore, an exposed pulp is not necessarily a lost organ (Fig. 5.8).
For pulp capping to be successful, the following factors are of decisive importance: the condition of the pulp (preoperative diagnosis), the pulp-capping material, and the accomplishment of a permanent bacteria-tight seal of the pulp cavity.
Indications
The exposed pulp of a tooth to be treated with pulp capping should be healthy and free of inflammation. Since pulpal inflammation as a rule is asymptomatic, this presents a problem in pre-operative diagnosis that is most often unsolvable. An exposed pulp free of inflammation can with present methods be diagnosed with certainty only when the exposure occurs accidentally, for example, as a result of crown preparation of an intact tooth or, more commonly, as a result of a traumatic injury (complicated crown fracture). However, even if the pulp is healthy at the time of exposure, it will soon become inflamed if left exposed to the oral environment. Bacteria will colonize the wound surface and may invade super-ficial layers of the pulp since extravasated blood is usually present in the tissue. An accumulation of inflammatory cells may be present in the pulp subjacent to the exposure site already after 48 hours. The pulp capping should, therefore, if at all possible be performed within 2 days after the exposure occurred. If the treatment is then carried out correctly, the prognosis is excellent (approximately 90%).
Accidental pulp exposures constitute only a small portion of the teeth with exposed pulp. More frequently the pulp is exposed during excavation of soft carious dentin. In these instances it must be assumed that the pulp is inflamed. If pulp capping is performed in teeth with carious exposures, therefore, the number of failures will increase dramatically and a success rate in the area of 30–40% can be expected.
Thus, with our present knowledge and the materials and methods that are now available to us, the indications for treatment of the exposed pulp with pulp capping are rather narrow. However, in the teeth with healthy pulps where the treatment is indicated, it is an elegant and reliable method. It is especially useful in the treatment of incompletely formed incisors in children where the preservation of the pulp will allow the development of the teeth to continue, resulting in fully formed, strong teeth that can function for a lifetime.
Wound Dressing and Tissue Reactions
A vast number of materials and medicaments have been used as pulp-capping agents: gold and silver, different types of cements, antiseptic pastes, chemotherapeutics, ivory powder, dentin chips, plaster of Paris, magnesium oxide, calcium hydroxide, and many others. It is interesting to note that both biologically inert materials like gold and silver and irritating antiseptic preparations like phenolic compounds are equally unsuitable as pulp-capping agents.
The first important progress with this type of therapy was gained in the 1920 s with a paste of zinc oxide and eugenol. This material has a mild antiseptic effect and seals the cavity well. Healing of the exposed pulp without hard-tissue bridging of the pulp wound was observed. An attempt was made at obtaining hard-tissue formation at the exposure site by covering the pulp wound with dentin chips or ivory powder under the zinc oxide and eugenol paste. This approach showed some promise, but it was not until the late 1930s when calcium hydroxide was introduced as the wound dressing that pulp capping as a clinical treatment method started to be taken seriously. With calcium hydroxide it became possible for the first time on a routine basis to obtain a healthy pulp, free of inflammation, covered by a hard-tissue barrier, a dentin bridge, at the exposure site (Fig. 5.8).
Calcium hydroxide is a white powder that can be mixed with physiological saline to a paste. The paste is highly alkaline with a pH of 12.5 and its application to the pulp results in necrosis of the pulp tissue contacting the paste. The necrotic area of the pulp is sharply limited and the subjacent vital pulp tissue shows no or only a mild inflammatory reaction (Fig. 5.9).
In the transition zone between the necrotic and the vital tissue, a relatively structureless “demarcation zone” is observed after a few days. This zone is rich in collagen and gradually becomes mineralized. It represents the beginning of the formation of the mineralized barrier. This first formed hard tissue contains no dentinal tubules, but after approximately 10 days odontoblasts which have differentiated from cells in the pulp are seen lining up along the pulpal aspect of the hard tissue, and formation of tubular dentin onto the atubular tissue begins (Fig. 5.10). The dentin formation goes on until the bridge has reached a certain thickness and then stops, usually after a/>
Stay updated, free dental videos. Join our Telegram channel
VIDEdental - Online dental courses


