Chapter 5
Techniques for Mandibular Anaesthesia
Aim
The aim of this chapter is to describe the different methods available to anaesthetise the lower teeth and their associated structures.
Outcome
After reading this chapter you should have an understanding of the different local anaesthetic techniques used in the lower jaw. You will understand the indications for use of each method.
Introduction and Terminology
Unlike the maxilla, where infiltration is the normal method, in the mandible both infiltration and regional block techniques may be considered as first-choice injections. The decision as to which to use is governed by:
-
the age of the patient
-
the tooth of interest.
It was mentioned in Chapter 4 that the patient position should allow access to the point of injection while affording the safest and most comfortable placement for the patient. The fully supine position aids cranial blood flow and prevents fainting but some patients may be uncomfortable or feel vulnerable in this position. A compromise position of tilting the chair back at least thirty degrees to the vertical is suggested. In some mandibular block techniques this tilted position provides an additional advantage. This is because when the mouth is wide open the mandibular occlusal plane is almost horizontal. This is useful in locating the appropriate landmarks.
Infiltration Methods
Age of the patient
Infiltration anaesthesia is the method of choice for anaesthesia of the deciduous dentition in children. The technique is similar to that described for maxillary buccal infiltrations as the approach is from the buccal side. In the lower jaw the area of penetration is made taut by pulling the tissues laterally and inferiorly rather than superiorly. The point of penetration is in the depth of the buccal sulcus and the technique is identical to maxillary buccal infiltration as described in Chapter 4. A 30-gauge needle is used and 1 mL of solution deposited over 30 seconds.
Tooth of interest
In adults, infiltration anaesthesia is the first choice for pulpal anaesthesia of the lower incisor teeth. Regional block injections are poor in this regard, partly due to supply from the contralateral inferior alveolar nerve. Pulpal anaesthesia is best achieved by depositing solution both buccally and lingually in the apical region of the tooth involved. A volume of at least 0.5 mL at each site is recommended. The buccal injection is as described above (Fig 5-1). The lingual infiltration is performed in the reflected mucosa in the apical region of the tooth of interest (Fig 5-2). The onset of anaesthesia may take longer than a maxillary buccal infiltration. It may be 8 to 10 minutes before pulpal anaesthesia is of sufficient depth to allow pain-free operative procedures on the tooth.
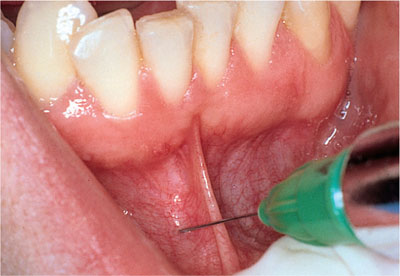
Fig 5-1 Buccal infiltration anaesthesia may be effective in the mandibular anterior region in adults.
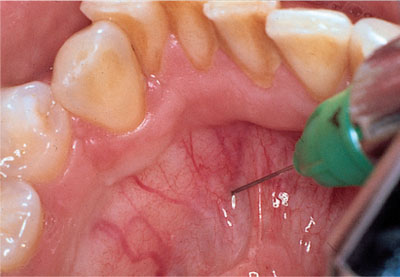
Fig 5-2 Lingual infiltration when combined with buccal infiltration can provide reliable pulpal anaesthesia in anterior mandibular teeth in adults.
Regional Block Methods
Most dental treatment on the adult dentition that requires anaesthesia is performed using regional block methods. In Chapter 4 the advantages and disadvantages of infiltration anaesthesia were listed. The advantages of regional block techniques are:
-
they produce widespread anaesthesia from one injection
-
the anaesthetic can be deposited away from infected areas.
The disadvantages of block injections are:
-
they are technically more difficult than infiltration anaesthesia
-
they do not anaesthetise nerve endings from different trunks (for example, in the mid-line where crossover may occur).
-
they produce excessive soft tissue anaesthesia
-
they may cause deep haemorrhage in patients with bleeding diatheses
-
although rare, the potential for direct injury to a nerve trunk is possible.
Regional block methods in the mandible
As is the case with the maxilla, there are extraoral approaches to the mandibular nerve. These are not recommended in dental practice and only intraoral techniques will be described. Regional block methods used in the mandible include:
-
inferior alveolar and lingual nerve block
-
Gow-Gates block
-
Akinosi-Vazirani block
-
incisive and mental nerve block
-
long buccal nerve block
-
mylohyoid nerve block.
The inferior alveolar and lingual nerve block
The inferior alveolar nerve block is probably the method used by most practitioners for anaesthesia in the adult mandible. The aim of the injection is to deposit local anaesthetic solution close to the mandibular foramen on the medial aspect of the mandibular ramus thus blocking transmission in the inferior alveolar nerve at the point of entry into the bone (Fig 5-3). There are a number of approaches to the mandibular foramen.
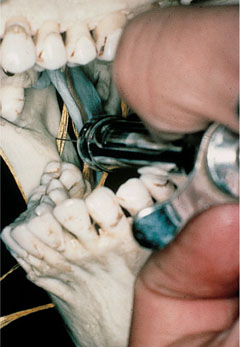
Fig 5-3 Deposition of local anaesthetic solution at the mandibular foramen can block the inferior alveolar nerve.
1. The direct technique
This method is also known as the Halstead approach and relies on simple anatomical landmarks. The aim is to deposit the local anaesthetic in the pterygomandibular space. This anatomical space is bordered posteriorly by the parotid gland, laterally by the ramus of the mandible, medially and inferiorly by the medial pterygoid muscle, superiorly by the lateral pterygoid muscle and anteriorly by the buccinator muscle (Fig 5-4). As the object is to deposit solution close to the mandibular foramen, the dentist should use all the information that is available to help locate this target. The standard anatomical pointers are given below, but the position of the foramen is variable. It should be noted that the mandibular foramen is usually apparent on dental panoramic radiographs (Fig 5-5) and if one of these is available it should be consulted. Information regarding the height (in relation to the teeth) and anteroposterior position of the foramen will be obtained from the radiograph.
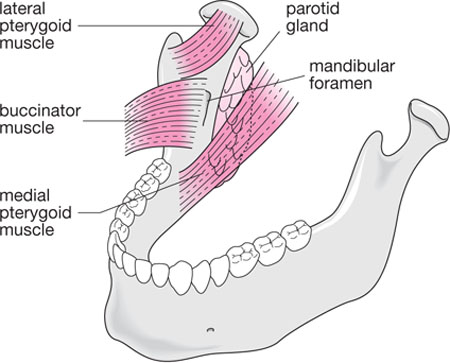
Fig 5-4 The anatomy of the pterygomandibular space.
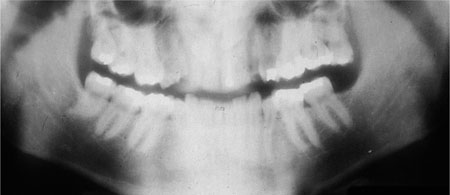
Fig 5-5 A panoramic radiograph can help in localising the mandibular foramina.
In adults a 27-gauge long needle is recommended. This is due to the depth of penetration that may be required; it is often around 25 mm. A needle should not be inserted to its hub (when using a short 25 mm needle this could occur). This is because it is at the hub at which needles fracture when stressed. This is a very rare occurrence. If a needle did fracture in the pterygomandibular space and there was nothing to grab hold of in the mouth a surgical procedure would be required for removal. Surgery in this site has the potential to produce nerve damage and is best avoided. This is why in most adults a long needle is recommended. The patient’s mouth is opened wide and the ramus is held between the operator’s thumb and index finger. The thumb is placed in the mandibular retromolar region in the coronoid notch of the ascending ramus (Fig 5-6). Before reaching this final resting point the thumb has stretched the mucosa over the ramus and in doing so achieves two important functions. First, the thumb has palpated the internal oblique ridge of the mandible and a mental note is made of its position. Secondly, this action has stretched the mucosa to enable easier needle penetration. The index or middle finger is placed extraorally on the posterior aspect of the ramus at the same height as the thumb. In the adult mandible the mandibular foramen is often approximately halfway between the operator’s thumb and index finger about halfway up the thumbnail (Fig 5-7). The syringe is introduced across the premolars of the opposite side (Fig 5-8) aiming to enter mucosa at the level of halfway up the operator’s thumbnail.
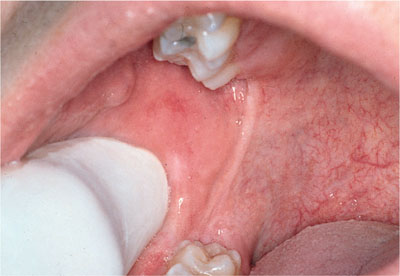
Fig 5-6 The operator’s thumb locates the coronoid notch of the ramus of the mandible.
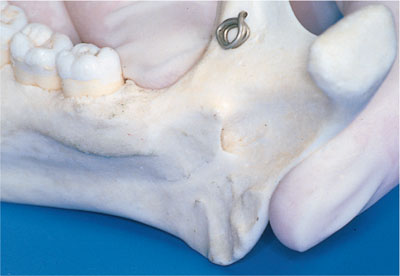
Fig 5-7 In adults the mandibular foramen is halfway between the operator’s thumb and finger when the ramus is held as shown.
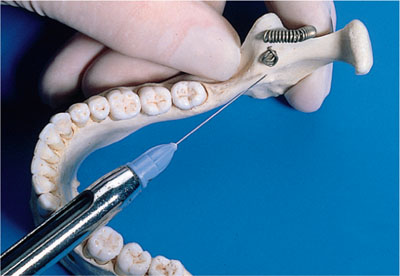
Fig 5-8 The direct approach to the mandibular foramen during an inferior alveolar nerve block.
The point of entry is midway between the internal oblique ridge (which was palpated by the thumb) and the pterygomandibular raphe (which is visualised) (Fig 5-9). The needle is advanced through tissue until bony contact is made (Fig 5-10). In adu/>
Stay updated, free dental videos. Join our Telegram channel
VIDEdental - Online dental courses


