General Dentistry
Learning Outcomes
On completion of this chapter, the student will be able to achieve the following objectives:
• Define, spell, and pronounce the Key Terms.
• Describe the process and principles of cavity preparation.
• Discuss the differences in assisting with an amalgam versus a composite restoration.
• Discuss why retention pins would be selected for a complex restorative procedure.
• Describe the need for placement of an intermediate restoration.
• Describe the procedure of applying composite veneers.
• Describe tooth-whitening procedures and explain the role of the dental assistant.
Performance Outcomes
On completion of this chapter, the student will be able to achieve competency standards in the following skills:
• Prepare the setup and assist in a class I restoration.
• Prepare the setup and assist in a class II restoration.
• Prepare the setup and assist in a class III restoration.
• Prepare the setup and assist in a class IV restoration.
• Prepare the setup and assist in a class V restoration.
• Prepare the setup and place and carve an intermediate restoration (expanded function).
Electronic Resources
 Additional information related to content in Chapter 48 can be found on the companion Evolve Web site.
• The Interactive Dental Office Patient Case Studies: Crystal Malone and Douglas Warner, Jr.
• Procedure Sequencing Exercises
• WebLinks
 and the Multimedia Procedures DVD
Key Terms
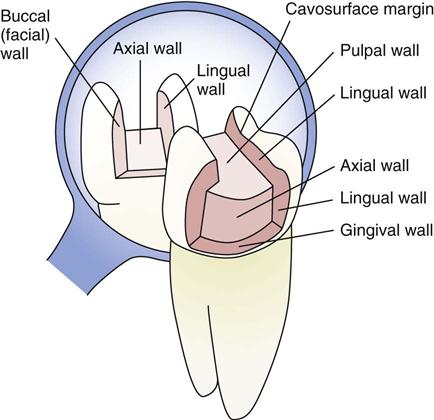
Axial (AK-see-ul) wall Internal surface of a cavity preparation positioned in the same vertical direction as the pulp within the tooth.
Cavity Pitted area in a tooth caused by decay.
Cavity preparation Process of decay removal and tooth design in preparation for restoring a tooth.
Cavity wall Internal surface of a cavity preparation.
Convenience form Cavity preparation step that allows the dentist easier access when restoring a tooth.
Diastema (dye-uh-STEE-muh) A space between two teeth.
Esthetic (es-THET-ik) dentistry Type of dentistry that improves the appearance of teeth by camouflaging defects and whitening teeth.
Line angle Junction of two walls in a cavity preparation.
Operative dentistry Term commonly used to describe restorative and esthetic dentistry.
Outline form Design and initial depth of sound tooth structure used by the dentist when restoring a tooth.
Pulpal (PUL-pul) wall Surface of the cavity preparation perpendicular to the pulp of a tooth.
Resistance (ree-ZIS-tuns) form Shape and placement of cavity walls in preparation for tooth restoration.
Restoration (res-tuh-RAY-shun) Use of a dental material to restore a tooth or teeth to a functional permanent unit.
Restorative (re-STOR-uh-tiv) dentistry Type of dentistry that restores teeth by removing decay and restoring defects.
Retention (ree-TEN-shun) form Shaping of the cavity walls to aid in retaining the restoration.
Retention (retentive) pin Basis of a stronger system used to retain and support a tooth restoration.
Veneer (vuh-NEER) Thin layer of composite resin or porcelain bonded or cemented to a prepared facial surface.
General dentistry, also referred to as operative dentistry, remains the primary responsibility of the general dentist. This chapter presents background knowledge and describes the skills needed for the clinical dental assistant to gain knowledge of restorative and esthetic procedures such as amalgam restorations, composite resin restorations, intermediate restorations, resin veneers, and tooth-whitening procedures.
Restorative dentistry is indicated when teeth are to be restored to their original form and shape through the use of direct and indirect restorative materials. Specific conditions that determine the need for restorative dentistry include the following:
• Initial or recurring decay (cavity)
• Replacement of a failed restoration
Esthetic dentistry is devoted primarily to improving the appearance of teeth by repairing imperfections with direct and indirect restorative materials, or by using whitening techniques. Specific conditions that result in the need for esthetic treatment include the following:
• Discoloration caused by extrinsic or intrinsic staining
• Anomalies caused by developmental disturbances
• Abnormal spacing between teeth
• Trauma
Cavity Preparation
To restore a tooth to its normal function while still maintaining its esthetic appearance, the dentist must master a technique that involves following specific steps to complete the process of restorative dentistry. When preparing a tooth for a permanent restoration, the dentist has acquired knowledge about the direction of the enamel rods, the thickness of the enamel, the body of the dentin, the size and position of the pulp, and the crown of the tooth as it relates to the gingival tissues.
Terminology
An understanding of the terminology of a cavity preparation will help you to know which dental instruments, dental accessories, and dental materials to have ready at the appropriate times throughout a procedure. The specific terminology refers to the anatomical structures as they relate to the cavity preparation, which is especially helpful for the expanded-function dental assistant (EFDA) in the application of dental materials and intermediate restorations. See Box 48-1 for tooth preparation terms.
BOX 48-1
Terminology Related to Cavity Preparation
Tooth Preparation Walls
Cavity wall: Internal surface of the tooth prepared for the restoration.
Internal wall: Cavity wall/surface that does not extend to the external tooth surface.
Enamel wall: Portion of a prepared external wall that consists of enamel.
Dentinal wall: Portion of a prepared external wall that consists of dentin.
Tooth Preparation Angles
Cavity preparation is the process of removing diseased tooth structure while leaving a limited amount of healthy tooth structure for the tooth to maintain a restoration. The principles of cavity preparation are divided into two stages, each with several steps. The dentist follows these steps in an exact order so that ideal results are achieved.
Initial Preparation
Cavity preparation involves the initial design and extension of the preparation’s external walls to a limited depth. The factors listed below are intended to help the dentist gain access to the decay or defect and reach sound tooth structure. The objectives for initial cavity preparation are as follows:
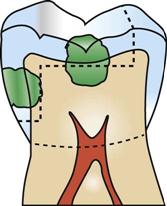
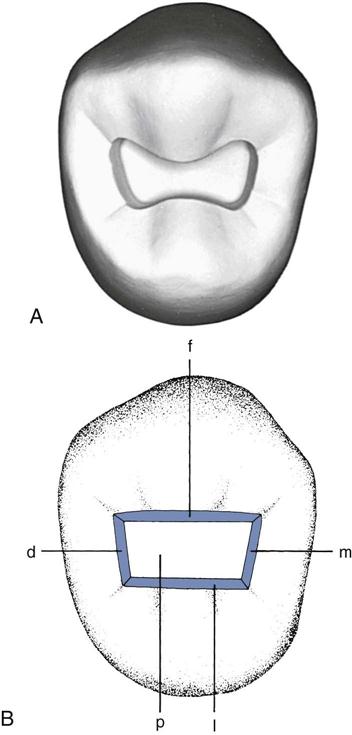
• Outline form—The dentist decides on the design and initial depth of sound tooth structure (Fig. 48-1).
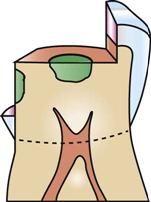
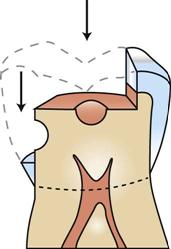
• Resistance form—The dentist determines the primary shape and placement of the cavity walls (Fig. 48-2).
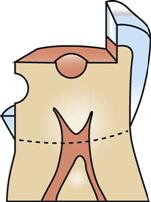
• Retention form—The dentist knows where to place retention in the preparation to help in securing the restoration in place (Fig. 48-3).
• Convenience form—The dentist has accessibility in preparing and restoring the tooth (Fig. 48-4).
Final Preparation
After the initial cavity preparation, the dentist will continue the procedure with the final cavity preparation. This includes the following:

Standardized Plan for a Restorative Procedure
• Communicate with the patient about the procedure and about what to expect during treatment.
• Position the patient correctly for the dentist and the type of procedure (see Chapter 33).
• The dentist will evaluate the tooth to be restored (see Chapter 28).
• The dentist will administer local anesthesia (see Chapter 37).
• Prepare the type of moisture control to be used for the procedure (cotton roll, dry angles, dental dam; see Chapter 36).
• The dentist will prepare the tooth for the restoration (this includes the use of dental hand instruments and dental handpieces with rotary instruments; see Chapters 34 and 35).
• The dentist will determine the types of dental materials to be used (see Chapters 43 and 44).
• Apply the dental materials. Burnish, carve, or finish the dental material.
Dental Assistant’s Role in a Restorative Procedure
• Be familiar with the procedure, and anticipate the dentist’s needs.
• Prepare the setup for the restorative procedure.
• Transfer dental instruments and accessories.
• Provide a proper mix and transfer of dental materials.
• Perform any required legal expanded functions.
Permanent Restorations
A permanent restoration can be anything from a small class I restoration to an extensive class II multisurface foundation. With the exception of steps added to the process by using supplementary accessories and dental materials, a restorative procedure will follow a standardized format.
Class I Restorations
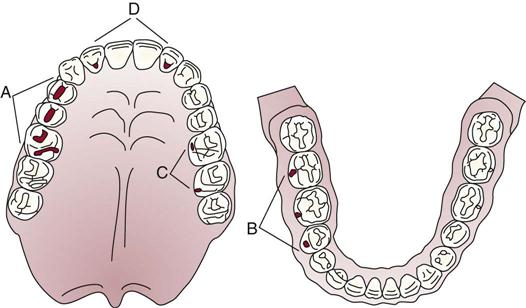
The class I cavity, or lesion, is a one-surface lesion involving the pits and fissures of a tooth. Because of this anatomical feature, plaque and debris will accumulate within these areas, making it difficult for a patient to keep the areas clean. Therefore, the pits and fissures are highly susceptible to decay. Class I decay involves the following areas of concern:
• Occlusal pits and fissures of premolars and molars (Fig. 48-5, A)
• Buccal pits and fissures of mandibular molars (Fig. 48-5, B)
• Lingual pits and fissures of maxillary molars (Fig. 48-5, C)
• Lingual pits of maxillary incisors, most frequently near the cingulum (Fig. 48-5, D)
Tooth Preparation
The occlusal or lingual class I cavity preparation is a simple preparation for the dentist. The outline of the cavity preparation involves the pit, the groove, or a fissure that is decayed. The dentist will use a bur to open the enamel, taking care not to create any sharp angles or corners within the preparation. This preparation should be smooth throughout the internal structure (Fig. 48-6).
The location of the restoration in the mouth will determine the type of permanent restorative material to be used. Because class I lesions are small restorations and most likely do not interfere with occlusal forces, the dentist will commonly select a composite resin material for the permanent restoration.
Special Considerations
Because class I restorations can occur on the occlusal surface, the dentist must evaluate the patient’s occlusion after replacing tooth structure. An easy way for the dentist to review how the tooth occludes with an opposing tooth is to mark the occlusion with articulating paper after the restorative process. See Procedure 48-1.
PROCEDURE 48-1 


Assisting in a Class I Restoration
Equipment and Supplies
✓ High-volume oral evacuator (HVE) tip
✓ High-speed and low-speed handpieces
✓ Burs, assorted (dentist’s choice)
✓ Cotton pellets, cotton rolls, 2 × 2–inch gauze
✓ Dental liners, base, sealers, bonding agents
✓ Permanent restorative material (composite or amalgam)
Procedural Steps
Preparing the Tooth
Preparing the Cavity
1 Transfer the mirror and the high-speed handpiece with a cutting bur to the dentist.
2 During cavity preparation, use the HVE and the air-water syringe, adjust the light, and retract the patient’s cheek as necessary to maintain a clear field for the dentist.
Purpose: With efficient placement and use of the HVE and the air-water syringe, the operating field will remain clean and clear for the dentist, and this will provide comfort for the patient.
Placing Dental Materials
Placing Permanent Material
3 When the preparation is slightly overfilled, exchange the condenser for the burnisher so that the dentist can burnish the surface and margins of the restoration.
Purpose: This strengthens the finished restoration by burnishing the excess mercury to the surface.
4 With composite, carry the material to the transfer zone with the composite placement instrument. The dentist will apply the material to the preparation in increments, following each placement with the curing light.
Note: The depth of the restoration will determine how often the curing light is used.
Final Carving or Finishing
1 For amalgam, transfer the carvers until the carving is complete.
2 For composite, transfer the high-speed handpiece with finishing burs.
3 Keep the tip of the HVE close to the restoration during the carving and finishing process.
Purpose: To remove all particles as soon as possible. This step is especially important when a dental dam is not used.
Occlusal Adjustment
1 Remove the cotton rolls or the dental dam, and rinse and dry the area.
2 Position the articulating paper within the quadrant, and instruct the patient to “tap” his teeth together very gently, and then to move his bite from side to side.
Note: Heavy blue marks will appear on any high spots on the new restoration. The patient is cautioned to not bite too hard, or the restoration may fracture.
3 Assist with transfers or as necessary while the dentist uses a carver or a finishing bur to remove any remaining high spots.
Note: This step is repeated as often as necessary to bring the new restoration into proper occlusion.
4 Transfer a moistened cotton pellet or cotton roll to gently clean the surface of the restoration.
Purpose: To remove any remaining small surface irregularities.
Postoperative Instructions
Stay updated, free dental videos. Join our Telegram channel
VIDEdental - Online dental courses


