Extraoral Imaging
Learning Outcomes
On completion of this chapter, the student will be able to achieve the following objectives:
• Pronounce, define, and spell the Key Terms.
• Describe the purpose and uses of panoramic imaging.
• Describe the purpose and uses of cone beam computed tomography (CBCT).
• Describe the equipment used in panoramic imaging.
• Describe the steps for patient preparation and positioning in panoramic imaging.
• Discuss the advantages and disadvantages of cone beam computed tomography (CBCT).
• Describe the equipment used in extraoral imaging.
• Identify the specific purpose of each of the extraoral film projections.
• Describe the purposes and uses of extraoral imaging.
• Describe the advantages of three-dimentional (3D) imaging.
Performance Outcomes
On completion of this chapter, the student will be able to meet competency standards in the following skills:
Electronic Resources
 Additional information related to content in Chapter 42 can be found on the companion Evolve Web site.
 and the Multimedia Procedures DVD
Key Terms
Cephalostat Special device that allows the operator to easily position both film and patient.
Computed tomography (CT) (toe-MOG-ruh-fee) Radiographic technique that allows imaging of one layer or section of the body while blurring images from structures in other planes.
Cone beam computed tomography (CBCT) A three-dimensional digital imaging method that uses a cone-shaped beam of radiation that rotates around the patient.
Digital panoramic units A filmless method of recording a panoramic image and displaying it by using an electronic sensor and a computer to process and store the image.
Exposure controls Feature that allows the operator to adjust the milliamperage and kilovoltage settings.
Extraoral images Images taken when large areas of the skull or jaw must be examined.
Extraoral imaging An image of the teeth and bones made by placing the film or cassette against the face or the head and projecting the x-rays from the opposite side.
Focal trough (trof) Imaginary three-dimensional horseshoe-shaped zone used to focus panoramic radiographs.
Frankfort plane Imaginary plane that passes through the top of the ear canal and the bottom of the eye socket.
Magnetic resonance imaging (MRI) Use of magnetic resonance to create images of the body.
Midsagittal plane Imaginary line that divides the patient’s face into right and left sides.
Temporomandibular (tem-puh-roe-man-DIB-yoo-lur) Joint on each side of the head that allows movement of the mandible.
Extraoral images are taken when large areas of the skull or jaw must be examined, or when patients are unable to open their mouths for image receptor placement. (Extraoral means “outside the mouth.”) Extraoral images are very useful for evaluating large areas but have never been recommended for detection of subtle changes, such as dental caries or early periodontal changes. The reason for this is that extraoral radiographs did not show details as well as intraoral films. This is changing with the introduction of full- featured digital panoramic units and a new technology called cone beam computed tomography (CBCT). Almost all digital extraoral images have better resolution than film-based images.
This chapter focuses on panoramic and cone beam computerized tomography and discusses various other extraoral imaging techniques and their advantages and disadvantages.

Panoramic Imaging
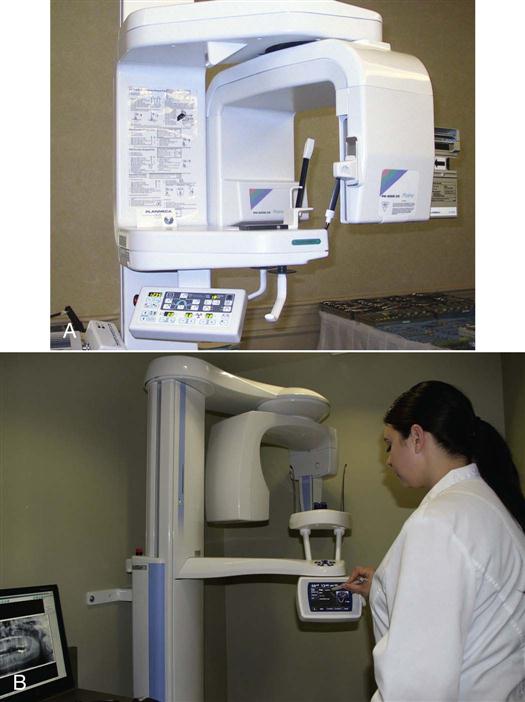
Panoramic imaging allows the dentist to view the entire dentition and related structures on a single image (Fig. 42-1). In the past, panoramic images were used primarily to locate impacted teeth, to detect lesions in the jaw, and to observe eruption patterns. Panoramic images were not recommended for diagnosing dental caries or periodontal disease or lesions because of the overlapping of posterior contact areas. Bitewing images had to be used to supplement the panoramic (Fig. 42-2). This situation has changed with the introduction of new full-featured digital panoramic units with a special C-arm. Panoramic digital images produced with these machines can show small interproximal carious lesions. They can “open up” contacts in the premolar areas that traditional panoramic machines showed as being overlapped (Fig. 42-3 and Table 42-1).
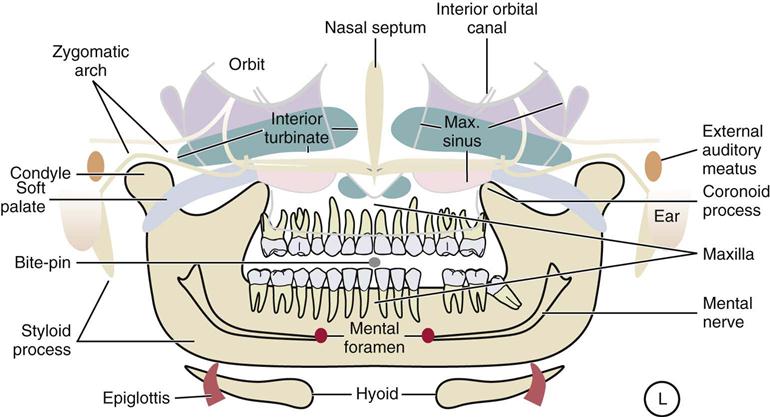
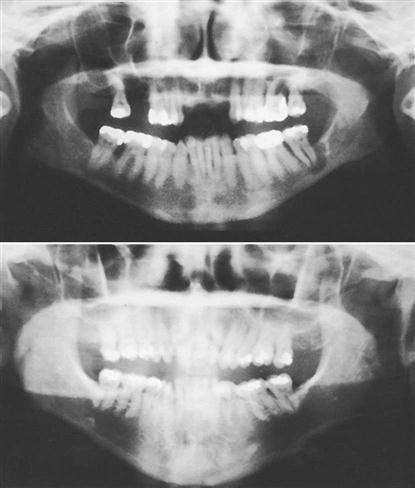
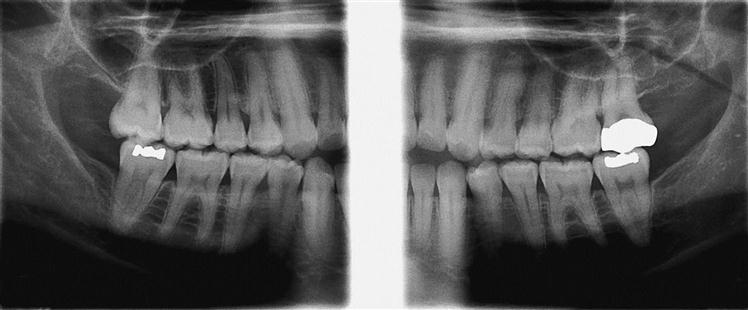
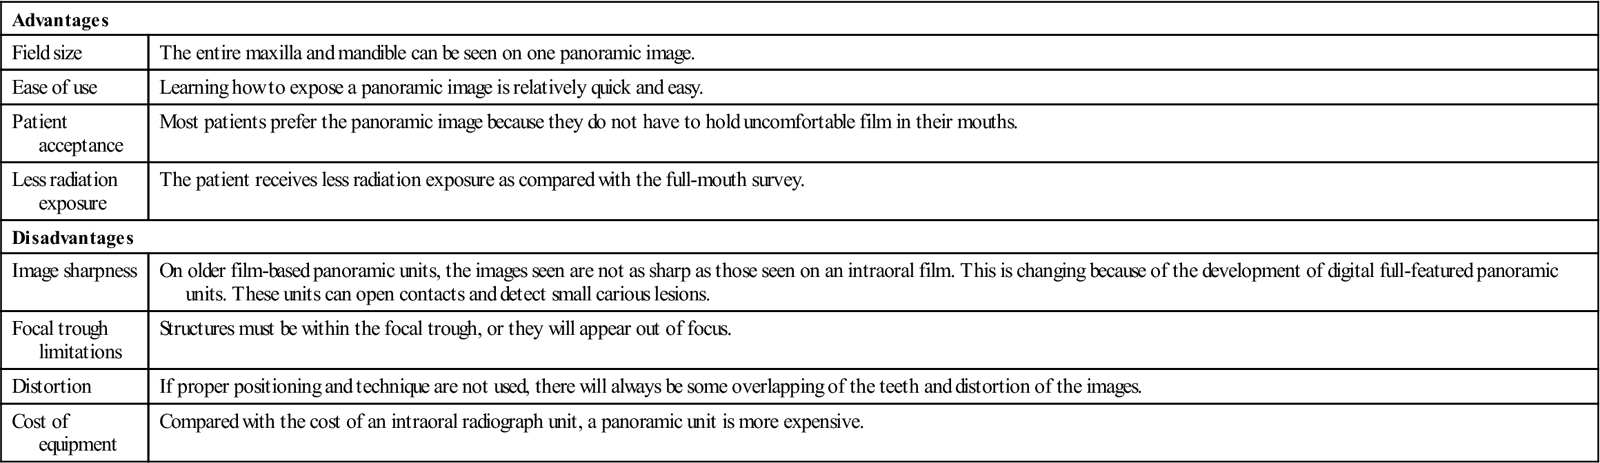
TABLE 42-1
Advantages and Disadvantages of Panoramic Imaging
< ?comst?>
| Advantages | |
| Field size | The entire maxilla and mandible can be seen on one panoramic image. |
| Ease of use | Learning how to expose a panoramic image is relatively quick and easy. |
| Patient acceptance | Most patients prefer the panoramic image because they do not have to hold uncomfortable film in their mouths. |
| Less radiation exposure | The patient receives less radiation exposure as compared with the full-mouth survey. |
| Disadvantages | |
| Image sharpness | On older film-based panoramic units, the images seen are not as sharp as those seen on an intraoral film. This is changing because of the development of digital full-featured panoramic units. These units can open contacts and detect small carious lesions. |
| Focal trough limitations | Structures must be within the focal trough, or they will appear out of focus. |
| Distortion | If proper positioning and technique are not used, there will always be some overlapping of the teeth and distortion of the images. |
| Cost of equipment | Compared with the cost of an intraoral radiograph unit, a panoramic unit is more expensive. |
< ?comen?>< ?comst1?>
< ?comst1?>
< ?comen1?>
Types of Panoramic Units
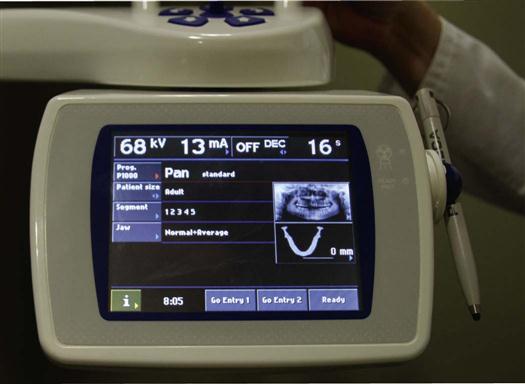
Two types of panoramic machines may be used: film-based imaging and direct digital imaging. The main difference between direct digital panoramic imaging and film-based panoramic imaging is the image receptor. Digital units use a sensor array rather than film, and the image is produced immediately on the computer monitor rather than on film after processing (Fig. 42-4).
Basic Concepts
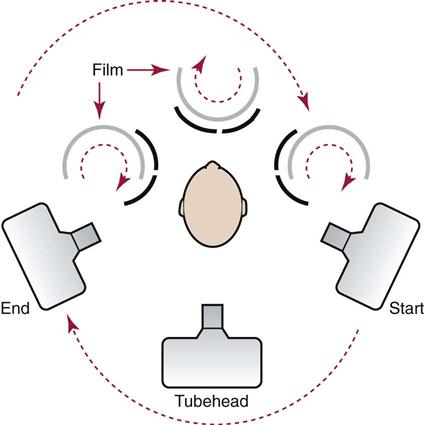
In panoramic imaging, the image receptor and the tubehead rotate around the patient, producing a series of individual images. When these images are combined on a single film, an overall view of the maxilla and mandible is created (Fig. 42-5).
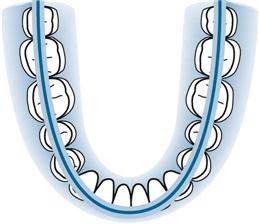
Focal Trough
The focal trough, also known as the image layer, is a three-dimensional horseshoe-shaped zone (Fig. 42-6). When the patient’s jaws are positioned within this zone, the resulting radiograph is reasonably clear and well defined. If the jaws are positioned outside of this zone, images on the radiograph appear blurred or indistinct. Imagine this trough as an area of ideal focus.
The size and shape of the focal trough vary with the manufacturer of the panoramic unit. Panoramic x-ray units are designed to accommodate the average size jaw. The quality of the resulting radiograph depends on how the patient’s jaws are positioned within the trough and how closely the patient’s jaws conform to the focal trough, which is designed for the average jaw.
Each manufacturer provides specific instructions about patient positioning to ensure that the teeth are positioned within the focal trough. When the jaws are outside this area, the resulting images are distorted. Proper positioning errors are important and are discussed later in this chapter.
Equipment
Film-based panoramic radiography requires the use of a panoramic x-ray unit, screen-type film, intensifying screens, and cassettes (see Chapter 39).
A number of different panoramic x-ray units are available. Although each manufacturer’s panoramic unit is slightly different, all machines have similar components. The main components of the panoramic unit include the panoramic x-ray tubehead, the head positioner, and exposure controls (Fig. 42-7).
Tubehead
The panoramic x-ray tubehead is similar to an intraoral tubehead in that it has a filament that produces electrons and a target that produces radiographs. The collimator used in the panoramic x-ray machine is a lead plate with an opening shaped like a narrow vertical slit.
Different from the intraoral tubehead, the vertical angulation of the panoramic tubehead is not adjustable. In addition, the tubehead of the panoramic unit always rotates behind the patient’s head as the film rotates in front of the patient.
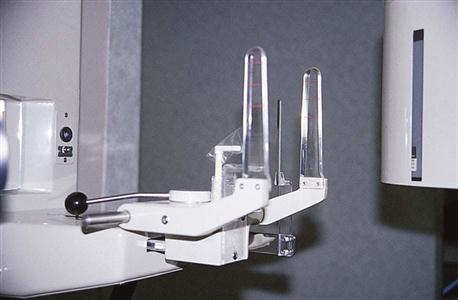
Head Positioner
Each panoramic unit includes a head positioner that is used to align the patient’s teeth as accurately as possible. Each head positioner consists of a chin rest, a notched bite-block, a forehead rest, and lateral head supports or guides (Fig. 42-8). Each panoramic unit is unique, and the operator must follow the manufacturer’s instructions to position the patient correctly in the focal trough.
Exposure Controls
Exposure controls allow the milliamperage and kilovoltage settings to be adjusted to accommodate patients of different sizes. However, the exposure time cannot be changed.
Step-by-step procedures for the exposure of a panoramic image include equipment preparation (Procedure 42-1), patient preparation (Procedure 42-2), and patient positioning (Procedure 42-3).
Stay updated, free dental videos. Join our Telegram channel
VIDEdental - Online dental courses


