Chapter 32 Stage II Surgery: Uncovery and Treatment of Healing Complications
The loss of implants from initial surgery to prosthetic loading has gradually decreased over the last decade and is often less than 5%.1,2 These failures may be explained to the patient as caused by local conditions or intraoral healing responses, and they are usually well accepted by the patient. Failures from stage II uncovery until prosthesis connection have also been identified and range from 2.5% to 5.9%.1–6 These early loading or “late failures” are more of a problem because the restoring dentist has begun the restoration, accompanied by laboratory and chair time costs. The patient often blames the restoring dentist for this complication, relating it to some clinical event such as the final impression or removal of the transitional prosthesis.
NOMENCLATURE FOR IMPLANT FAILURES
Misch and Jividen have published a classification for implant failure, based on the unusual events of an implant history.7 The suggested terminology of failures relative to time includes surgical failure, which may be used to describe the inability to place the implant at the time of surgery (e.g., from fracture of bone, failure to obtain initial rigid fixation)(Table 32-1).
| TYPE OF FAILURE | TIMING |
|---|---|
| Surgical | At surgery |
| Osseous healing failure | Between stages I and II |
| Early loading | Abutment placement to first year |
| Intermediate | First-year loading to 5 years |
| Late | 5 to 10 years |
| Long term | >10 years |
The initial surgery and healing process ideally result in a rigidly fixated implant, absence of crestal bone loss around the implant, adequate zones of nonmobile keratinized tissue (>2 mm), soft tissue thickness less than 4 mm, and an absence of tenderness or discomfort under vertical or lateral forces (Box 32-1). A second-stage implant (uncovery) surgery permits the direct evaluation of these criteria and the corrections necessary to lay the groundwork for long-term success. An opportunity exists at the stage II surgery to correct poor implant placement, inadequate crestal bone healing, soft tissue defects, or poor soft tissue relationships. The final restoration should not be placed in long-term jeopardy at the expense of compromised initial healing conditions.
The goal of a two-stage surgical approach, as presented by Brånemark in 1977, is to have the implant covered with soft tissue for 3 to 6 months while the bone remodels around the implant.8 The primary reasons cited were to reduce the risk of infection and prevent the apical migration of tissue around the implant. In addition, the implant was countersunk below the bone to reduce the risk of loading or movement during initial healing. If the implant became prematurely exposed during the first 6 weeks, the soft tissue would be surgically repositioned to recover the implant once again.
SPONTANEOUS EARLY EXPOSURE
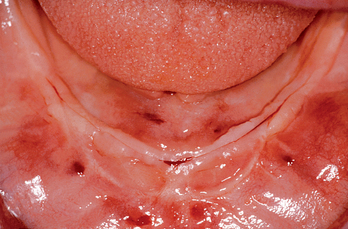
The implant covered with soft tissue may spontaneously become partially or completely exposed prior to stage II uncovery (Figure 32-1). The spontaneous early exposure of submerged implants has been found, on occasion, to be accompanied by early exudate, inflammation, and crestal bone loss. In a 15-year report by Adell et al., 4.6% of 2768 implants presented early perforations.9 These implants had an external hex and were countersunk, level with the bone.
When Rosenquist and Grenthe10 placed implants into extraction sockets, 11% of the implants had early exposures. Tal et al.11–14 observed early exposure in 16.1% of external hex implants and 11% with internal hex implants. Therefore it appears the risks of early exposure occurs approximately 5% to 15% of the time and is dependent on the profile of the implant at surgery and the hard and soft tissue conditions.
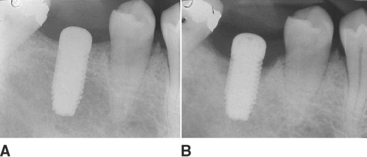
When the implant has an early exposure, the epithelium may become hyperplastic, with cells exhibiting hyperparakeratosis and acanthosis (Figures 32-2, 32-3). The connective tissue may also be infiltrated by chronic inflammatory cells, mainly lymphocytes and plasma cells.13 Toljanic reported 3.9 times more bone loss in premature exposures, with a mean bone loss of 2.71 mm (standard deviation [SD] ±1.78 mm) for prematurely exposed implants versus 0.43 mm (SD ±1.08 mm) for nonexposed implants. It may be argued that the exposure of the implant triggers the “biological width” phenomenon, which would occur regardless after stage II uncovery. In 1996, Ericsson et al. found in a dog study the amount of marginal bone loss initially was similar, but after 6 months of exposure, both the one-stage and two-stage implant bone levels were similar (Figures 32-4, 32-5).16
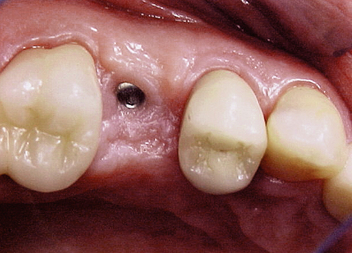
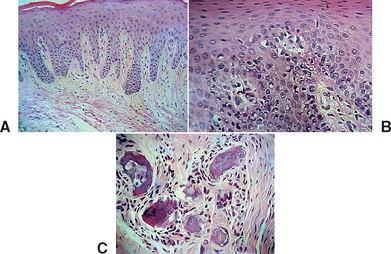
Figure 32-3 Histologic evaluation of the patient in Figure 32-2 (A) revealed connective tissue with infiltrated chronic inflammatory cells (B,C).
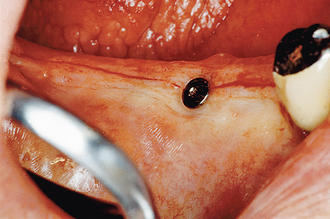
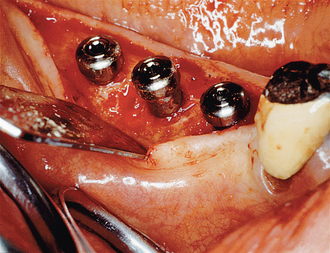
Tal et al. evaluated 115 early exposures of submerged endosteal implants.14 Of this group, 11% had significant bone loss, with 2 implants >4 mm; 2 implants, 3 to 4 mm; and 10 implants, 2 mm of bone loss. Although most often premature exposure was not a complication, on occasion the condition may lead to significant bone loss. Barboza et al. compared crestal bone loss for one-stage surgery versus a two-stage surgery in 10 patients with 56 implants.17 She found more crestal bone loss around exposed implants and also found a higher incidence of Prevotella intermedia, Streptococcus beta hemolysin, and Fusobacterium sp. The exposure of the implant cover screw seems to create a potential focus for bacterial plaque which may contribute to crestal bone loss (Figures 32-6, 32-7). Therefore it is indicated to monitor patients from stage I surgery to stage II surgery every 4 to 8 weeks to access and treat appropriately premature exposure of implants.
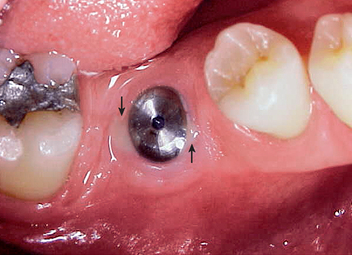
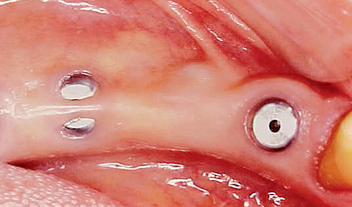
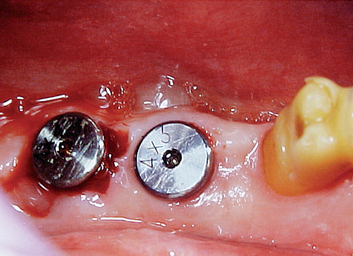
It has been observed by several authors that the risk of exudate or inflammation is increased when the implant is only partially exposed (Figure 32-8).11–16 The contaminated crevice of the cover screw is more likely to be in a septic environment under these conditions. Therefore whenever the implant cover screw is partially exposed, the first action is to completely expose the implant (Figure 32-9). The cover screw is then removed and the implant body irrigated with chlorhexidine 0.12%. A permucosal extension (PME) is then inserted into the implant. After the implant is completely exposed in the oral environment, a daily oral hygiene regimen is in order. This consists of twice-daily plaque removal with a soft toothbrush and the direct application of chlorhexidine 0.12%. If the patient is wearing an overlaying removable prosthesis, it should be modified so that no direct force is applied to the implant until after the bone interface is ready for occlusal loading.

It should be mentioned that after the implant is uncovered and used for prosthetic support, the phenomena described occur and bone loss becomes evident. Although submerged implants exhibit less marginal bone loss after initial healing, the overall marginal bone loss of two-stage and one-stage implants may be similar by the time the prosthesis is delivered to the patient.17
In addition to marginal bone loss from the microgap and the biological width, additional bone loss may occur from bacterial plaque. Rams and Link noted the bacterial environment becomes at greater risk of an anaerobic component when the probing depth is greater than 5 mm.18 The anaerobic condition may be established around a prematurely exposed implant in two ways: A partial exposure of the implant has a greater risk of an anaerobic environment, and the cover screw is not tightened to 10 to 30 N-cm and may be loose, making the implant internal structure more likely anaerobic. Either of these conditions increases the risk of exudate or inflammation with greater marginal bone loss. It should be noted this cause of marginal bone loss could be corrected by uncovering the implant completely and flushing the region with chlorhexidine 0.12%. However, the bone loss that occurred before this event would not be corrected at this point.
UNCOVERY PROCEDURE
When more than three implants are uncovered, the patient is prepared for surgery in a manner similar to the original stage I procedure. In general, discomfort, swelling, and risk of infection occur to a lesser degree than at the original surgery. However, if corrective procedures are indicated during surgery, they should not be compromised by poor patient preparation. This chapter primarily addresses uncovery of multiple implants out of the primary esthetic zones. Maxillary anterior implants in patients with high lip lines are treated similar to anterior single tooth replacements, which are discussed in Chapter 33.
Soft Tissue Incision
The initial incision for stage II surgery is as important as in the first stage. When a one-stage surgical approach is used, attention to the soft tissue is similar to the following procedure. The incision is designed to place keratinized tissue on each side of the permucosal abutment. Therefore the full-thickness incision bisects the attached tissue on the crest of the ridge (Figure 32-10). The attached tissue and incision are usually more lingual than the actual implant site. As a result, a tissue punch is rarely used, because it usually eliminates the facial attached tissue around the implant site. The incision continues at least 5 to 10 mm distal to the last implant placed. A full-thickness envelope flap design permits reflection of the periosteum for direct implant-bone interface observation. A tissue punch may be used to uncover the implant when there is 1.5 mm or more of attached keratinized tissue facial to the implant site. This occurs more often in the posterior maxilla or when an implant was immediately inserted after the tooth was extracted.
The periosteal elevators should not be levered against the endosteal implant body or first-stage cover screw during this procedure. Instead, the lingual or palatal bone is used for leverage, and the facial tissues are gently pulled off the healed implant sites. Adequate reflection of the soft tissue completely exposes the crestal bone around the implant site and allows repositioning of the attached tissue at the conclusion of the procedure (Figure 32-11). If the healing cover screw became exposed during the healing phase, the primary crestal incision is made along the lingual aspect of the healing cover, and a sulcular incision is placed around the rest of the implant. A mucoperiosteal flap is then reflected in a fashion similar to that previously described. A lack of attached tissue is common on the facial aspect of the implant when it becomes exposed during initial healing and may require a tissue graft or acellular tissue graft on the facial to restore attached or immobile tissue.

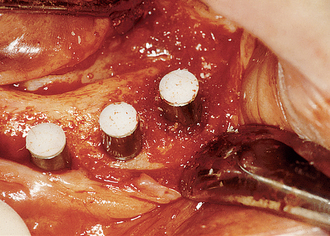
Bone-to-Implant Interface Evaluation
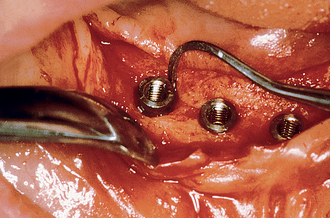
After the soft tissues are reflected, the first-stage cover screws are identified and the surrounding area is closely evaluated. Many implant abutments are wider than the first-stage cover screw and may require as much as 1 mm of horizontal space around the implant platform on the crest module (Figure 32-12). Any bone growth on the cover screws or over the surrounding region is removed with surgical curettes or low-speed rotary uncovery burs designed to remove excess bone, accompanied by cooled sterile saline irrigation (Figure 32-13).

Bony Defects
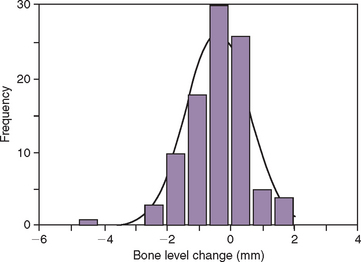
On occasion, a vertical or horizontal defect may be revealed around the uncovered implant. The causes for this defect are often similar to those of premature implant exposure and include crestal bone trauma during surgery, excess torque from implant insertion (especially with wider crest modules), bone flexure or torsion in the posterior mandible, local patient habits that load the implants during healing, incision line opening, postoperative infection, implant surface contamination, idiopathic bone loss, or healing factors related to systemic disease. In a study by Kline et al., the average crestal bone loss was 0.2 mm at stage II uncovery, but the range was −5 mm to +2 mm (Figure 32-14) (Box 32-2).2
Vertical Defects
If a vertical defect filled with soft tissue is identified anywhere around the implant, a curette is used to eliminate it (Figure 32-15). When soft tissue is removed from around a tooth, the root is scraped because the tissue attaches to the cementum. The fibrous tissue in a vertical defect around an implant is not attached to the implant. Therefore the bone is scraped, not the implant. This loosely bound and unorganized tissue is relatively easy to remove at this time. The implant surface should not be scratched or contaminated during this procedure. The extent of bone loss is assessed and should be less than 3 mm if the implant is to be uncovered at this appointment (Table 32-2).
| DEFECT | MANAGEMENT | OPTIONS |
|---|---|---|
| Vertical <3 mm | Osteoplasty | Convert into horizontal defect by leveling off bone |
| Vertical >3 mm | Less than half of implant height | Graft with autogenous bone wedge or membrane if deep defect |
| More than half of implant height | Remove implant | |
| Horizontal | Less than half of implant height | Position soft tissue apically; graft autogenous bone |
| More than half of implant height | Remove implant |
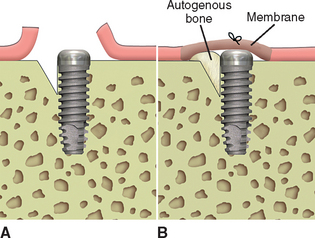
When bone loss exposes the threads of the implant body, the ability to reform bone in the defect when the implant is uncovered and loaded is reduced. When the implant has not been exposed before the uncovery procedure, the implant body is usually not contaminated by microorganisms because it has been under soft tissue. The full-thickness reflection of the region has exposed areas of vital bone not involved in the implant support. This bone may be harvested and packed into the vertical defect (after the soft tissue in the defect has been thoroughly removed). The defect and surrounding area are overpacked. When the implant defect is larger than 3 mm, the most predictable method to correct the condition is with a particulate autologous bone graft covered by a resorbable membrane (i.e., Alloderm, Biomend), and the soft tissue is reapproximated over the membrane, bone graft, and implant for an additional 8 to 12 weeks of healing (Figures 32-16, 32-17). A vertical defect greater than 3 mm is usually grafted, unless it represents half or more of the total implant height, in which case the implant should be removed (see Table 32-2).
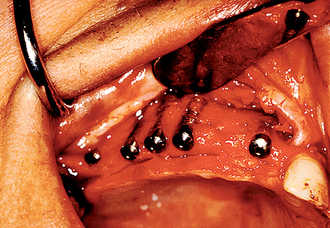
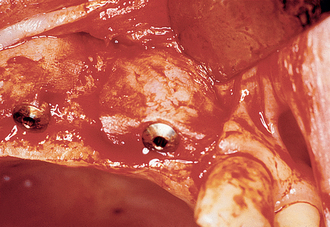
Figure 32-17 At the uncovery 8 to 12 weeks later, bone is now present over the threads of the implants.
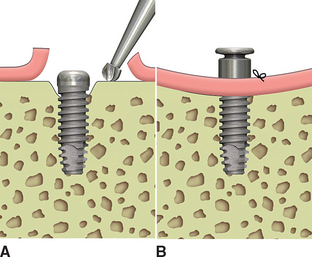
When the vertical bone defect around an implant is less than 3 mm, the implant may be uncovered and used in the current condition for the prosthetic abutment. After the soft tissue is removed from a defect, the surrounding bone is again evaluated. In the case of a vertical bone defect of less than 3 mm, there are three surgical options. An osteoplasty may eliminate the vertical defect when the reduced bone-implant interface does not compromise the prosthetic support or esthetics. The PME is placed at the same appointment (Figure 32-18). A second method to correct a vertical defect less than 3 mm is to curette the defect and overfill the region with an autograft (Figure 32-19). The PME may be added at the same appointment and the tissue approximated around the site (Figure 32-20). When there is a desire to have thicker soft tissue around the site, a barrier membrane (e.g., Alloderm) may be used over the implant site and covered with soft tissue.
Stay updated, free dental videos. Join our Telegram channel
VIDEdental - Online dental courses


