Chapter 3
Retention of Cores
Aim
The aim of this chapter is to familiarise the reader with the need to place reliable, retentive cores.
Outcome
On reading this chapter the reader should understand the importance of cores for vital and non-vital teeth.
Introduction
The most commonly placed indirect restoration is a full coverage crown. The reason for the placement of such a restoration is usually a badly broken down, worn or heavily restored tooth. In these situations the cavity is often unretentive and the remaining tooth tissue weak and thin. During crown preparation the remaining tooth tissue is further reduced. The retention of the core therefore underpins the ultimate success of the indirect restoration. How this retention is achieved will depend on the vitality of the tooth and the type of core material, which in turn will be dictated by the type of crown and the particular circumstances.
Vital Teeth
The ideal root canal filling is a vital healthy pulp, which should be preserved wherever possible. Retention for a core can be achieved using dentine adhesives, slots and grooves and with increasing infrequency dentine pins. In extreme situations, elective endodontic treatment may be needed to utilise the pulp chamber or root canal space for a crown.
Dentine Adhesives
Dentine bonding agents have improved dramatically over the last two decades and are now reliable for bonding composite and ceramics to tooth tissues. There is no evidence that an amalgam core will perform better than one of composite. One of the advantages of composite over amalgam for a core is that the material reliably bonds to the tooth, it can be prepared immediately and conserves tooth tissue as undercuts are not required for retention.
Composite Cores
There is no alternative to composite on anterior teeth, whereas posteriorly the choice between composite and amalgam is more balanced. Whatever material is chosen, there should be sufficient tooth tissue remaining to retain the core. Although bond strengths between dentine adhesives and dentine approach that of enamel, caution is needed if the bond is the major component of retention for a core. If insufficient tooth tissue remains, either crown lengthening can be used to surgically lengthen the tooth, or in extreme situations elective root treatment may be required. Occasionally, in patients with canine guidance, where on lateral excursions the molar/premolars have limited, if any, contact, direct bonding of a crown to a flattened tooth surface is possible (Fig 3-1). More commonly direct composites can be placed with the aid of an adhesive to form a core (Fig 3-2).
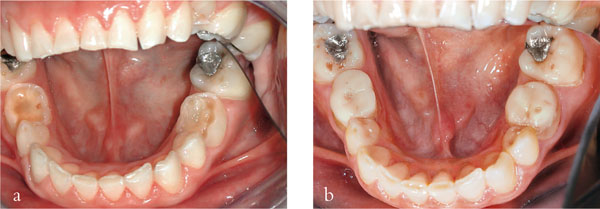
Fig 3-1 (a,b) Composite cores placed on retained deciduous molars in preparation for metal-ceramic crowns.

Fig 3-2 Composite cores placed on upper premolar teeth and prepared for a metal-ceramic crown and bridge retainer.
Some manufacturers have produced bespoke fibre reinforced core materials. These materials are high strength materials which have a consistency similar to natural teeth when prepared. In addition, they come together with plastic core formers made to the ideal taper and shape of a preparation. These materials are dual cured and packaged with the appropriate dentine bonding agent.
Glass-ionomer Cores
There are few indications for using glass-ionomers for cores in anterior or posterior teeth. One limited example is small additions to existing cores which have fractures involving only part of a cusp. The bond strength between a glassionomer cement and tooth or existing restoration is weaker than that of bonded composite, and the potential for loss of the addition increases as the amount of the material increases. Extensive additions may result in the loss of the glassionomer cement during a later stage in the provision of the crown. Sometimes it is worthwhile including the fractured portion in the preparation or completely removing the intracoronal part of the restoration. This is especially useful in teeth with short clinical crowns (Fig 3-3a,b).
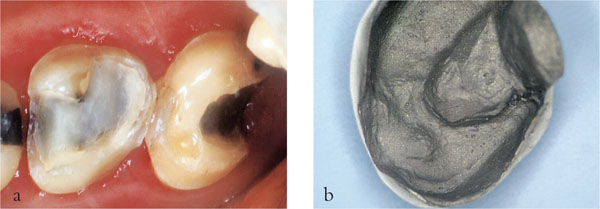
Fig 3-3 (a,b) These molar teeth have short clinical crowns and are to receive gold crowns/onlays as part of a complex treatment plan. Additional retention can be gained by removing the conventional restorations, blocking out undercuts with composite and utilising the intracoronal element in the preparation (a). The fit surface of the casting for the second molar tooth can be seen (b).
Amalgam Cores
Amalgam remains a useful material for cores, but has the disadvantage that it does not bond to tooth tissue (Fig 3-4). To overcome this, a number of materials have been used to bond amalgam to tooth tissue including 4-META resins and BIS-GMA adhesive cements. Ideally, the adhesive resin cement should be chemically or dual cured. The resin is thinly coated onto the cavity walls and the amalgam is packed directly onto it before it sets. Laboratory studies indicate that the retention provided by bonded amalgams is equal to or greater than undercuts grooves, dovetails or pins. Other laboratory and clinical studies suggest that bonded amalgams reduce leakage and postoperative sensitivity. On balance, bonded amalgams should be considered in preference to the placement of pins.
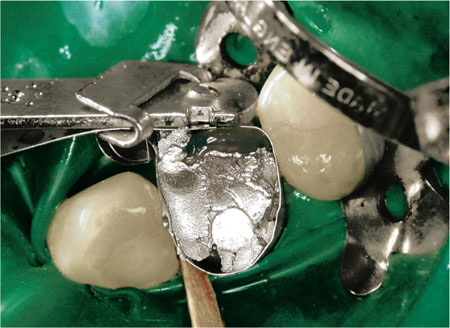
Fig 3-4 Amalgam core being packed. Minimum tooth tissue will remain after crown preparation, necessitating bonding of the amalgam.
Slots and Grooves
Undercuts, slots and grooves can be cut into the remaining dentine and may be found to enhance retention and resistance form to a greater extent than dentine pins. They have the advantage over dentine pins that there is no potential for inadvertent placement of a pin into the pulp or periodontal ligament or loosening or exposure of the pin during carving. On balance they should be used in preference to pins wherever possible. In Fig 3-5, the slots cut labially and proximally increase the surface area over the preparation, help resist unseating occlusal forces and reduce the taper between opposing walls of the preparation.
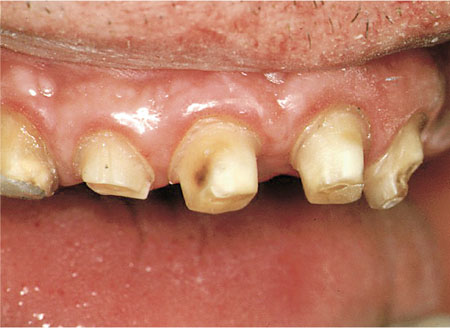
Fig 3-5 The short clinical crown of the upper right lateral incisor has led to an unretentive crown preparation. Buccal and proximal slots have been cut to improve retention.
Dentine Pins
Pin Types
Self-tapping pins have a diameter larger than the drill and are more commonly used (Fig 3-6). However, the advent of reliable resin adhesive luting cements has led to their demise. Historically, cemented pin systems involved a drill slightly larger than the diameter of the pin which was cemented into the prepared pin hole, and friction retained pins were driven into pin channels of slightly smaller diameter than the pin. Passively fitting pins were also used in indirect castings when conventional retention was poor (Fig 3-7).
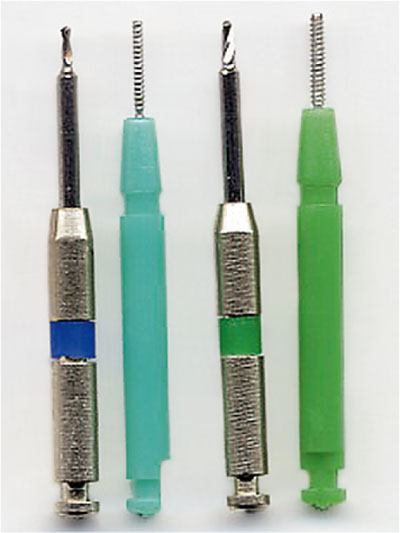
Fig 3-6 Two sizes of a self-tapping pin system (Stabilok, Fairfax Dental, UK), showing pin drill and corresponding self-shearing pin.
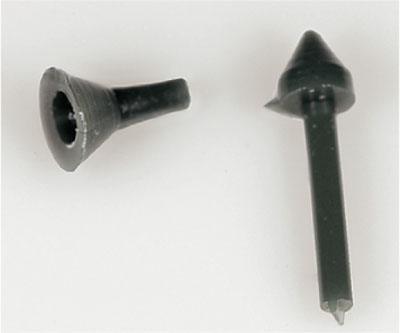
Fig 3-7 Plastic burn out pins that can be incorporated into the wax pattern of crowns or onlays during construction.
Pins are usually placed in the region of a missing cusp, 1.0–1.5 mm in from the external surface to avoid furcation areas. This location usually corresponds to the safest place for pin placement and allows adequate bulk of restorative material to be packed around the pin. Once the position has been chosen, the dentine forming the floor of the cavity should be flattened. In addition, a small round bur can be used to create a dimple in the dentine at the insertion site to reduce the risk of the pin drill being displaced from skating around on the dentine (Fig 3-8a–e). The twist drill should be aligned with the root surface prior to preparation to determine the correct angulation of the drill. Maintaining the same angulation, the drill is moved to the dimple and the pin hole prepared with single vertical plunge (a definite in-out movement). The pin drill should be inserted to its full extent of the shoulder and a speed reducing handpiece used to reduce the amount of heat generated. The pin is then inserted and once at its full depth it automatically shears. The pin can be bent towards the middle of the tooth to stay within the contour of the core.
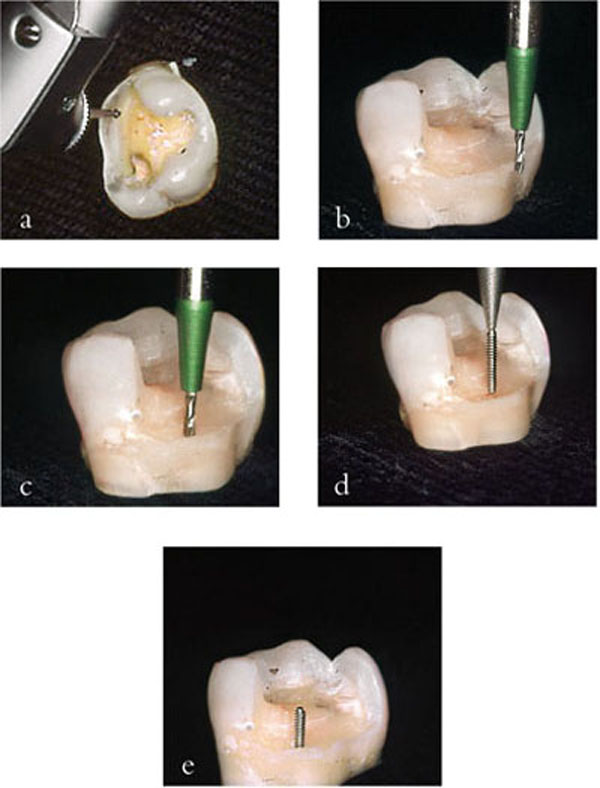
Fig 3-8 (a–e) Technique for placement of a self-threading, self-shearing pin. A dimple is cut onto a flat surface of dentine away from any furcation areas (a), the pin drill is aligned with the outer surface of the tooth (b), without altering the angulation it is brought to the dimple (c) and the pin hole is cut. The pin is then “threaded” into this hole (d) and automatically shears when it reaches the base (e) (Courtesy of Professor A Grieve).
To achieve success the following should be followed as a guide:
-
Depth of the pin in dentine should be 2–2.5 mm.
-
Depth of pin in restorative material should be 2–2.5 mm.
-
At least 1 mm of core material should surround the pin.
-
Pin placement should be at least 0.5 mm inside the enamel-dentine junction.
The first two points ensures optimum retention within the dentine and the restorative material. Pins only serve to retain the core and do not add strength or support the restorative material. In fact the converse is true, pins act as a line of weakness within the restorative material, which is particularly pronounced in amalgam. Consequently, an adequate amount of material should surround the pin. This is a dilemma when pins are used to retain cores for metal-ceramic crowns. Consider the situation in Fig 3-9 where a clear core form has been placed to allow a buccal shoulder preparation. Little or no core material is likely to surround the pin. The only solution is to place the pin further pulpally, increasing the risk of perforation into the pulp. In this situation an alternative to pins should be considered.
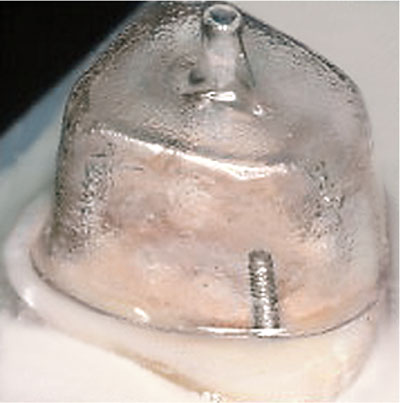
Fig 3-9 Pin placement in a position to avoid pulp perforation leaves inadequate space for core placement, as seen through a clear core former.
There are a number of disadvantages associated with dentine pins:
-
They induce stresses within the dentine.
-
They cause dentinal crazing.
-
Self-shearing pins may fail to penetrate to the full depth of the pin hole.
-
The fracture resistance of core materials is reduced, particularly with amalgam, as the number of pins increases.
-
Perforation into the periodontium and pulp (if vital) can occur.
Because the diameter of the pin thread is wider than the diameter of the hole cut, distortion of the dentine is inevitable and this leads to crazing of the dentine (Fig 3-10). If pins are placed too close to the enamel-dentine junction, this distortion can lead to enamel fracture and if the pins are placed too close together communication of the lateral crazing can lead to failure. On insertion, the frictional forces increase as more of the pin engages the dentine and frequently the pins shear off before penetrating the full depth of the pin hole (Fig 3-11). When this occurs, a gap of between 0.5 mm and 0.75 mm remains at the bottom of the pin hole. Whilst this seems small it represents a 25% to 33% discrepancy for a 2 mm to 2.5 mm pin. This leads to decreased retention and a pin that is too long within the cavity which typically interferes with the occlusion and strength of the core material.
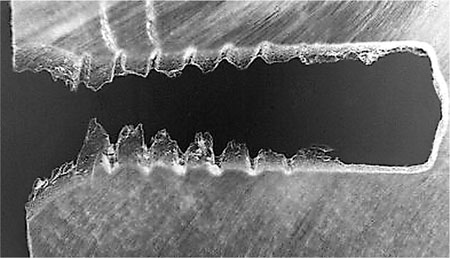
Fig 3-10 This micrograph shows cracks forming in dentine in relation to the threads of the pin (Courtesy of Professor A Grieve).
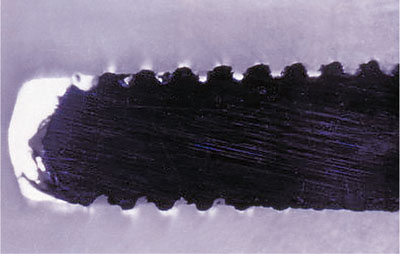
Fig 3-11 This pin has sheared off before reaching the full depth of/>
Stay updated, free dental videos. Join our Telegram channel
VIDEdental - Online dental courses


