Chapter 3
Introduction to Microsurgery and Training
INTRODUCTION
In 1960, J.H. Jacobson and E.L. Suarez first introduced microsurgical technique when they anastomosed small vessels under an operative microscope. In 1963, Chen Zong-Wei, the authoritative figure in microsurgery in China, reported the world’s first successful replantation of an amputated forearm (Chen et al 1963a & b). Thereafter, with the development and refinement of microsurgical technique and its clinical application, much progress has been made in reconstructive surgery throughout the world.
TRAINING IN MICROSURGERY
Generally speaking, microsurgery techniques are comparatively difficult to learn. Learning microsurgical skills requires practice that involves a period of hardship and endurance. Before the clinical application in patients, it is paramount that one train in the laboratory and on animal models to gain familiarity with techniques.
Since viewing objects under the microscope or surgical loupes is different from viewing objects with the naked eye, a surgeon’s hand-eye coordination must be precisely adjusted according to various degrees of magnification. The hands must be trained for delicate manipulation. This is one of the challenges in microsurgery. The higher the magnification is, the more accurate the maneuvering that is required.
BASIC MICRO INSTRUMENTATION
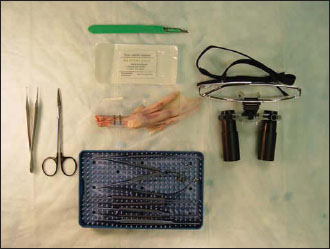
Few items are required for the training in microsurgery (Fig. 3.1).
Microsurgery basic set
The five pieces are:
- One curved, 14-m-long microneedle holder
- Two straight, 15-cm-long micro–strong forceps, with a 0.3-mm tip and round handle with platform
- One straight, 15-cm-long forceps, with a 0.2-mm tip and round handle with platform
- One straight, 14-cm-long scissors
Other surgical instruments and materials
These include:
- Straight, 12.5-cm-long Adson forceps (Microsurgery Instruments, Bellaire, TX, USA), with 1 × 2 teeth
- Curved, 12.5-cm-long Iris scissors (Microsurgery Instruments)
- Suture card with 16 lines for suture practice
- Vascular double clamps
- Irrigating needle and spring
Figure 3.1. Basic setup for microsurgical training.
Microneedle holder
The needle holder is used to grasp the needle, pull it through the tissues, and tie knots. The needle should be held between its middle and lower thirds at its distal tip. If the needle is held too close to the top, the anastomosis between the two ends of the vessel cannot be completed with a single stitch. If it is held too close to the bottom, maintaining steady control is difficult, and the direction of the tip can be changed easily. The needle can be bent or broken if too much force is used.
The needle holder is mainly manipulated by the thumb, index, and middle fingers, similar to how a pencil is held between the fingers. With this pencil-holding posture, the hand is maintained in a functional or neutral position.
The appropriate needle-holder length depends on the nature of the operation. The most commonly used are 14 cm and 18 cm. The tips can be straight or gently curved, but the latter are most often used. The choice of the tip is determined by the nature of the suture. Usually a delicate tip (0.3 mm) is used for 8-0 and 10-0 sutures. The needle holder with a 1-mm tip is used for 5-0 and 6-0 sutures.
Dentists commonly use a locking-type needle holder. A locking needle holder is useful because one can hold the needle securely, which is most important during needle insertion. To minimize jogging, the lock should be closed slowly but released promptly. Dedicated practice is necessary to develop skillful manipulation of the needle holder.
A needle holder should ensure that a needle is held steadily without slipping. It should be light and require the minimal force from the hand. It should be a length to suit the size of the hand and be manipulated easily. A titanium needle holder is the best choice.
Microforceps
These are important instruments in microsurgery, especially for delicate manipulation and detailed movement. They are used to handle minute tissues without damaging them and to hold fine sutures while tying knots. Microforceps can make those maneuvers that cannot be performed by hand. For example, the forceps can be inserted into the lumen of a cut vessel end to open the vascular lumen for needle insertion. The forceps used for vessel anastomosis are very fine and called dilators.
A standard pair of forceps should be able to pick up a 10–0 nylon suture on a glass board without slipping. The tips of the forceps should be smooth and strong. The forceps should not damage the tissue, and no break to the suture should occur during suturing.
Microdissection
Microforceps are used for dissection, especially for blood vessels and nerves. A common mistake occurs when the tips of the forceps adhere to the vessel wall, and the vessel breaks, which leads to massive bleeding. Therefore, when using the forceps for dissection, the artery and the vein should not be touched with the tips, which should be kept closed. The sides of the tips are used for dissection of tissues and blood vessels, similar to how fingers are used during blunt dissection in general surgery.
To prevent unnecessary bleeding, it is important to remember to use the sides of the tips for dissection so that the tips do not face and break the vessels. Delicate dissection can be performed after one is familiar with the use of microforceps. Even 0.3- to 0.5-mm blood vessels or nerves can be handled after repeated practice.
There are different types of microforceps for different operations. The most commo/>
Stay updated, free dental videos. Join our Telegram channel
VIDEdental - Online dental courses


