Chapter 39 Local Anesthesia
Procedure 39-1 LOADING THE METALLIC OR PLASTIC CARTRIDGE-TYPE SYRINGE
| EQUIPMENT | |
| Personal protective equipment | |
| Syringe | |
| Needle | |
| Gauze | |
| Anesthetic cartridge | |
| Topical anesthetic | |
| Cotton-tip applicator | |
| Hemostat or cotton pliers | |
| STEPS | RATIONALES |
| 1. Assemble armamentarium (Figure 39-1). | |
| 2. Remove the sterilized syringe from its container and inspect to ensure the harpoon is sharp and straight. | Ensures armamentarium is free of defects and in working order. |
| 3. Retract the piston (Figure 39-2). | Allows room for the cartridge to fit into the syringe. |
| 4. Insert the cartridge (Figure 39-3). | Cartridge fits into the syringe without being damaged. |
| 5. Engage the harpoon in plunger with gentle finger pressure (Figure 39-4) | Secures the cartridge in the barrel of the syringe. |
| 6. Do not exert forced on plunger; the glass may crack (Figure 39-5). | Too much force on the syringe may cause the cartridge glass to crack. |
| 7. Remove the clear or white plastic protective shield that covers the syringe and cartridge end of the needle (Figure 39-6). | This removal of the plastic cap allows for the needle to be screwed onto the rubber diaphragm of the anesthetic cartridge. |
| 8. Screw the colored plastic-hubbed needle onto the syringe while simultaneously pushing it into the metal needle adapter of the syringe (arrow) (Figure 39-7). | The plastic hub of the needle maintains the sterility of the needle and protects the clinician from a needle stick. Piercing the rubber diaphragm of the anesthetic cartridge ensures that anesthetic solution can be expelled from the cartridge. |
| 9. Directing the needle away from the body, keep the hand at the needle hub and loosen the colored plastic protective cap from the needle (Figure 39-8). | Facilitates removal of the colored plastic protective cap from the needle. |
| 10. Let the cap slide off the needle and onto a piece of sterile gauze (Figure 39-9). | Checks for needle sharpness to ensure an atraumatic insertion and withdrawal. |
| 11. Expel a few drops of solution to test for proper flow, and recap the needle using the scoop technique (Figure 39-10). | Ensures that the syringe, needle, and cartridge are properly prepared and functional. |
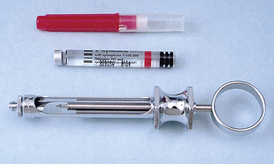
Figure 39-1 Armamentarium. From top: needle, cartridge, syringe.
(From Malamed SF: Handbook of local anesthesia, ed 5, St Louis, 2004, Mosby.)
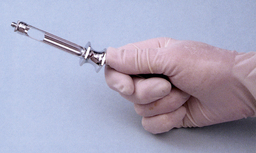
Figure 39-2 Retract the piston.
(From Malamed SF: Handbook of local anesthesia, ed 5, St Louis, 2004, Mosby.)
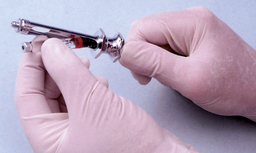
Figure 39-3 Insert the cartridge.
(From Malamed SF: Handbook of local anesthesia, ed 5, St Louis, 2004, Mosby.)
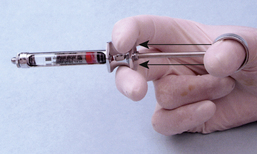
Figure 39-4 Engage the harpoon in the plunger with gentle finger pressure.
(From Malamed SF: Handbook of local anesthesia, ed 5, St Louis, 2004, Mosby.)
Figure 39-5 Do not exert force on the plunger.
(From Malamed SF: Handbook of local anesthesia, ed 5, St Louis, 2004, Mosby.)
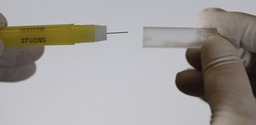
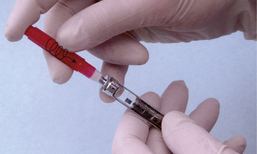
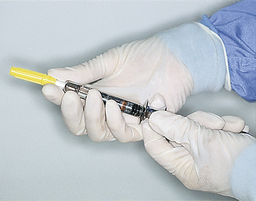
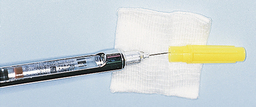

Figure 39-10 “Scoop” technique for recapping needle after use.
(From Malamed SF: Handbook of local anesthesia, ed 5, St Louis, 2004, Mosby.)
Procedure 39-2 UNLOADING THE BREECH-LOADING METALLIC OR PLASTIC CARTRIDGE-TYPE SYRINGE
| EQUIPMENT | |
| See Procedure 39-1. | |
| STEPS | RATIONALES |
| 1. Retract the piston and pull the cartridge away from the needle with your thumb and forefinger as you retract the piston, until the harpoon disengages from the plunger (Figure 39-11). | Allows room for the cartridge to be disengaged from the syringe. |
| 2. Remove the cartridge from the syringe by inverting the syringe, permitting the cartridge to fall free (Figure 39-12). | Frees the cartridge from the barrel of the syringe. |
| 3. Carefully unscrew the recapped needle, being careful not to accidentally discard the metal needle adaptor (Figure 39-13). | Frees the needle from the syringe. Recapped needle protects the dental hygienist from needle stick exposure during needle removal and disposal. |
| 4. Place the needle in a sharps container (Figure 39-14) and the cartridge in a separate sealed container (Figure 39-15). | Used needles and cartridges are considered infectious. Sharps must be discarded in a rigid, puncture-proof, leak-resistant container. |
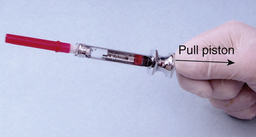
Figure 39-11 Retract the piston.
(From Malamed SF: Handbook of local anesthesia, ed 5, St Louis, 2004, Mosby.)
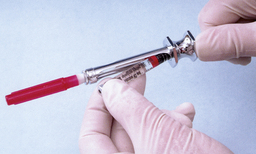
Figure 39-12 Remove the used cartridge.
(From Malamed SF: Handbook of local anesthesia, ed 5, St Louis, 2004, Mosby.)
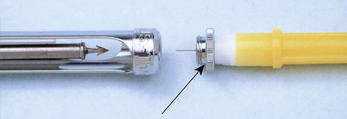
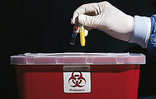
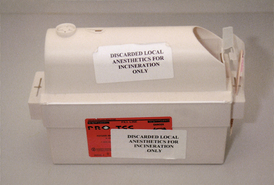
Figure 39-15 Separate sealed container.
(From Malamed SF: Handbook of local anesthesia, ed 5, St Louis, 2004, Mosby.)
Procedure 39-3 BASIC TECHNIQUES FOR A SUCCESSFUL INJECTION
| EQUIPMENT | |
| See Procedure 39-1. | |
| STEPS | RATIONALES |
| 1. Assess health history. Take vital signs (include blood pressure, heart rate (pulse) and respiratory rate at a minimum). | Assists the dental hygienist in determining if the client is physiologically and psychologically able to tolerate the proposed treatment and local anesthetic administration and in modifying approach to care, if necessary, to decrease risks and prevent subsequent medical emergencies. Taking vital signs and following guidelines for dental hygiene care management minimize medical complications. |
| 2. Confirm care plan. | Verifies with the client the dental hygiene care indicated. |
| 3. Check armamentarium. | Ensures that all materials are properly assembled, prepared, and functional so the procedure is efficient. |
| 4. Load the syringe and determine the syringe window and needle bevel orientation. The window of the cartridge should face the clinician, and the bevel of the needle should face the bone. | The large window of the syringe should face the operator so that she or he is able to see the amount of anesthetic being administered and detect a positive aspiration. The bevel of the needle should face the bone; therefore if the needle contacts bone, the bevel deflects over the periosteum, minimizing discomfort and trauma. If the bevel faces away from the bone, the point of the needle may tear the sensitive tissues, causing discomfort both during and after the injection. |
| 5. Check that the needle is sharp with no fishhook-type barbs on the tip by placing the needle against a sterile 2 × 2 gauze square. If the gauze is snagged, indicating a barb is present, discard the needle. | A sharp needle free of barbs does not snag gauze and provides an atraumatic insertion and withdrawal. |
| 6. Expel a few drops of the anesthetic solution to determine if a free flow of solution exists. | Ensures the syringe, needle, and cartridge are properly prepared and functional so the procedure is efficient. |
| 7. Position the client in a supine position (head and heart parallel to the floor) with the feet elevated slightly (Figure 39-16). | Placing the client in a supine position provides better accessibility and visibility for the clinician and reduces the likelihood of syncope for the client. Position may vary with client’s health status or clinician’s preference. |
| 8. Communicate with the client to place positive ideas in the client’s mind about the injection. Tell the client about the reasons for topical anesthetic (e.g., “I am applying a topical anesthetic to the tissue so that the remainder of the procedure will be much more comfortable.” Do not use words with a negative connotation, such as injection, shot, pain, or hurt. Instead, use less-threatening terms such as administer the local anesthetic. | Keeping the client informed about the procedure helps the client anticipate the operator’s actions. A calm approach minimizes client anxiety. |
| 9. Visualize or palpate to locate the penetration site. | Accurate injection of anesthetic requires insertion in correct site. |
| 10. Dry the needle penetration site with gauze (Figure 39-17). | Removes saliva and debris from the penetration site, reducing the risk of infection. |
| 11. Apply topical anesthetic to needle penetration site for 1 to 2 minutes (Figure 39-18). | Application of topical anesthetic results in a more comfortable penetration. |
| 12. In the case of palatal injections, when placing topical anesthetic on the injection site, apply considerable pressure with the cotton swab for a minimum of 1 minute before the injection. Move the swab immediately adjacent to the penetration site, and maintain pressure at this site during the injection (Figures 39-19 and 39-20). | Injections into the dense, tightly attached palatal tissue can be extremely painful to the client. Pressure anesthesia provides for a more comfortable procedure by producing ischemia and blocking pain impulses arising from the needle penetration. |
| 13. After the topical anesthetic swab is removed from the tissue, dry the penetration site. | Removes the saliva and excess topical anesthetic from the injection site. |
| 14. Pick up the prepared local anesthetic syringe and establish a firm hand rest. Never place the arm holding the syringe directly on the client’s arm or shoulder. | Provides stability and control during the injection, thus ensuring greater client safety and comfort. |
| 15. Make the tissue taut at the penetration site by retracting it (except on the palate) using sterile gauze, aiding both visibility and atraumatic needle insertion (Figure 39-21). | Gauze is used to aid in retraction and stability. Stretching the tissue tightly at the penetration site provides maximal visibility and allows the needle to enter the tissue with minimal resistance and discomfort. Avoid jiggling the soft tissues or pulling the lip over the needle tip, which may impair visibility of the penetration site. |
| 16. Keep syringe and needle out of the client’s line of vision. | Minimizes client anxiety. |
| 17. Gently insert the needle into the mucosa until the bevel is completely under the tissue (see Figure 39-21). | Initiates needle penetration with minimal discomfort. |
| 18. Observe and communicate with the client. Watch for any signs of discomfort or distress. | Keeping the client informed about the procedure helps the client anticipate the operator’s actions and minimizes anxiety. Careful observation of the client alerts the clinician to a potential behavioral problem or medical emergency. |
| 19. Deposit a few drops of anesthetic solution, pause for 5 seconds, and then advance the needle a few millimeters. Repeat process as you slowly advance to the deposition site. Communicate with the client by saying, “To make you more comfortable, I will deposit a little anesthetic as I advance toward the target.” | Anesthetizes the tissues in front of the needle before its advancement, thus minimizing discomfort. Pausing for several seconds allows the anesthesia to develop. At this point, aspiration is not necessary because of the small amount of solution being deposited over a changing injection site. |
| 20. Aspirate on arrival at the deposition site by pulling the thumb ring back gently. Movement of only 1 or 2 mm is needed. Tip of needle must remain unmoved. | Minimizes the possibility of an intravascular injection by ascertaining if the needle tip is located within a blood vessel. Aspiration of blood into the cartridge indicates intravenous placement of the needle (see Figure 39-23). |
| 21. Rotate barrel of the syringe about 45 degrees, and aspirate a second time to ensure that the needle is not located inside a blood vessel but abutting against the wall of the vessel, providing a false-negative aspiration (Figures 39-22 and 39-23). | False-negative aspiration may occur if the needle bevel is occluded by the inner wall of the blood vessel. Multiple aspirations with the needle bevel in different planes prevent this potential problem. |
| 22. If no blood appears (negative aspiration), slowly deposit the local anesthetic solution at a rate of 1 mL/min for approximately 2 minutes for a full cartridge. | Slow deposition reduces the risk of inadvertent intravascular injection and the severity of an overdose reaction in case inadvertent intravascular injection occurs, and prevents tearing and necrosis of the tissue and subsequent discomfort. If, despite slow introduction of the solution, blood levels of anesthetic become elevated, the severity and duration of the toxic reaction will be reduced. Slow injection of the anesthetic solution is critical to preventing an adverse drug reaction. |
| 23. Observe and communicate with the client. Watch for any signs of discomfort or distress. Reassure the client with statements such as “I am depositing the solution slowly so this procedure will be comfortable for you.” | Keeping the client informed about the procedure helps the client to anticipate the operator’s actions and minimizes anxiety. |
| 24. Slowly withdraw the needle when the indicated amount of anesthetic has been deposited. | Concludes the injection with minimal discomfort. |
| 25. Replace the needle sheath using the scoop technique (Figure 39-24). | Prevents inadvertent needle stick injury with a contaminated needle to the hygienist and other oral healthcare personnel. |
| 26. Observe the client. | Most adverse reactions, such as syncope, occur either during the injection or within 5 to 10 minutes after completion of administration; therefore remaining with the client after the injection is imperative. |
| 27. Rinse the client’s mouth. | Washes out any anesthetic solution that may have dripped into the client’s mouth. |
| 28. Massage the tissue over the injection site when indicated. | Gives the client a sense of well-being. |
| 29.T est for anesthesia by touching the rounded back of an explorer to both the area anesthetized and an area not anesthetized. The client should have little or no sensation in the anesthetized area. | Ensures that proper anesthesia is obtained before treatment is commenced. |
| 30. Reassure the client that numbness, tingling, and a sense of swelling, or the tooth feeling different, are normal responses. | Gives the client a sense of well-being. |
| 31. Record the injection(s) in the client’s chart, including: |
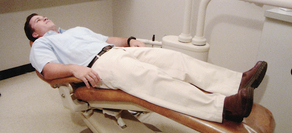
Figure 39-16 Physiologic position of patient for receipt of local anesthetic injection.
(From Malamed SF: Handbook of local anesthesia, ed 5, St Louis, 2004, Mosby.)
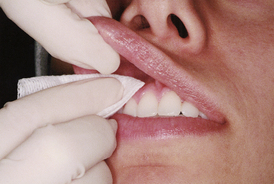
Figure 39-17 Sterilized gauze is used to gently wipe tissue at site of needle.
(From Malamed SF: Handbook of local anesthesia, ed 5, St Louis, 2004, Mosby.)
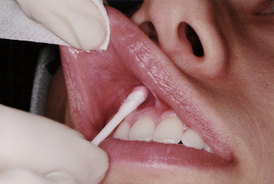
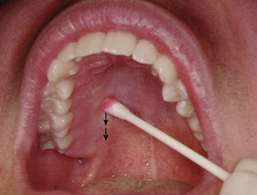
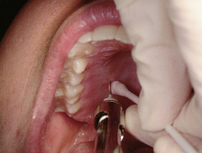
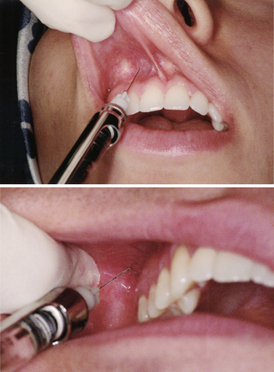
Figure 39-21 Tissue at needle penetration site is pulled taut, promoting both visibility and atraumatic needle insertion.
(From Malamed SF: Handbook of local anesthesia, ed 5, St Louis, 2004, Mosby.)
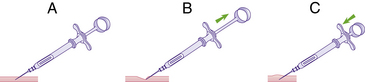
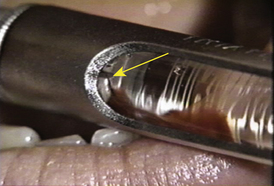
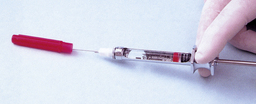
Figure 39-24 “Scoop” technique for recapping needle after use.
(From Malamed SF: Handbook of local anesthesia, ed 5, St Louis, 2004, Mosby.)
See Tables 39-1 to 39-11 on pp. 228-244 for specific injection techniques.
TABLE 39-1 Supraperiosteal In/>
Stay updated, free dental videos. Join our Telegram channel
VIDEdental - Online dental courses


