Diagnostic Casts, Surgical Templates, and Provisionalization
Randolph R. Resnik, Carl E. Misch
The long-term success of dental implant treatment begins with comprehensive treatment planning and ideal implant placement surgery. It is widely accepted that the ideal implant position is driven by the final prosthetics according to esthetics, function, and biomechanical factors. If dental implants are not surgically placed ideally with respect to these factors, prosthetic complications may result, increasing the morbidity of the case. Thus, to minimize the possibility of malpositioned implants, a comprehensive diagnostic treatment plan ideally should be completed often with the use of radiographic and surgical templates.
This chapter emphasizes important components of the diagnostic phase of implant treatment planning. Guidelines for ideal implant positioning are discussed and implemented into treatment planning principles along with fabrication of radiographic and surgical templates. In addition, various types of postoperative provisionalization prosthesis techniques are described to assist clinicians in the interim replacement of the edentulous areas after surgical procedures.
Diagnostic Casts
The first step in the process of treatment planning for dental implants is the fabrication of accurate diagnostic casts. The value of diagnostic casts or study models is crucial in all phases of dentistry, especially in oral implantology. When edentulous sites exist, the combination of continued bone loss and dentition changes related to missing teeth greatly increase the number of factors that must be considered for oral rehabilitation compared with traditional prosthodontic treatment. The implant dentist must determine the type of implant prosthesis initially (i.e., FP-1, FP-2, FP-3, RP-4, RP-5)1 followed by the number and location of ideal and optional abutment sites and the final occlusal scheme.
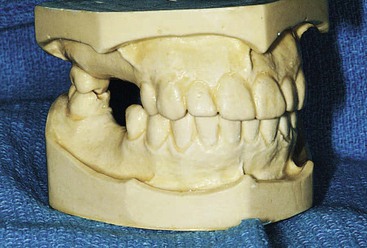
Diagnostic casts must be accurate reproductions of the maxillary and mandibular arches with complete representation of the edentulous areas (Figure 18-1). Diagnostic casts mounted on an articulator allow for an initial evaluation for implant site selection, angulation requirements, prosthesis selection, existing occlusion, and fabrication of a surgical template. In addition, these study casts allow for a preoperative assessment of treatment options that may be discussed with other practitioners, laboratory technicians, and patient consultations.
Articulators
To accurately assess the maxillomandibular relationship of the implant patient, proper mounting of the study casts must be completed using an articulator. An articulator is defined as a “mechanical instrument that represents the temporomandibular joints (TMJs) and jaws, to which maxillary and mandibular casts may be attached to simulate some or all mandibular movements.”2 Today, the use and indications for the various types of articulators used in prosthetic dentistry are very controversial.
Currently, wide arrays of articulator types are available, with multiple ranges of movements and adjustments, making classification and nomenclature very confusing. In the dental literature, many different classifications exist; however, today the most simplistic and most often used classification parallels the one in the “Glossary of Prosthodontic Terms.”2 Articulators may be categorized into four groups according to the adjustability of the articulators. This classification is based on the ability of the articulator to accept the five most common patient records: (1) facebow transfer, (2) centric jaw record, (3) protrusive record, (4) lateral records (Bennett movement), and (5) intercondylar distance3 (Table 18-1).
TABLE 18-1
Articulator Options
| Hinge Axis (Facebow) | CR Record | Protrusive Movement | Lateral Excursion | Bennett Movement | |
| NONADJUSTABLE (Simple and Average) | No | Yes | No | No | No |
| SEMI ADJUSTABLE | Approximate (Arbitrary) | Yes | Yes (Straight line) | Yes (Straight line) | Approximate |
| FULLY ADJUSTABLE | Yes (Kinematic) | Yes | Yes (Curved) | Yes (Curved) | Yes |

Nonadjustable2
Class 1: Simple Hinge
This type of articulator uses the arbitrary mounting of study casts without a facebow transfer. Maximum intercuspation position (MIP) is the only position that may be produced accurately because its fixed hinge axis is inaccurate because of the opening and closing movement predicated on a fixed axis (with no correlation to the hinge axis of the patient) (Figure 18-2, A).

Class 2: Arbitrary Plane Line (Average Value)
This type of articulator has evolved from the simple hinge that does allow restricted lateral movement. Arbitrary plane line articulators have fixed arbitrary condylar inclinations, vertical axes of rotation settings, and Bennett angles. The main disadvantage of nonadjustable articulators is the significant differences between the hinge closure of the articulator compared with the patient’s anatomy. A closed-mouth MIP recording of the patient is made because an open-bite registration in centric relation does not correspond to the arc of mandibular closure with a nonadjustable articulator. The distance between the hinge and teeth is less on a nonadjustable articulator; therefore, a steeper curve exists upon closing, which results in premature contacts and incorrect ridge and groove direction in the final prosthesis (Figure 18-2, B).
Adjustable2
Class 3: Semiadjustable Articulators
These types of articulators can be set to closely simulate various mandibular movements that are usually sufficient for most prosthetic cases. They do require the use of a facebow transfer and maxillomandibular records. Simulation of lateral, protrusive, and Bennett movements are available with these types of articulators. There exist two different designs of semi-adjustable articulators, the Arcon (condylar element in maxillary member) and the non-Arcon (condylar element in mandibular member). The Arcon type more closely represents the anatomical location of the natural condyle and the glenoid fossa assembly (Figure 18-2, C).
Semiadjustable articulators are usually indicated for most types of routine fixed partial dentures in both partial and fully edentulous cases. Because semiadjustable articulators closely parallel the size and distances of the anatomical structures they represent, articulated casts can be mounted with sufficient accuracy to determine and reduce possible occlusal interferences.
Class 4: Fully Adjustable
This type of Arcon articulator is very complex, accepts a wide range of positions, and can be set to simulate the patient’s border movements. For an articulator to be defined as fully adjustable, it must be able to accept all records, including a facebow transfer, centric jaw record, protrusive record, lateral records, and intercondylar distance.4 Fully adjustable articulators rely on special pantographic tracings instead of wax occlusal records. A kinetic facebow is used along with complex pantographic registrations. Because the fully adjustable articulator can duplicate border movements and irregular pathways of movement, complex prostheses with a change in vertical dimension can be accomplished with minimal adjustments (Figure 18-2, D).
The accuracy of this articulator depends on the skill of the practitioner and laboratory technician, inherent errors in the articulation and recording devices, and any possible malalignment caused by musculature and flexure of the mandible.
Facebow Transfers
Facebow transfers are used in prosthetic dentistry to record the anteroposterior and mediolateral spatial positions of the maxillary occlusal cusps in relation to the transverse opening and closing of the patient’s mandible.5 Two types of facebows are recognized in the field of prosthodontics, arbitrary and kinematic.
Arbitrary
This type of facebow transfers the approximate horizontal transverse axis and relies on anatomical averages. Typically, an anatomical landmark such as the external auditory meatus is used to stabilize the facebow and assist in the mounting of the study casts. The arbitrary facebow is sufficiently accurate for most diagnostic and prosthodontic procedures with a semiadjustable articulator (Figure 18-3, A).

Kinematic
This type of facebow is mainly used when a more precise location of the horizontal axis is required such as complex fixed partial dentures or full-mouth reconstruction that uses the patient’s true hinge axis. All mandibular border movements are recorded from the most retruded position to the lateral and most anterior position. This type of facebow is only used in conjunction with a fully adjustable articulator (Figure 18-3, B).
Selection of Articulator Type
As can be seen, articulators vary dramatically on their abilities to reproduce biomechanical factors that are associated with the various mandibular movements. There exists no one articulator that is “correct” for every dental condition, and great controversy is present surrounding the type of articulator that should be used in various situations. The selection of an articulator with a treatment type is highly dependent on the patient’s occlusal requirements, prosthesis type, practitioner’s philosophy, experience and knowledge, and the skill of the laboratory used.6
Additionally, the practitioner needs to differentiate the intended goal and need for the use of the articulator. If the goal includes only the diagnostic phase (diagnostic wax-up for a surgical template), this is much different than the use of an articulator in the prosthodontic phase (fabrication of the final prosthesis). As a generalized guide, the following classification of uses and indications for various types of articulators may be used.
Nonadjustable (Class 1 and 2)
When the patient has no occlusal pathology and the desire of the final implant restoration is to fit within the existing occlusion, a nonadjustable articulator may be used. This most often represents single or small edentulous sites that allow for accurate maximum intercuspation of the study casts (tripod occlusal stability); a nonadjustable articulator may be used.
Indications
Diagnostic phase: Single edentulous areas, multiple edentulous spaces with tripod stability, and no change in occlusal relationship indicated
Prosthodontic phase: Single and multiple edentulous spaces with tripod stability with no change in occlusal relationship indicated
Semiadjustable (Class 3)
When there exist multiple edentulous areas or complete edentulism, a semiadjustable articulator is recommended. Because large segments of occlusion need to be replaced, a semiadjustable articulator allows for greater accuracy of the laboratory condition and the actual patient condition. Use of a facebow transfer minimizes tooth-hinge axis errors along with lateral check bites and protrusive records. Furthermore, if any change in vertical dimension is warranted or a cant in the occlusal table exists, a semiadjustable articulator should most definitely be used. When partially edentulous patients are evaluated, an open-mouth bite registration is recommended to evaluate the existing occlusion for premature contacts upon closure of the casts.
Indications
Diagnostic phase: Single and multiple edentulous spaces without tripod stability, significant changes in occlusion or vertical dimension, and all edentulous patients
Prosthodontic phase: Single and multiple edentulous spaces without tripod stability, occlusal or vertical dimension instability, and all edentulous patients
Fully Adjustable (Class 4)
This type of articulator is indicated for full-mouth rehabilitation, extensive treatment in which opposing arches are being restored, restoration of vertical dimension, patients with significant side-shift during lateral movements, and patients exhibiting severe parafunction and TMJ disorders. Practitioner knowledge and skill in obtaining a kinematically located hinge axis along with accurate recordings of mandibular movement is mandatory to achieve a high degree of accuracy with this articulator.
Indications
Diagnostic phase: Usually not indicated
Prosthodontic phase: Full-mouth rehabilitation requiring significant change in maxillomandibular relationships; practitioner and laboratory technician expertise
Maxillomandibular Relationships
Proper mounting of diagnostic casts with an open-bite registration and facebow transfer allows for the static and dynamic (class 3 and 4 articulators) relationships of the teeth and edentulous ridges without interference from protective neuromuscular reflexes. In addition, abnormalities or interferences that are not easily detectable intraorally can be determined. Table 18-1 details comprehensive information that may be obtained that may be paramount in dental implant treatment planning7–9 (Box 18-1).
Occlusal Interferences
The implant dentist should evaluate the existing occlusion before implant surgical placement. Partially edentulous patients often have occlusal interferences as a result of tooth migration. Ideally, all abnormal contacts should be identified and eliminated before the implant prosthodontic phase. This is especially appropriate when any occlusal disease is present. In prosthetics, there exist four types of occlusal interferences: (1) centric occlusal interferences, (2) working occlusal interferences, (3) nonworking occlusal interferences, and (4) protrusive occlusal interferences.6
With centric occlusal interferences, the premature contact causes the mandible to deflect forward or laterally from the mandibular condyles’ optimum superior position in the glenoid fossa. These types of interferences may cause parafunctional habits such as clenching or bruxism with associated muscle fatigue and TMJ pain.10
Working occlusal interferences occur between the maxillary and mandibular teeth during lateral movement on the side corresponding to the direction in which the mandible is moving. A nonworking occlusal interference is a deflective contact that occurs on the opposite side of the direction of mandibular movement. These types of forces are potentially damaging to the masticatory apparatus (especially with implants) because they place shear forces outside the long axis of the teeth (or implants) and may cause bone loss and disruption of normal muscle function. They also increase the amount of force to the dentition during the excursions because more muscle mass fires in the masseter and temporal musculature.
The protrusive occlusal interference usually includes deflective contact between the mesial aspects of the mandibular posterior teeth and the distal aspects of maxillary posterior teeth during a protrusive mandibular movement. This is not a border movement and is usually less damaging to the stomatognathic system. However, these types of interferences may be damaging to teeth and implants because they result in shear forces because they prevent the posterior teeth from being disoccluded by the incisors.
Premature contacts may be ascertained after proper mounting of the study casts with the use of a wax spacer or bite registration (open-mouth bite). Upon removal of the occlusal records that separate the teeth, the premature or irregular contacts may be determined and verified when the casts are closed and then modified intraorally.11
A considerable prosthetic advantage is present when centric relation occlusion is harmonious with maximal intercuspal position. Lack of change in the occlusal vertical dimension permits a closed-mouth centric recording during prosthetic reconstruction for the fabrication of the prosthesis without the need for an accurate hinge axis recording of the condyles or fully adjustable articulators. When the incisal edge position of the maxilla is determined, its position usually causes a steeper protrusive or excursive position than the condylar disc assembly on semiadjustable articulators. As a result, posterior disocclusion can be easily established. These conditions permit the prosthetic reconstruction to be fabricated in the laboratory and transferred accurately to the patient.
The occlusion may require complete rehabilitation to eliminate potential unfavorable forces for the implant restoration. Both arches may require prosthodontic treatment to establish the desired occlusal schemes. Parafunctional bruxism with loss of incisal guidance from attrition or an opposing single denture are the most common conditions that mandate more comprehensive opposing dentition modification. Whereas the first condition often indicates a need to increase the anterior guidance for posterior disocclusion in excursions, the second warrants bilateral balance occlusion (Box 18-2).
Diagnostic Treatment Planning
Techniques used to determine the location, angulation, and contours of the final prosthesis are initiated by the completion of a diagnostic wax-up. Procedures vary from being simplistic (single missing tooth) to rather complex (full-mouth rehabilitation).
Partially Edentulous
Diagnostic Wax-Up
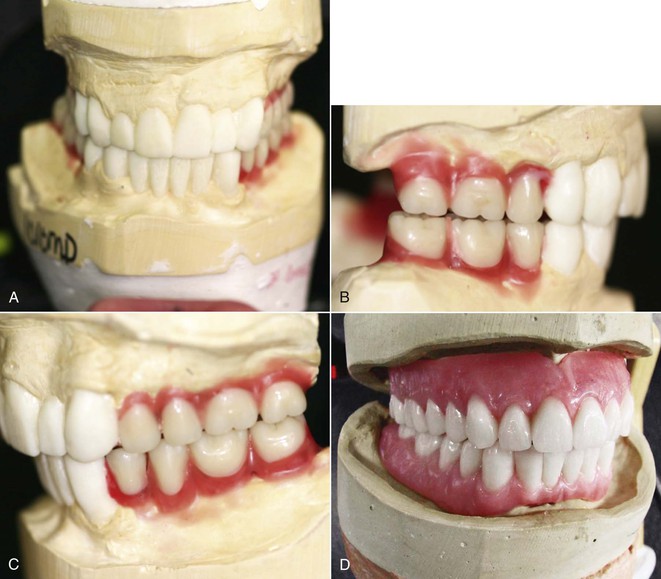
Duplicate diagnostic casts are mounted on an articulator, and a diagnostic wax-up is completed for the desired contour, occlusal scheme, and esthetic aspects of the final restoration. Attention should be given to individual tooth morphology, tooth axis, gingival contours, and interdental contacts. The diagnostic wax-up technique is especially recommended when full-mouth rehabilitation is indicated, particularly if a change in vertical dimension is desired (Figure 18-4 and Box 18-3).
Completely Edentulous
Requiring No Modification to Existing Prosthesis
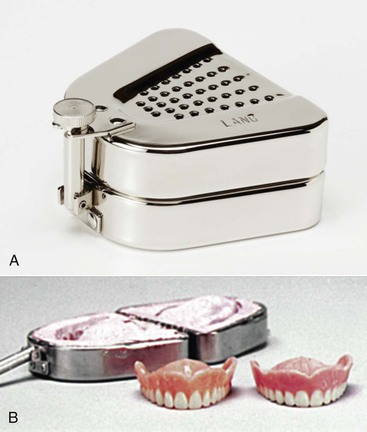
For fully edentulous cases, duplication of the patient’s existing prosthesis (if esthetically and functionally ideal) may be used for the mounting of the diagnostic casts. The most simple technique is the use of a denture duplicator (Figure 18-5).
Modification to Existing Prosthesis Is Indicated
If modification of the existing prosthesis is required because of a change in esthetics or function, a traditional complete denture setup is indicated. After the try-in approval, the prosthesis may be duplicated to be used as a radiographic or surgical template fabrication (see Figure 18-4, D).
Ideal Implant Positioning Guidelines
In the design and planning of the diagnostic wax-up, knowledge of ideal implant positioning is important to the long-term success of the implant system. Optimal dental implant positioning should consider the three-dimensional placement of implants with respect to the biomechanical and prosthetic principles related to the final implant prosthesis. The implant should be positioned in relation to existing teeth, vital structures, and other implants as well as in buccolingual, mesiodistal, and apicocoronal dimensions.12,13
General Positioning Guidelines from Anatomical and Vital Structures
Implant–Natural Tooth Distance
An implant placed adjacent to a natural tooth ideally should remain 1.5 to 2 mm or more away from the interproximal cementoenamel junction (CEJ) and root (Figure 18-6). This is more important in esthetic regions, where the contour of the interdental papilla is a determining factor in the esthetics of the final prosthesis. Therefore, when positioning an implant adjacent to a tooth, the pilot hole (center of the implant) should be approximately 4 mm away from the natural tooth to place a 4-mm-diameter implant at the crest module. This requires at least a 7-mm mesiodistal distance in the edentulous space.14
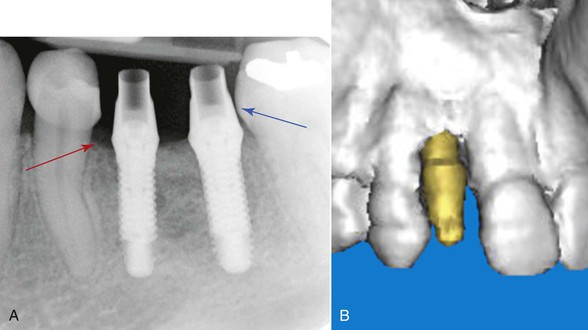
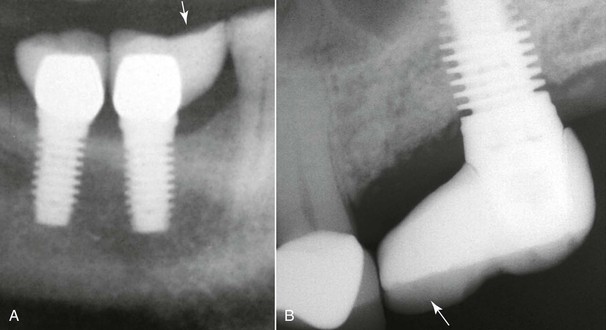
If implants are not positioned as per these guidelines, complications in the final prosthesis may result. Implants placed too close to an adjacent tooth (<1.5 mm) may cause periodontal complications, adjacent tooth damage, bone loss, or a nonideal emergence profile of the final crown (Figure 18-7). Studies have shown a correlation between increased bone loss and decreased distance of the implant from the adjacent tooth.15 When implants are placed more than 2 mm from an adjacent tooth, a cantilever effect will result on the marginal ridge of the implant crown, which in some cases may lead to biomechanical overload or esthetic issues (Figure 18-8).
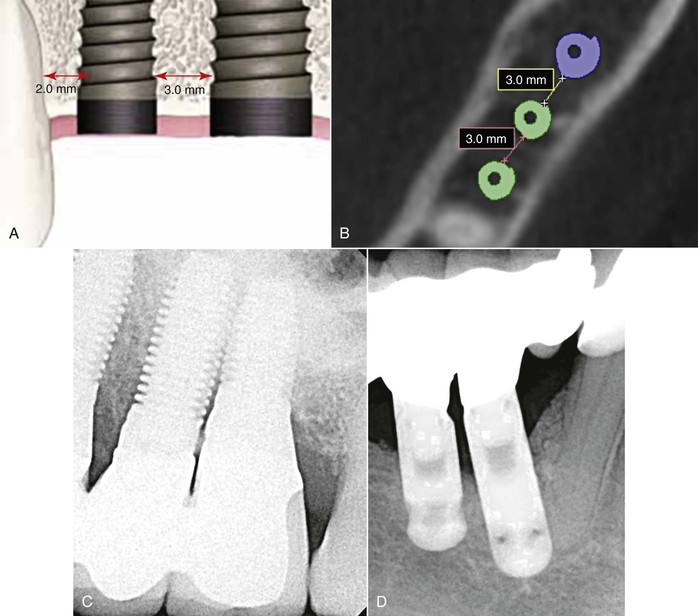
Implant–Implant Distance
The distance between two implants has been determined to be significant with respect to bone loss, the presence of an interimplant papilla, and tissue health. After final insertion, 3 mm or more of space should be present between implants. This allows for adequate room for interdental papilla and tissue health as well minimizing horizontal bone loss. Also, proper spacing allows the patient the ability to cleanse embrasures and allows adequate space for transfer copings during prosthetic impressions12 (Figure 18-9).
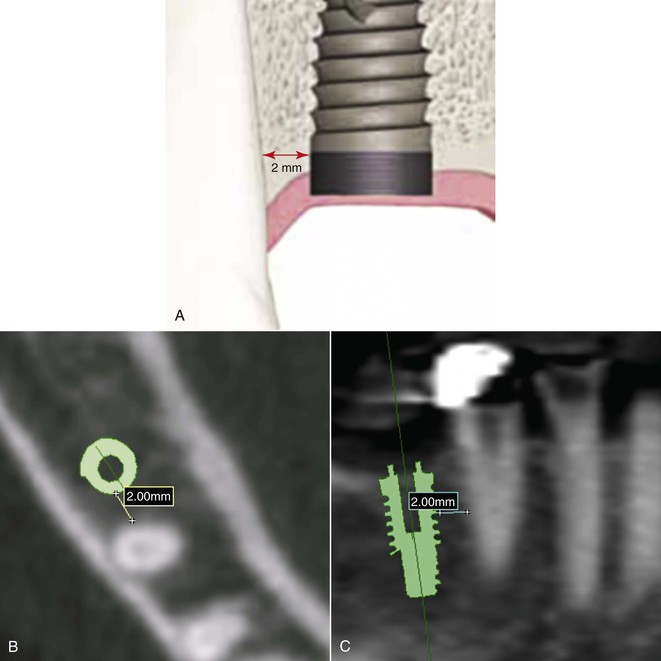
Distance from the Inferior Alveolar Nerve Canal or Mental Foramen (Figure 18-10, A)
Accurate positioning of implants in approximation to the inferior alveolar canal and mental foramen is crucial in preventing neurosensory impairment. The correct location of the nerve and canal should ideally be ascertained via three-dimensional imaging, especially when the implant may be within 2 mm of the nerve. After identification of the vital structures, the implant should be placed greater than 2 mm from the inferior alveolar canal or mental foramen. Implant placement less than 2 mm increases the risk compression or traumatic injuries to the nerve trunk and neurosensory deficits.12
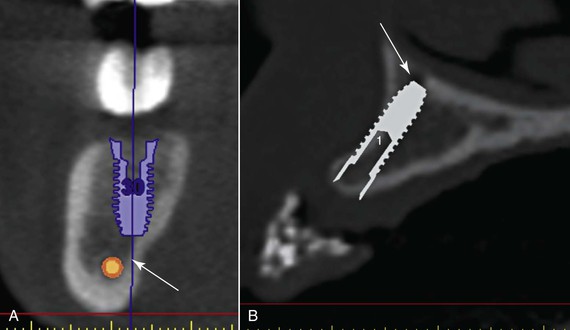
Distance from the Nasal Cavity (Figure 18-10, B)
Placement of implants in the anterior maxilla may be very challenging, especially when minimal height of bone is present. Ideally, implants should be positioned just short of the nasal floor. However, more advanced surgical techniques exist where the implant may extend into the nasal cavity 2 to 4 mm via a subnasal graft.12
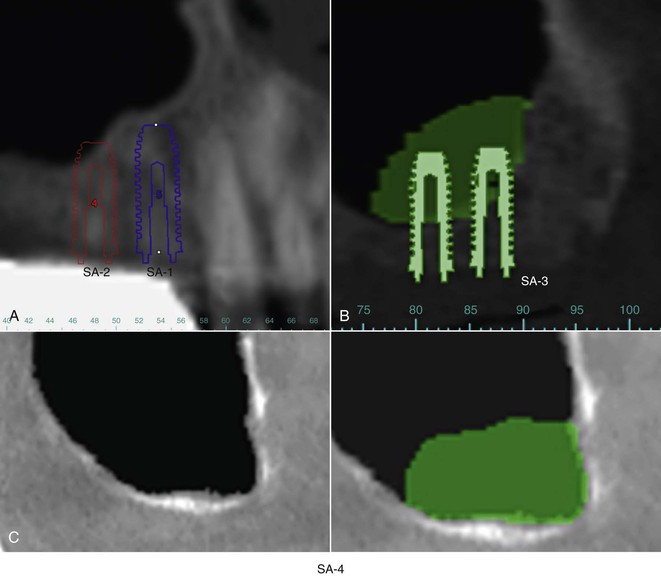
Distance from the Maxillary Sinus (Inferior Border) (Figure 18-11)
One of the more challenging areas for implant placement involves the posterior maxilla. The implant dentist often encounters compromised bone height in this area because of bone loss and pneumatization of the maxillary sinus. There exist four treatment options for implants placed in this area with respect to the quantity of bone from the crest of the ridge to the inferior border of the sinus16:
Implant Angulation Positioning
The placement of a dental implant in available bone is comparable to an object in space that is defined by “x,” “y,” and “z” coordinates. In implant dentistry, the x-axis is defined by the mesiodistal plane, the y-axis is the buccolingual dimension, and the z-axis is known as the apicocoronal (length of implant body in relation to the osseous crest).17
Buccolingually (“y-Axis”)
The buccolingual positioning of the dental implant is very crucial to the final prosthesis. Frequently, implant positioning is dictated by the resulting available bone, leading to angulation complications. Bone remodeling after extractions is common with bone initially resorbing from the buccal, decreasing the width of bone.
Ideally, the implant position is in the center of the ridge with a minimum of 1.0 mm present on the buccal and lingual aspects of the ridges. Adequate cortical bone prevents future hard and soft tissue recession. The buccolingual positioning is also predicated on the final prosthesis.
FP-1 and FP-2
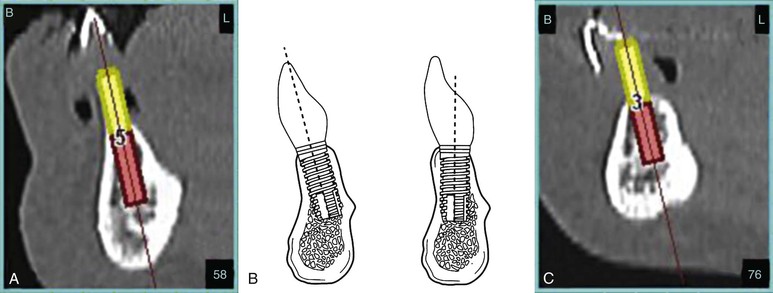
If a FP-1 prosthesis is indicated, precise implant placement is indicated. In the anterior region, the implant position allows the placement of a straight abutment directly under the incisal edge of the final crown for a cemented prosthesis. Thus, the resulting forces are along the long axis of the implant, minimizing damaging shear forces. If the implant is placed too facial, many complications will result, including loss of the facial plate of bone, tissue recession, need for an angled abutment, and esthetic issues of the final prosthesis. Implants placed too lingually can result in facial overcontouring of the final prosthesis (ridge-lap), need for an angled abutment, unesthetic restoration, and crowding of the tongue space.
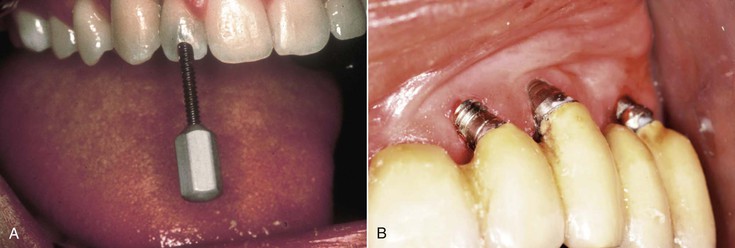
For screw-retained prostheses, the implant should emerge toward the cingulum of the anterior tooth so that the access hole does not affect the esthetics. If the implant is placed too facially, the access hole will impinge on the esthetics of the restoration. If the implant is placed too far lingually, overcontouring of the final crown may result in biomechanical issues (Figure 18-12).
In the posterior region, the long axis of the implant should emerge within the approximate center of the tooth for a screw- or cement-retained FP-1 or FP-2. This allows occlusal forces to be directed ideally along the long axis of the implant (Figure 18-13).
FP-2 and FP-3
After evaluation of the articulated setup, arch form, available bone, and force factors, the FP-2 or FP-3 prostheses should be determined to be either screw retained or cement retained. For screw-retained prostheses, ideal positioning should be slightly lingual to the denture or porcelain teeth. Implants positioned too facially will impinge on the esthetics and complicate screw insertion. Implants placed too far lingually will result in an overcontoured prosthesis, resulting in possible speech problems in the maxilla and crowding of the tongue in the mandible.
For cement-retained restorations, implant positioning should be located along the incisal edge in the anterior region and in the central fossa area in the posterior. If force factors are a concern, ideal implant placement is crucial to minimize biomechanical overload. However, if force factors are low, nonideal placement is less of a problem as abutment angulation may be modified (Figure 18-14).
The mesiodistal position of implants is usually less important than the faciolingual position in FP-2 and FP-3 restorations because the implants do not have to be positioned related to teeth dimensions.
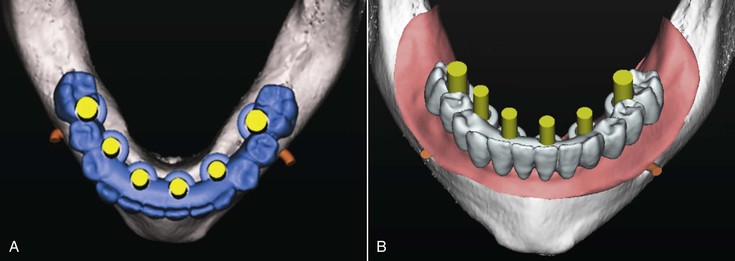
RP-4 and RP-5
Implants placed for removable overdentures should be positioned to emerge within the body of the denture base. This is important so that the components that are attached to the implant do not impinge on the ideal setting of the denture teeth. Implants that are positioned too far lingually may interfere with phonetics and an overcontoured lingual surface leading to crowding of the tongue. Implants placed too far facially will interfere with ideal denture tooth placement, leading to possible denture tooth “pop-offs.” In addition, facially positioned implants often result in lack of adequate attached tissue and potential periodontal concerns because gingival recession is more likely to result.
Mesiodistal (“x-Axis”)
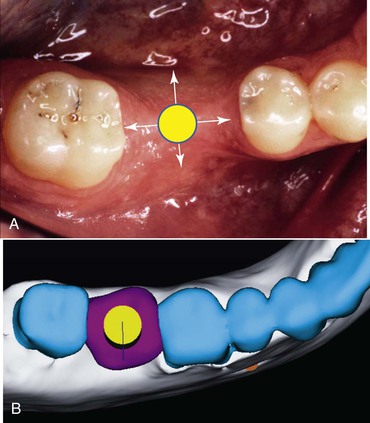
When evaluating the position of the implant in the mesiodistal plane, the proximity to the adjacent teeth is the greatest limiting factor followed by the prosthetic reconstruction. Ideally, the mesiodistal implant position is in the center of the ridge, equidistant from the adjacent teeth (Figure 18-15).
Stay updated, free dental videos. Join our Telegram channel
VIDEdental - Online dental courses


