16
Prosthodontics
- the various prosthodontics techniques available to restore a damaged tooth
- the various prosthodontics techniques available to replace a missing tooth
- the various impression materials and techniques used in prosthodontics
- fixed prosthodontics techniques, including instruments and materials used
- removable prosthodontics techniques, including instruments and materials used
- other removable prosthetic procedures
- fixed and removable orthodontic appliances, including instruments and equipment used
- the use of dental implants in tooth replacement
Prosthodontics is the branch of dentistry that involves the restoration or replacement of damaged or missing teeth by the use of artificially constructed devices. In this specialty, teeth that have been damaged (whether by dental caries, trauma or some other means) are restored by dental techniques other than fillings – namely, inlays, crowns and veneers – or they are extracted and replaced. Missing teeth are replaced by the use of dentures, bridges or implants.
Tooth restorations or replacements that are permanently cemented to existing teeth are also referred to as fixed prostheses, while those that can be removed from the mouth by the patient are referred to as removable prostheses. Implants are a stand-alone category of tooth replacement that are provided by dentists who have undergone additional training and are overviewed here for the sake of completeness.
All the artificial devices used to restore or replace the teeth are constructed outside the oral cavity by a technician, rather than within it by the dentist or therapist, as for fillings. For this reason, accurate copies of the prepared teeth and/or the dental arches must be taken and provided to the technician for them to create the artificial restoration or replacement. This is then returned to the dentist for placement or fitting in the patient’s mouth, at a later date. These accurate copies are made by taking impressions of the teeth, after the necessary tooth preparation has been carried out by the dentist beforehand.
In addition, the occlusion of the individual patient’s dental arches must also be recorded accurately, as any disruption to the normal occlusion will be uncomfortable for the patient, sometimes to the point of being painful. This is because the musculature surrounding the temporomandibular joint, especially the lateral pterygoid muscles, will become strained as the teeth attempt to bite in their correct positions, and the patient will experience facial pain as the muscles are stretched, as well as dental pain due to premature contacts on the teeth.
The skill of the dental technician involved in fixed prosthetic dentistry is to construct the restorations with the same tooth morphology as the original tooth, and to fit the restoration into the occlusion of that individual patient. So each restoration is consequently constructed by hand as a unique artificial device. An inlay or crown made for one specific tooth in one dental arch would therefore fit no other tooth accurately in any other patient. Although the teeth used in denture construction are preformed, the technician involved in removable prosthetic dentistry is equally skilled in constructing prostheses that accurately fit the individual oral anatomy of the patient, as well as sitting comfortably in the correct occlusion. Again, each removable artificial device is hand-made and unique to that patient.
The techniques used to cement fixed prostheses to teeth are similar to those used with fixed orthodontic appliances, while the construction of removable prostheses is the same for removable orthodontic appliances. Consequently, orthodontic appliances are overviewed at the end of this chapter. Occlusion and malocclusion are discussed in detail in Chapter 12.
Impression materials used in prosthodontics
As mentioned above, all prosthodontics devices are constructed outside the patient’s mouth, and impression materials are used to record an accurate copy for that construction to take place. An impression is also taken of the opposing arch of the patient (the dental arch that does not contain the tooth to be restored or replaced), and this may involve a different impression material.
The variety of impression materials available for use in dentistry is vast, but they must all have the following properties.
- To be easily mixed – if their correct mixing is too difficult to achieve by the average member of staff, their use will be limited.
- To be cost effective – certainly within the NHS where treatment costs are fixed, materials that are overly expensive to use routinely will not be cost-effective and are likely to be avoided by the profession.
- To have an adequate working time before setting – the working time is that available to correctly mix the material before it begins to set; if this is too short then the impression will not be in place before it begins to set, and the mix will be unusable.
- To have a relatively short setting time – the setting time is that taken for the material to fully set so that it can be removed from the mouth without any tearing or distortion, and needs to be as short as possible for the patient’s comfort.
- To record the tooth details accurately – a high level of accuracy must be achieved with every impression, so that tooth morphology, tooth preparation and occlusion can be reproduced correctly.
- To be stable when set – models cast from the impression must be accurate and not distorted, so the material must not deteriorate in normal room temperature and conditions before before it arrives with the technician and the models are cast up.
- To be elastic – this property ensures that tearing of the impression on removal from the mouth does not occur, while any distortion that does occur as the impression is pulled out of any undercuts is not permanent, and the impression ‘bounces’ back into its original shape and maintains the recorded details accurately.
- To be able to be disinfected without affecting the accuracy of the details recorded – this is to avoid cross-infection from the patient to the dental staff and the technician, and the impression must be able to withstand the use and concentrations of any recommended disinfectants.
Where no undercuts are present in the mouth, such as in some edentulous patients (those with no remaining teeth), non-elastic impression materials may be used, but they have been largely superseded by the more modern elastic materials. The more commonly used elastic types of impression materials fall into one of the following categories.
- Irreversible hydrocolloids – alginate.
- Addition silicones, from heavy-bodied putty to light-bodied paste.
- Polyethers.
A far less commonly used impression material is agar, which is a reversible hydrocolloid.
Details of the more common materials available are shown in Table 16.1, but some of the more modern ones can be mixed automatically in special machines, rather than by hand. However, impression material mixing is a daily task of the dental nurse in the vast majority of dental workplaces, and all should be proficient in the hand mixing of all commonly used materials. The techniques and skills required should be covered in all good training courses.
Alginate impression material
This is the impression material most commonly used in the dental workplace, as it is easy to mix and relatively cheap. It is suitable for producing impressions for models for the following.
- Opposing arch models for crown, bridge, inlay and veneer construction.
- Models for the construction of full and partial acrylic dentures.
- Models for the construction of removable orthodontic appliances.
- Study models, for any purpose.
- Models for the construction of special trays, bleaching trays, orthodontic retainers.
- Reproduction of models, as more than one cast can be made from a single impression.
However, the set material is not accurate enough to be used to take the working model for crown, bridge, veneer or inlay construction.
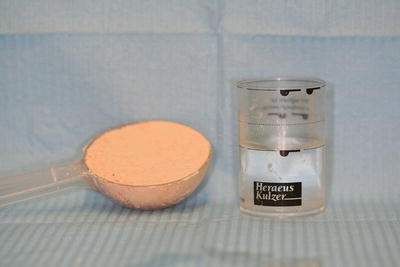
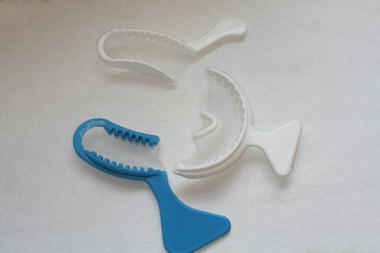
It is presented as a coloured dry powder of calcium salt, alginate salt and filler, with a measured scoop, which is mixed with water at room temperature using a similar measuring cup (Figure 16.1). Once the container has been shaken to ensure even distribution of the constituents, and then measured out into the flexible mixing bowl using the scoop provided, a 1:1 proportion of water is added and the constituents are mixed together with a large spatula. Correct mixing is achieved by folding the powder into the water initially, then vigorously spreading it against the bowl side – this is called spatulating (Figure 16.2). The mix needs to be spatulated thoroughly to be free of air bubbles, and to create a stiff and creamy consistency.
Table 16.1 Common impression materials used in prosthodontics
| Name | Type of material | Mixing components and technique |
| Alginate | Irreversible hydrocolloid | Powder and room-temperature water in equal portions, mixed by spatulating in a bowl |
| Addition silicone | Elastomer | Base and catalyst, as putty and liquid or two pastes, mixed in equal portions by spatulation, or in preloaded tubes, or in a mixing machine |
| Polyether | Elastomer | Base and catalyst pastes, mixed in equal portions by spatulation, then loaded into a syringe for direct application |
| Agar | Reversible hydrocolloid | Gel in a sealed tube, becomes fluid by heating the tube and is mixed by manipulation within the tube before use Used in the laboratory to produce duplicate models |
Figure 16.1 Alginate scoop and water measurer.
The mix is then loaded into an impression tray before insertion into the patient’s mouth (see later). A set impression is shown in Figure 16.3.
The working time of alginate is affected by the temperature of the mixing water used, and the setting time is affected by the room temperature. In both cases, the higher the temperature, the less time is required. Room temperature water and surroundings provide the optimum conditions of use but are not always possible, such as on cold winter days and hot summer days. Some alginates are presented as ‘chromogenic’ materials which change colour during the mixing and setting stages, so that the tray can be loaded and the impression taken at the optimal points of the procedure. So an initial white powder changes to pink during the working time, and the tray is loaded and inserted into the patient’s mouth. Once the material has changed to a purple colour it is set, and the impression can be removed from the patient’s mouth.
Figure 16.2 Alginate mixing stages and tray loading.

The uses and advantages of alginate are listed above. Its disadvantages are as follows.
- Can undergo dimensional changes in the presence or absence of water.
- If left immersed in water, the impression expands.
- If allowed to dry out, the impression shrinks.
- Ideally, then, the model should be cast immediately.
- When this is not possible, the impression should be wrapped in a damp gauze and sealed in an airtight plastic bag before sending to the laboratory.
Figure 16.3 Alginate impression.

Addition silicone impression material
This is one of the elastomer impression materials and is highly accurate when set. It is used specifically for all fixed prosthetic work and some removable prosthetic work. It has a variety of presentations.
- Tubs of heavy-bodied putty with liquid or paste activator, a chemical which starts the reaction to produce the impression material (for example, Express – Figure 16.4).
- Tubes of light-bodied paste with liquid or paste activator (for example, Xantopren – Figure 16.5).
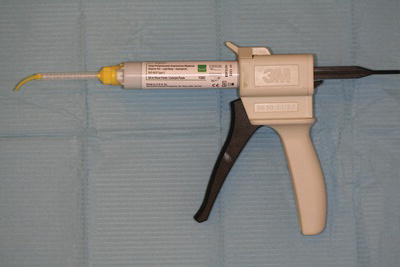
- More recent preloaded gun syringes which mix the constituents automatically (for example, Express – Figure 16.6).
As with alginate, measuring scoops are provided for accurate mixing, but it should be noted that it is possible for the mixing and setting times to be affected by some types of rubber PPE gloves. If mixing is to occur by hand, it is advisable that vinyl gloves are worn.
When putty materials are being mixed, equal numbers of measured scoops are laid out ready for hand mixing, and when lighter bodied materials are being mixed, either similar measured lengths of paste or the correct number of liquid drops are laid out ready for spatulation on the mixing pad. Many of the materials can also be measured out and mixed in an automatic mixing machine. As each component is usually highly coloured, adequate mixing can be seen to have occurred when a non-streaky mix is produced. Unlike alginates, silicones are not affected by temperature.
The silicones can be used either in a one-stage technique (the most widely available, and using addition cured silicones) or a two-stage technique (using condensation cured silicones).
With the former, both the heavy-bodied putty and the light-bodied paste are mixed at the same time. The putty is loaded into the impression tray while the paste is either syringed onto the prepared tooth or placed onto it using a flat plastic instrument. Both materials then set and are removed together.
With the latter, the putty is mixed, loaded into the tray, inserted into the mouth and allowed to set first. It is then carefully removed and spaced in the area of the preparation, while the mixed paste is syringed or wiped onto the tooth. The set putty and tray are reinserted and the whole is removed when the paste has set.
Figure 16.4 Express putty material.
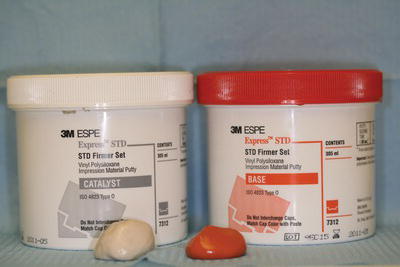
Figure 16.5 Xantopren wash material.
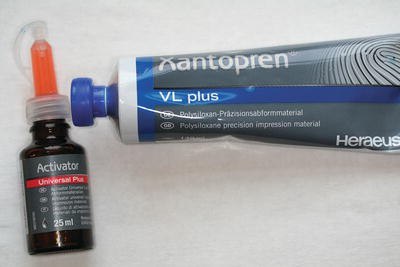
Figure 16.6 Express soft body material in delivery gun.
While the one-stage technique is obviously quicker, the two-stage ensures that adequate paste remains around the prepared tooth during tray insertion and gives a very accurate impression, whereas it can be displaced by the putty during tray insertion in the one-stage method. Adhesive is usually supplied by the manufacturer, but perforated trays can also be used.
Setting time for the silicones is usually 4 min or more, so adequate moisture control to maintain patient comfort is of great importance during this period.
The advantages of silicones are as follows.
- Are dimensionally stable in the presence of moisture.
- Have excellent elasticity, strength and accuracy that allow for:
- use in deep undercuts, without tearing of the impression
- undistorted final impression for model casting, as their elasticity allows the material to ‘bounce back’ to its original shape once it has been removed from the mouth
- several tooth preparations to be recorded accurately in one impression, without tearing.
- Suitable for use for all types of denture construction, as well as for fixed prostheses.
The disadvantages of silicones are as follows.
- More complicated and time-consuming technique of impression taking than for alginate.
- More expensive materials.
- Longer setting time may be too uncomfortable for some patients to tolerate.
- Paste materials are particularly sticky before setting, and need to be carefully handled to avoid causing an unnecessary mess.
Polyethers
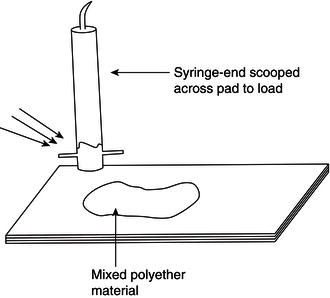
These are also highly accurate impression materials, used specifically for fixed prosthetic work and certain removable prosthetic work. An example of this type of impression material is Impregum (Figure 16.7).
They are presented as two pastes which are usually different colours to ensure that uniform mixing occurs. They are mixed in equal proportions by spatulation on a waxed paper pad, and then collected into special syringes for administration to the prepared tooth (Figure 16.8).
The remaining material is loaded into the impression tray. Again, adhesive is supplied by the manufacturer. Polyethers have a similar setting time to silicones but set more stiffly than other elastomers, and therefore need to be removed with a sharp displacing action from the mouth, otherwise they can be difficult to remove. Their advantages and disadvantages are as for silicones, except that they are slightly less dimensionally stable when moist.
Impression handling
As all the impressions taken have been inside the patient’s mouth, they will obviously be contaminated by their saliva and perhaps even their blood. To avoid cross-infection from the patient to either staff or the technician, the impressions (and bite records) must be disinfected immediately after their removal from the mouth. This is done as follows.
- Rinsed under cold running water to remove any visible debris.
- Fully immersed in a disinfectant bath of a recommended impression disinfectant, such as a solution of up to 10% sodium hypochlorite (bleach).
- Immersed for up to 10 min.
- Rinsed under cold running water again, to remove the disinfectant solution.
- Alginate impressions – covered with wet gauze and sealed in an air-tight bag.
- Elastomer impressions – blown dry using the triple syringe and then sealed in an air-tight bag.
- All stored at room temperature or below before transportation to the laboratory.
- Work ticket enclosed, detailing dentist, patient name and age, prosthesis to be constructed, material to be used, shade, additional features, date of delivery for fitting, disinfection details. The work ticket details should also be recorded onto the patient’s record card or computer notes.
As indicated, the majority of impressions are sent away to a laboratory and this can take some considerable time, especially if they are posted. During this period, they must remain stable so that the cast models eventually produced are accurate, otherwise the fixed prostheses will not fit onto the patient’s tooth or into their mouth accurately. For this reason, impressions should not be exposed to any heat sources or chemicals, and alginate impressions must be kept moist and not be allowed to dry out, otherwise they will distort and any models cast from them will be useless.
Figure 16.7 Impregum material.
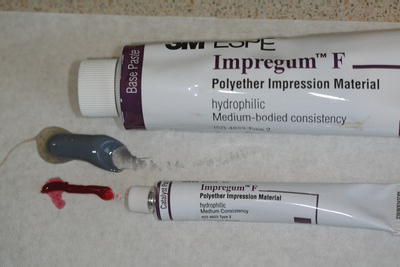
Figure 16.8 Polyether collection technique.
Impression trays
Impression trays are devices used to hold the semi-solid impression material in the shape of a dental arch, so that it can be inserted into the patient’s mouth and held in place without dripping, while it sets over the teeth and other oral structures. The tray then holds the set impression in a horse-shoe shape while it is removed from the mouth, inspected and disinfected, then sent to the laboratory for model casting.
The trays are available for use with edentulous patients (Figure 16.9) and dentate patients (Figure 16.10), the latter examples being referred to as ‘box trays’. They can be plastic and single use, or metal and autoclavable for reuse. As many impression materials are not adhesive to plastic or metal, the trays are either perforated so the set material locks itself into the tray, or are unperforated and require the use of an adhesive so that the impression sticks to the tray. Obviously, the shape of upper and lower trays differs by the inclusion of the palatal coverage required in the upper trays.
Figure 16.9 Edentulous impression trays.
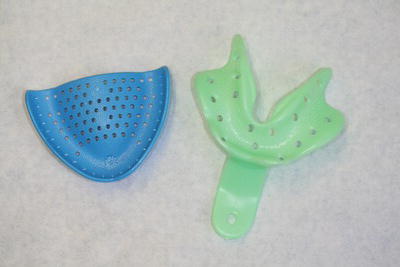
Figure 16.10 Boxed impression trays.
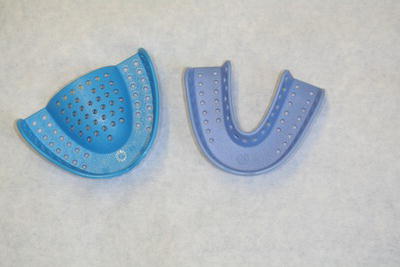
Figure 16.11 Special trays with models.
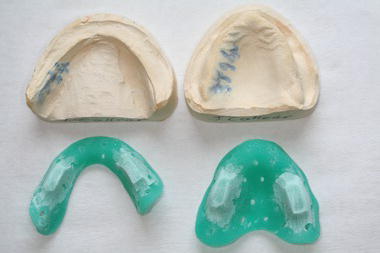
Figure 16.12 Triple trays.
Those impression trays available in a variety of child and adult sizes and preformed by the manufacturer are called ‘stock trays’, while those hand-made in acrylic by the technician from an initial study model are called ‘special trays’ (Figure 16.11). These are custom-made and individual to the patient, and are used when a high level of accuracy is required, such as when chrome-cobalt dentures are being constructed.
A final type of tray is that used for fixed prosthodontic work, which records a partial section of both dental arches and the occlusion of the area in one impression. Examples are the triple trays shown in Figure 16.12, which are discussed later.
Fixed prosthodontics
These tooth restorations or replacements are cemented within, or onto, a tooth and include the following prostheses (Table 16.2).
- Temporary or permanent crown – a cap or shell-like device made to cover three-quarters to the whole surface of a single tooth.
- Temporary or permanent bridge – two or more crown-like units joined together as a single device, at least one of which is to replace a missing tooth.
- Veneer – a facing made to fully cover the labial surface of a tooth.
- Inlay – an insert into a tooth cavity that has been constructed in a laboratory.
Table 16.2 Types of fixed prostheses available
| Fixed prosthesis |
Purpose of prosthesis | Construction materials |
| Temporary crown (Figure 16.13) | To cover the prepared tooth while awaiting a permanent crown As an emergency restoration |
Preformed acrylic or polycarbonate Cold-cure acrylic |
| Permanent crown (Figure 16.14) |
To protect a heavily filled or root-filled tooth from fracture during chewing Aesthetics Tooth shape change |
Porcelain ceramic Bonded porcelain to metal Precious metal alloy Non-precious metal alloy |
| Temporary bridge |
To cover prepared teeth and replace missing teeth while awaiting the permanent bridge To replace missing teeth after extraction while resorption occurs |
Acrylic Resin-based materials |
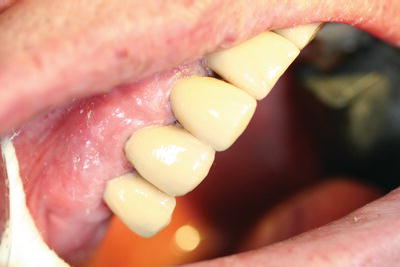
| Permanent bridge (Figure 16.15) |
To replace missing teeth Aesthetics |
Ceramic Bonded porcelain to metal Precious metal alloy Non-precious metal alloy |
| Veneer (Figure 16.16) |
Aesthetics, to cover the labial surface of an anterior tooth when it is discoloured or misshapen |
Porcelain |
| Inlay (Figure 16.17) |
To restore a cavity in a tooth with a material stronger than conventional filling materials | Porcelain Precious metal alloy Non-precious metal alloy |
All are provided for varying reasons but involve the use of similar impression and cementation materials, and similar instruments. The material used depends on the following considerations.
- Tooth involved – are high chewing forces likely to occur?
- Aesthetics – is an anterior tooth involved?
- Longevity – is the prosthesis temporary or permanent?
- Occlusion – is the patient’s bite unusual in any way?
Although some temporary crowns and bridges can be constructed at the chair side, using either stock crown-forms or preoperative impressions to construct them, all other fixed prostheses are sent to a laboratory for construction by the technician.
Figure 16.13 Temporary polycarbonate crown forms.
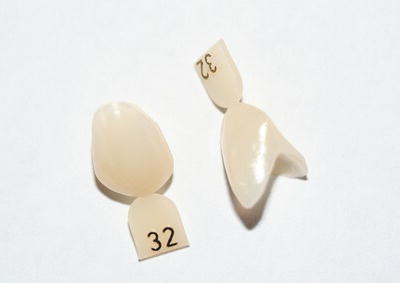
Figure 16.14 Full gold crown on model.
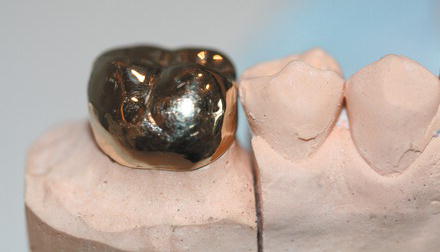
Figure 16.15 Permanent bridge on model.
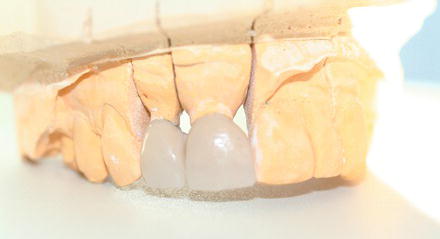
Figure 16.16 Porcelain veneers.
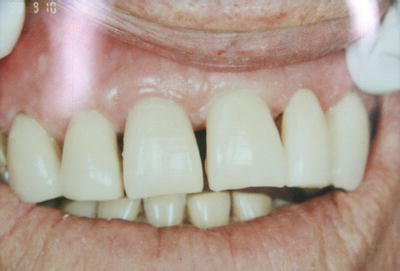
Figure 16.17 Cemented gold inlay.
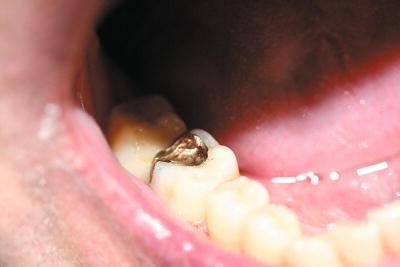
Crowns
A crown is a laboratory-constructed artificial restoration which replaces at least three-quarters of the natural crown surface of the tooth. There are various types, made of various materials, and they require at least two visits for the tooth preparation, crown construction and fitting to be completed.
The surgery procedure for the tooth preparation is summarised below.
- All staff and the patient are provided with suitable personal protective equipment.
- Unless the tooth is non-vital, local anaesthetic is administered to anaesthetise the tooth to be prepared.
- An alginate impression of the opposing arch is taken, using the appropriate impression tray.
- An occlusal registration is often taken, especially in complicated cases, using softened wax which the patient bites into, a specific occlusal recording material such as Blu-Mousse or a face bow technique for articulation of the models at the laboratory.
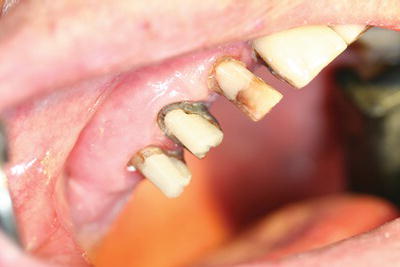
- The tooth is prepared by reducing its overall dimensions by 1 mm for metallic or ceramic crowns or 1.5 mm for bonded crowns, using diamond burs which produce near-parallel sides to provide optimum retention, but without producing undercuts (Figure 16.18).
- The prepared tooth shape to be achieved is illustrated in Figure 16.19.
- To ensure accurate recording of the crown preparation margins, gingival retraction cord can be pushed into the gingival crevice and removed immediately before the impression is inserted. This is cord soaked in either adrenaline or alum, both of which cause the gingivae to retract and pull away from the tooth, thus allowing impression material to flow into the crevice created and accurately record the prepared tooth margins.
- An elastomer impression is then taken of the working arch, using a silicone or polyether material.
- When satisfactory impressions have been produced, a temporary crown is made at the chair side and cemented temporarily to the prepared tooth (see later).
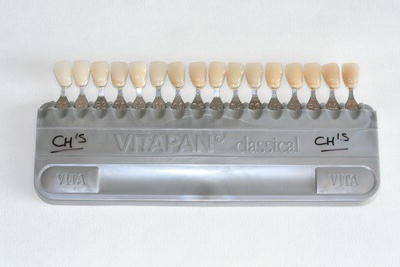
- A shade of the tooth is taken by comparing the adjacent teeth to a suitable shade guide (Figure 16.20), and ensuring that any surface characteristics such as root darkening or hypomineralised spots are mimicked too – this stage may be carried out at any point in the procedure.
- All relevant details are accurately recorded on the laboratory slip, which is sent to the laboratory with the disinfected impressions and occlusal registration for construction of the permanent crown.
- A correct return date should be given, to coincide with the patient’s next appointment for fitting of the crown.
Figure 16.18 Tapered diamond crown preparation burs.
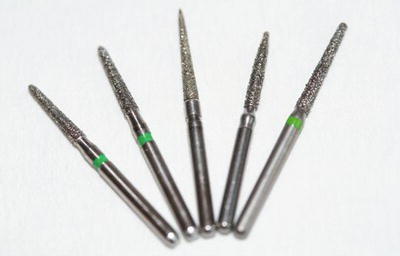
Figure 16.19 Crown preparations.
Laboratories vary in the time required for the crown to be custom made, and the period may range from a few days to 2 weeks. Accurate and detailed information provided on the laboratory slip will ensure that unnecessary delays are avoided, and a professional and trusting relationship between the practice and the laboratory technician often allows for a speedier completion on occasion.
The surgery procedure for the fitting of the crown is summarised below.
- Provide suitable personal protective equipment for the patient and all staff.
- Local anaesthesia is administered, unless the tooth is non-vital.
- At this point, some dentists may choose to apply a rubber dam to the prepared tooth, so that it is isolated from possible oral contamination.
- Removal of the temporary prosthesis, using specific crown removal instruments or a bur in the high-speed turbine to cut the temporary prosthesis off the tooth.
- Try-in of the permanent prosthesis onto the tooth (or teeth).
- The marginal fit of the crown will be checked for accuracy, along with the occlusion and the shade of the prosthesis.
- Occlusion will be checked using articulating paper – high spots will leave a coloured mark to indicate the point that needs reducing.
- Reduction is carried out using burs in the high-speed handpiece, and polishing burs or stones to smooth the area afterwards.
- When the dentist and patient are happy with the fit, the prosthesis can be cemented into place using one of a variety of luting cements – these materials are summarised below, and discussed in detail in Chapter 15.
- If the fit is poor or the occlusion is completely incorrect, the dentist will take new impressions and bite registration and request a remake of the prosthesis.
Figure 16.20 Shade guide.
Instruments and materials required
The majority of dentists have a normal ‘conservation tray’ set up as the basic instruments required for crown preparation and fitting, and some may work under a rubber dam too. The additional equipment and materials specifically required are shown in Table 16.3.
The fixed prosthesis is permanently cemented to the prepared tooth using a luting cement. These are adhesive to the dentine of the tooth, and are mixed to a creamy consistency so that the prosthesis can be seated fully onto the tooth before the cement sets. Types available are discussed fully in Chapter 15 and summarised in Table 16.4.
Modern types of cement tend to be provided in double syringe form with no mixing necessary, but older types (such as phosphate, polycarboxylate and glass ionomer cements) require correct proportioning and thorough mixing before use.
All can be mixed on a cool glass slab with a small spatula, by incorporating increments of powder into the relevant liquid and spatulating thoroughly until a smooth, creamy mix is produced.
Table 16.3 Crowns: additional equipment and materials
| Item | Function |
| Diamond burs (see Figure 16.18) | Tapered so that no undercuts are produced on the prepared tooth or teeth, otherwise the fixed prosthesis will not seat fully onto the tooth |
| Retraction cord | Cord soaked in an astringent solution (adrenaline or alum) that is then packed into the gingival crevice to cause shrinkage of the gingiva away from the prepared tooth. This provides a definitive tooth margin which is reproduced in the impression and also the cast model |
| Impression trays (see Figures 16.10 and 16.12) | Variety of plastic or metal boxed trays, sized to fit fully over the dental arch – upper and lower styles Also triple tray system |
| Crown former (see Figure 16.13) | Preformed plastic or polycarbonate tooth-shaped formers, in a variety of sizes and available for each tooth shape |
| Beebee crown shears (see Figure 16.21) | Short beaked shears for cutting and shaping the margins of temporary crowns |
| Shade guide (see Figure 16.20) | Shaded teeth in holder, to determine the required shade of the prosthesis by comparing each example to the adjacent teeth and determining the best match available |
Table 16.4 Types of luting cement
| Type | Action | Mixing |
| Zinc phosphate | Mechanically adhesive to rough inner surface of prosthesis, and surface of tooth | Glass slab and spatula |
| Zinc polycarboxylate | Chemically adhesive to tooth and inner surface of prosthesis | Glass slab and spatula |
| Glass ionomer | Chemically adhesive to tooth and inner surface of prosthesis | Waxed pad and spatula |
| Polyester resin | Chemically adhesive, and inert in saliva | Waxed pad and spatula |
| Self-cure resin | Chemical bonding between tooth and prosthesis | Double syringe mix |
| Light-cure resin | Light-cure bonding between tooth and prosthesis | Double syringe mix |
| Dual-cure resin | Combination of self-cure and light-cure bonding between tooth and prosthesis | Double syringe mix |
Temporary crowns are provided for aesthetic reasons, to prevent overeruption of the prepared tooth, and to avoid sensitivity problems in the prepared tooth while the permanent crown is being constructed. They can be hand made at the chair side on the day of crown preparation, or prefabricated types can be adjusted to fit the individual tooth.
Those hand made on the day are created as follows.
- An alginate impression of the tooth is taken before crown preparation begins.
- A cold cure acrylic material is then mixed and placed in the impression after crown preparation, and reinserted into the mouth over the prepared tooth.
- This takes just minutes to set, and produces a temporary crown of exactly the shape of the original tooth.
- Shades are rather restricted, so colour matching is as accurate as can be expected.
Temporary crowns can also be provided by mass production in various sizes, for each tooth shape. These can be cut and trimmed at the chair side to fit any prepared tooth, using either acrylic trimming burs or ‘Beebee’ crown shears to ensure an accurate marginal fit (Figure 16.21). They are then temporarily cemented to the tooth, using a zinc oxide and eugenol temporary cement such as Temp Bond, while awaiting the permanent crown construction.
The types of permanent crown available can be summarised as follows.
- Porcelain jacket crown (PJC) – an early type of all-porcelain crown used for anterior teeth only, to provide good aesthetics when the only other alternatives were metal crowns.
- Ceramic crown – the modern successor to PJCs, constructed of stronger ceramic materials than porcelain alone (such as zirconia), and therefore able to be used both anteriorly and posteriorly to give a more ‘tooth-like’ appearance than other crowns.
- Porcelain bonded crown (PBC) – these consist of a substructure of metal for strength with a buccal or labial face of porcelain for better aesthetics than an all-metal crown (Figure 16.22); these crowns are currently popular although the porcelain can be cracked off the underlying metal in patients with a heavy bite.
- Full gold crown (FGC) – these can be made of yellow gold (see Figure 16.14) or a mixture of precious or non-precious metals to give a silvery appearance, and are the strongest of all crowns available, making them ideal for posterior teeth, especially in patients with a heavy bite.
- These can be made as full coverage crowns or three-quarter crowns which leave the buccal or labial surface of the tooth intact but cover the rest of the tooth – this gives better aesthetics while still providing adequate coverage of the tooth cusps, so providing strength to the device.
- Three-quarter crowns have tended to be superseded by bonded crowns, which provide both good aesthetics and strength in the same situations.
Figure 16.21 Beebee crown shears.
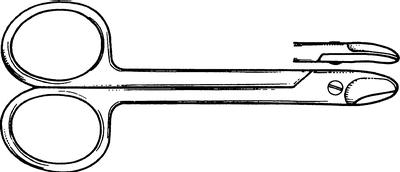
Figure 16.22 Porcelain bonded crowns.
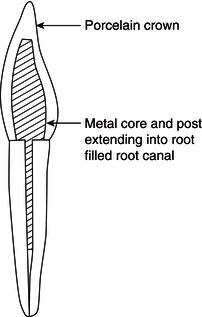
Post crowns
As discussed in Chapter 15, when teeth die and are preserved by root filling and restoration, the remaining tooth structure often becomes brittle with time and fractures. Sometimes the fracture is so extensive that there is not enough tooth structure left to restore it without the use of additional support. This support is often achieved by the placement of a metallic post and core structure which is then shaped to hold a conventional crown – these restorations are called post crowns (Figure 16.23).
Figure 16.23 Post crown.
The metallic post and core system can be constructed from preformed posts, such as Paraposts or Dentatus posts with a core constructed at the chair side, or the prepared root forms part of the crown preparation impression, and the post and core are hand made by the technician, along with the crown.
The chairside procedure differs only in the preparation of the post hole in the root, and the chairside post and core placement or impression technique, as follows.
- The root face margins of the fractured tooth are shaped as for a conventional crown preparation.
- The root filling material in the root canal is carefully removed to a suitable depth using Gates Glidden drills (see Figure 15.45).
- The post needs to be as long as possible to provide adequate support for the new crown, but drilling should not be so deep that there is a risk of root fracture.
- The canal is then prepared widthways, using drills specific to the type of post to be placed, so that a parallel-sided hole is produced – this will give the maximum retention for the post, once cemented.
- A prefabricated post is then either screwed into the canal (Dentatus system) or cemented into the canal (Parapost system, Composipost system) using one of the usual luting cements. Examples of the post systems are shown in Figure 16.24.
- Alternatively, a />
Stay updated, free dental videos. Join our Telegram channel
VIDEdental - Online dental courses


