14
Loading Approaches for Mandibular Implant Overdentures
HEALING PERIOD BEFORE LOADING
Originally, the recommended waiting period between implant placement and loading was 12 weeks. Recently, however, implant manufacturers and clinicians have found it generally acceptable to practice premature loading of splinted or non-splinted implants that are being utilized for mandibular implant overdentures.
THREE CONCEPTS IN PREMATURE LOADING
Early Loading
Early loading means insertion of the prosthesis before 12 weeks—usually longer than a week but within a period of 20 to 28 days after implant placement.
Progressive Loading
Progressive loading means a gradual increase in application of the functional forces on the supporting implants, whether they are applied intentionally with the prosthesis during mastication or unintentionally via forces placed by the adjacent anatomic structure or parafunctional loading.
Immediate Loading
Immediate loading means that full occlusal and incisal loading is applied on the supporting dental implants with the overdenture the same day of implant placement or within the first few days after surgery.
CRITICAL FACTORS IN DETERMINING LOADING STRATEGIES
- Primary stability of the implant
- Bone quality
- Surgical technique
- Implant length
- Implant surface
- Implant design features
IMPORTANT INDICATING FACTORS FOR SUCCESS OF PREMATURELY LOADED IMPLANTS
- Fully functional prosthesis without any discomfort
- No changes in the patient’s sensation
- No infection
- Absence or minimal marginal bone loss
- Implant stability
Premature loading can be done successfully with implants that have machined surface characteristics, but it is preferred to use implants with more advanced surface characteristics such as SLA, TiUnite, RBT, and so on. These new generations of surface characteristics provide faster bone healing and more implant-bone interface.
The concept of immediate replacement of teeth for fully edentulous patients has been in the forefront of clinical implantology research for more than 20 years. Currently, immediate loading as well as early loading of the implants placed in the fully edentulous mandible has become a very popular treatment protocol.
The most important prerequisites for successful immediate-function procedures appear to be achieving initial implant stability and controlling the immediate loading forces directed to the implant. The initial stability is achieved through biomechanical interlocking of the implant in the surrounding bone and is needed to avoid micromotion at the interface during early healing. The implant’s surface properties are believed to influence the bone healing and implant stability over time. In order to optimize the initial bone healing, especially in situations with less dense bone, using an enhanced implant surface characteristic and thread design will help primary implant stability and achieve secondary stability earlier than machined surfaces through heightened bone response to more advanced surfaces.
Lederman showed in 1979 that an overdenture can be inserted over a bar attachment assembly supported by four implants in the edentulous mandible immediately after the surgery, eventually obtaining successful osseoin-tegration as well as a fully functional implant-supported overdenture. However, making an immediate bar-supported overdenture involves considerable laboratory procedures and expenses. Furthermore, there would be a 12–24 hour delay between the surgical appointment and delivery of the overdenture.
Some implant companies have developed very sophisticated computer-milled metal substructures as well as a matching surgical guide for immediately loaded, screw-retained implant-supported overdenture. The negatives of this technique are the high cost of the overdenture, the complex surgical steps it requires, and the necessity of utilizing very sophisticated equipment and machinery to produce this type of overdenture, which requires advanced training and mastership.
ADVANTAGES OF IMMEDIATE LOADING IN IMPLANT-SUPPORTED OVERDENTURE CASES
- Reduces treatment duration and the frequency of patient visits
- Reduces chair-side time for the dentist, which reduces overhead
- Does not require second-stage surgery
- Reduces patient stress and anxiety due to the treatment process
- Benefits patient psychologically
IMPORTANT REQUIREMENTS FOR TREATMENT PROTOCOL
- Treatment protocol that is applicable for geriatric patients
- Shortened total treatment time
- High primary stability of the implants
- Immobilization of the implants immediately after surgery
- Sufficient bone quality at the implant site
- Simple clinical and laboratory steps utilizing prefabricated components as well as chair-side techniques
- Applicable with an implant system that offers multiple clinical applications
- Ease of switching treatment strategy to the conventional treatment protocol
- Good patient compliance
SYNCONE® CONCEPT
It has long been reported that full dentures can be retained with telescopic crowns. However, the high costs and labor-intensive laboratory procedures required for telescopic crowns have minimized the application of this concept. The SynCone® system is an innovative telescopic crown technique that combines technical precision with affordability. It has been developed by May and Romanos (2000) and has been used specifically for the immediate loading of oral implants in the anterior part of the mandible. For this concept, the Ankylos® implant system (Friadent, Dentsply, Mannheim, Germany) has been used.
Advantages of Telescopic Crown Techniques
- Excellent three-dimensional immobilization of the restoration
- Defined release force
- Flexibility of design
- Optimal access for oral hygiene
The treatment protocol described here is based on four implants placed between the two mandibular foramens and utilization of 4-degree taper SynCone® abutments. No reliable long-term clinical data are available on the use of higher or lower numbers of implants and SynCone® abutments in the maxilla. Deviation from the following protocol is not advisable when the implants will be loaded immediately after their placement.
Patient Selection
Selecting patients who are generally good health and good compliance is important. The candidate for this treatment option should have at least 12–14mm of bone height in the anterior mandible. The width of the alveolar ridge and the bone quality are of great importance in order to get high primary stability.
Pre-Surgical Steps
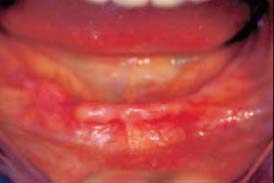
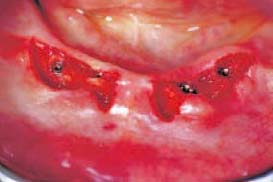
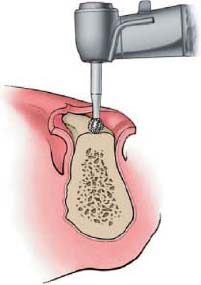
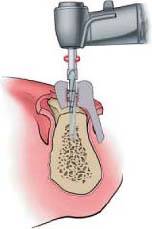
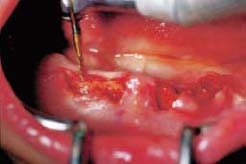
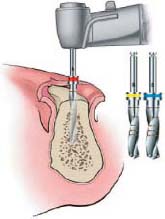
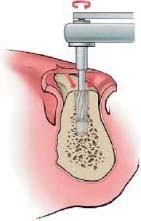
Surgical Steps
Stay updated, free dental videos. Join our Telegram channel
VIDEdental - Online dental courses


