13
Adult restorative dentistry
- Treatment plans
- Dental charting
- Classification of dental diseases
- Tooth preparation and restoration techniques
- Restorative treatment options
- Impression taking
- The working environment
Introduction: the importance of the treatment plan
The treatment plan is the end stage of a process that has involved gathering information from the patient, making a diagnosis, deciding treatment options and working out the care priorities.
The information that is gathered will include the patient’s concerns, medical history, dental history and social history. The next important information gathering stage is the clinical examination. This should be carried out extraorally and intraorally for both the soft and hard tissues and must be methodically completed. Special investigations such as sensitivity (vitality) tests, radiographs and diet analysis may also be required. All of these will help with making the diagnosis and formulating an appropriate treatment plan.
Priorities in treatment
This may be a balance between patient and operator as both may have different priorities. This should be established before treatment is started. Normally the relief of pain is the first priority for the patient and the operator. Pain is often the reason for initial attendance at the dental surgery. Fortunately, the relief of dental pain is normally possible assuming the correct diagnosis has been made. There may be rare cases when this is not achieved but normally this is due to misdiagnosis or to the pain not being of dental origin.
After the relief of pain, the next stage is usually the control of active disease. This will allow further assessment of the patient, including their attitude towards care and their management and maintenance of their oral health. If active disease control is not a priority for the patient, then the options are either to explain your reasons for managing disease or to accept the patient’s point of view. If the patient is going on holiday the next week and has fractured a central incisor, the caries in their molar teeth is not a priority to them – not unreasonably.
Control of disease may involve a number of treatment items. It should certainly include an appropriate preventive regime. This may include dietary advice, oral hygiene instruction or smoking cessation therapy. At this stage any teeth that are of hopeless prognosis should be extracted. Initial periodontal therapy including removal of plaque traps such as ledges on restorations should be completed. This phase, which is termed the stabilisation phase, may also include root canal treatment, simple direct restorations and the provision of interim dentures or indirect restorations.
On completion of this stage, it is essential to review what has been achieved and re-assess the treatment plan. Assuming an appropriate level of oral health has been achieved and maintained over a suitable time period, consideration may then be given to the appearance and functional needs and wishes of the patient.
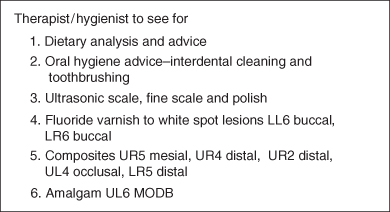
An important aspect of a treatment plan is that it acts as a scheme that the clinicians involved in the patient’s care can follow. It shows the order of treatment and can also indicate who is carrying out each item. See Figure 13.1 for an example of a treatment plan.
Figure 13.1 An example of a treatment plan.
Order of treatment provision
- Relief of pain.
- Stabilisation phase – the control of active disease:
- prevention and motivation
- extraction of unrestorable teeth
- direct restorations
- interim restorations.
- Reassess.
- Restorative phase – managing appearance and function:
- indirect restorations
- removable prostheses
- Review and maintenance.
Charting the adult dentition
Tooth notation
Several systems of tooth notation are available, but the systems commonly used in the UK are the FDI (Federation Dentaire International) and Palmer systems.
Federation Dentaire International (FDI) notation
The mouth is divided into four quadrants and each quadrant is given a number: starting with the upper right quadrant and working in a clockwise direction. For example the upper left quadrant is 2. The teeth are then allocated a number starting from the midline, so all central incisors are 1 and all third molars are 8. Therefore the lower right second premolar is 45.
Permanent teeth

Palmer system
In this system, sometimes called the Zsigmondy–Palmer system, the dentition is divided into quadrants and the teeth in each quadrant are numbered 1 through 8 starting at the midline. Each quadrant is separated by a vertical line for right and left and by a horizontal line for upper and lower. Thus |6 is the upper left first molar in the permanent dentition.
Permanent teeth

This system works well for hand-written notes but is more difficult for computerised notes and printed letters and therefore the lines are sometimes replaced by two letters describing the quadrant, for example UR8 is the upper right third molar tooth.
Universal system
A further system is used in the United States, called the Universal System. This is also a two digit system but the teeth are numbered from 1 through to 32 in a clockwise direction starting with the upper right third molar.

For the charting of primary teeth, see Chapter 12, p. 245.
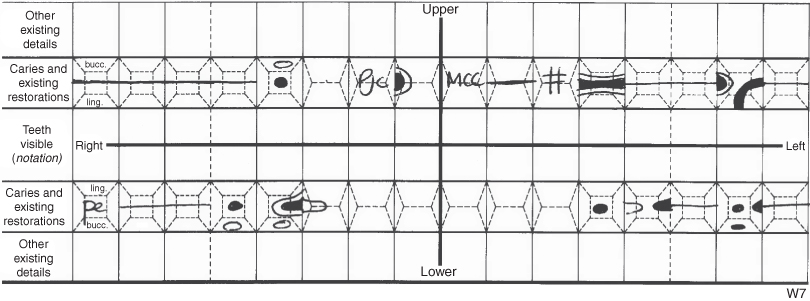
Charting the teeth
The teeth present and absent, teeth unerupted or partially erupted, the presence of caries and other defects of the teeth and the restorations present are recorded on a chart. The chart shows the buccal/labial, palatal/lingual, mesial, distal and occlusal surfaces of all the teeth (Figure 13.2).
Figure 13.2 An example of a dental charting.
How to examine teeth
The teeth should be examined in a systematic manner, making sure that each surface of each tooth is carefully inspected. A probe is used to remove plaque from the fissures and to detect ledges and deficiencies in existing restorations. The probe should not be pressed firmly into the fissure pattern as this could damage demineralised enamel. Good eyesight and lighting is essential if caries is to be detected. It is also important that the teeth are examined dry and free from plaque as caries is more likely to be detected.
Classification of cavities
Black’s classification
G.V. Black was an American dentist who wrote textbooks on dentistry in the early twentieth century in which he outlined principles for cavity preparation. He also described a classification for carious lesions. This was based on the knowledge and evidence available at the time and is still used by some people today despite its limitations: namely it only refers to primary carious lesions and does not include root or secondary caries.
Black’s classification:
Class I Caries affecting pits and fissures: commonly used to refer to caries affecting the occlusal surfaces of premolars and molars.
Class II Caries affecting the proximal surfaces of posterior teeth.
Class III Caries affecting the proximal surfaces of anterior teeth.
Class IV Caries affecting the proximal surfaces of anterior teeth and also including the incisal angle.
Class V Caries affecting the cervical surfaces.
Current methods of cavity classification
Cavities or lesions in teeth are described by the cause of the cavitation or lesion and by the surface(s) affected.
Causes:
- Dental caries.
- Tooth wear.
- Trauma.
- Developmental defects.
Dental caries
Carious lesions may be described by the type of caries that is present:
- Primary: caries affecting the coronal part of the tooth, on a surface that has not previously had caries.
- Secondary: caries around an existing restoration. Also referred to as recurrent caries.
- Rampant: occurring quickly; it is soft and pale in colour. Sometimes referred to as bottle caries as it may be seen in infants who are given bottles containing sugary drinks.
- Root surface: affecting the root surfaces. Seen in patients with gingival recession, namely those with periodontal disease and the elderly.
Tooth wear
For tooth wear, the lesion is described by the type of tooth surface loss:
- Attrition: the gradual loss of hard tooth substance as a result of chewing activity. Essentially this is the result of tooth to tooth contact.
- Erosion: the loss of hard tooth substance owing to a chemical process not involving bacteria. Usually caused by acid from dietary sources such as carbonated drinks, citrus fruits or by acid from the stomach in patients with regurgitation problems or an eating disorder.
- Abrasion: friction from a foreign body, such a toothbrush with toothpaste, independent of occlusion between teeth.
- Abfraction: thought to be caused by tooth flexure. Occlusal loading results in loss of cervical enamel.
Developmental defects
Developmental defects may be classified as relating to:
- Number: The most common teeth to be absent are lateral incisors, second premolars and third molars. Absence of one or more teeth is called hypodontia. Absence of all teeth is called anodontia.
Extra teeth may also occur. These are referred to as supernumerary teeth. - Shape: Teeth may be larger than normal (macrodontia), smaller than normal (microdontia), have extra cusps or be joined together to give a double tooth (geminated).
- Tooth tissue involved: Defects of enamel and dentine may be described as inherited or acquired. Amelogenesis and dentinogenesis imperfecta are inherited defects.
Fluorosis is an example of an acquired defect. Fluorosis is classified by the extent of mottling of the enamel (see Chapter 11, p. 226).
Trauma
Dental trauma is classified according to the extent of damage to the tooth: from an enamel chip to a fracture involving the pulp. See Table 13.1 for the World Health Organization (WHO) classification of dentoalveolar injuries.
Table 13.1 WHO classification of dentoalveolar trauma.
| Injury | Description |
| Injuries to the hard dental tissues and the pulp | |
| Enamel infraction | Incomplete fracture crack of enamel without loss of tooth substance |
| Enamel fracture | Loss of tooth substance confined to enamel |
| Enamel–dentine fracture | Loss of tooth substance confined to enamel and dentine, not involving the pulp |
| Complicated crown fracture | Fracture of enamel and dentine exposing the pulp |
| Uncomplicated crown root fracture | Fracture of enamel, dentine and cementum but not involving the pulp |
| Complicated crown root fracture | Fracture of enamel, dentine and cementum and exposing the pulp |
| Root fracture | Fracture involving dentine, cementum and pulp; can be subclassified into apical, middle and coronal third |
| Injuries to the periodontal tissues | |
| Concussion | No abnormal loosening or displacement but marked reaction to percussion |
| Subluxation (loosening) | Abnormal loosening but no displacement |
| Extrusive luxation (partial avulsion) | Partial displacement of tooth from the socket |
| Lateral luxation | Displacement other than axially with comminution or fracture of the socket |
| Intrusive luxation | Displacement into alveolar bone with comminution or fracture of the socket |
| Avulsion | Complete displacement of tooth from the socket |
| Injuries to supporting bone | |
| Comminution of alveolar socket wall | Crushing and compression of alveolar socket |
| Fracture of socket wall | Fracture confined to buccal or lingual socket wall |
| Fracture of alveolar process | Fracture of the alveolar process: may or may not involve the tooth sockets |
| Fracture of mandible or maxilla | May or may not involve the alveolar socket |
| Injuries to gingiva or oral mucosa | |
| Laceration | Wound in the mucosa resulting from a tear |
| Contusion | Bruise not accompanied by a break in the mucosa |
| Abrasion | Superficial wound produc ed by rubbing or scraping the mucosal surface |
Cavity classification by surface affected
- Pit and fissure – the occlusal surfaces of molars and premolars and pits on the buccal surfaces of molars and cingulum pits in incisors.
- Posterior proximal – adjoining surfaces of molars and premolars.
- Anterior proximal – adjoining surfaces of incisors and canines.
- Smooth surface cervical/necks of teeth.
Preparation of cavities
Instruments for cavity preparation
Conventionally, cavities are prepared using a combination of hand instruments and rotary instruments.
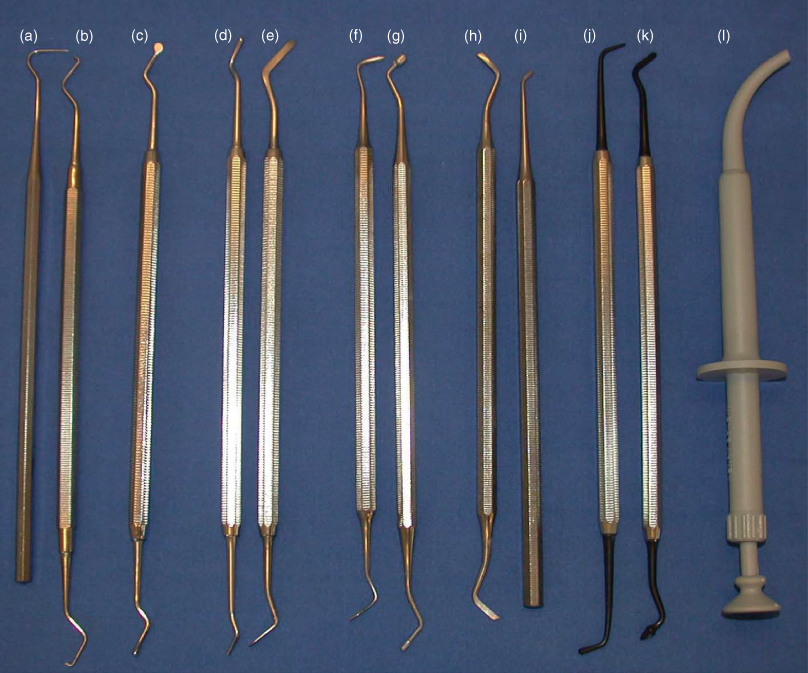
Hand instruments (Figure 13.3)
Examination of teeth
- Mirrors: used for indirect examination of teeth, to retract tissues and to direct light to specific areas of the mouth.
- Straight probe: used to check the margins of restorations and to carefully examine for dentine caries.
- Briault probe: used to detect deficiencies and ledges on proximal surfaces.
Cavity preparation
- Excavators: used to remove soft dentine caries, particularly from the floor of the cavity. Excavators may also be used to remove temporary dressing materials. Small excavators may be employed for carving fissure patterns in plastic materials such as amalgam.
- Chisels: used to remove unsupported enamel.
- Gingival margin trimmers: used to remove unsupported enamel at the base of proximal cavities.
Material placement
- Flat plastic: used to place plastic restorative materials (i.e. those that are soft on placement and subsequently set and harden in the cavity). They can be used to place temporary dressings, linings, glass ionomers and composites. Flat plastics are not suitable for carving amalgams as their blades are too thick and the amalgam is smeared rather than cut and removed.
- Round-ended plastic: used for placing and shaping plastic materials such as temporary dressings and composite.
- Amalgam carrier: used to carry amalgam to the cavity.
- Amalgam plugger: used to condense the amalgam into the cavity.
Figure 13.3 Hand instruments: (a) straight probe; (b) Briault probe; (c) excavator; (d) ballended plastic; (e) flat plastic; (f) ½ Hollenbach; (g) amalgam plugger; (h) gingival margin trimmer; (i) hatchet; (j) Teflon coated composite instrument; (k) Teflon coated composite instrument; (l) amalgam carrier.
Material shaping
- Amalgam carvers: examples include Ward’s carvers and the ½ Hollenbach. These instruments have thin cutting blades that cut through the amalgam.
- Composite instruments: specific instruments with non-stick coatings, such as Teflon or titanium-nitride, have been developed for placing and shaping composite resins.
Rotary instruments
Slow speed
The slow speed handpiece is driven either by compressed air or directly by an electric motor. The speed of the handpiece ranges from 0 rpm to 40 000 rpm. The most efficient cutting is achieved with a straight handpiece, but this is difficult to use in the mouth and is therefore restricted to extraoral use such as adjusting temporary crowns and dentures. The contra-angle handpiece is used for the removal of caries, polishing and finishing.
High speed
The high speed handpiece is driven by compressed air and is sometimes referred to as an air-turbine or airotor. It is used for cutting through enamel and dentine and removing previous restorations. It has a speed of 250 000–500 000 rpm and to keep it cool, a water spray is directed at the cutting part of the bur which is held in the head of the handpiece by friction. A fibre-optic light in the head of the handpiece aids visibility.
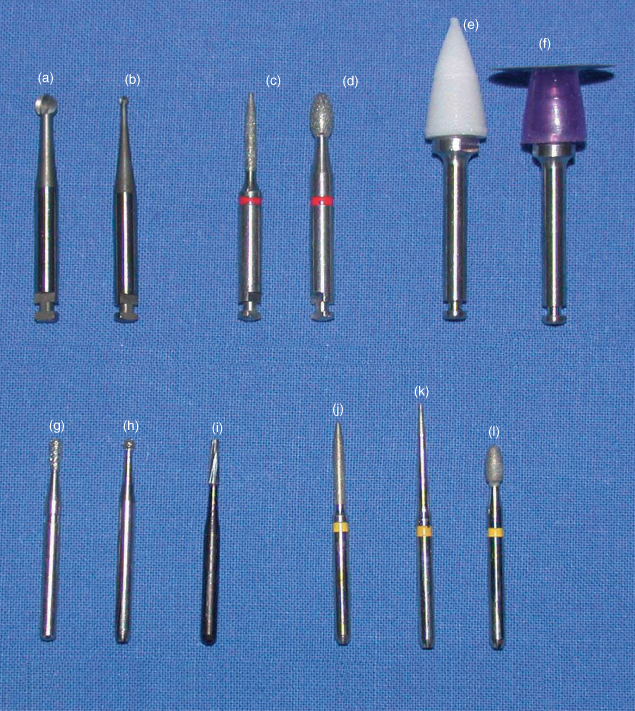
Burs
Burs are described by:
- The method of retention in the handpiece:
- latch grip for slow speed
- friction grip for high speed.
- Shape:
- round
- football (like an American football or a rugby ball rather than spherical)
- flame
- tapered fissure
- straight fissure
- pear
- inverted cone.
- Size.
- The material on the cutting end:
- diamond – grit size
- tungsten carbide – number of blades
- stainless steel.
Figure 13.4 shows examples of a selection of burs.
Figure 13.4 Burs: (a) latch grip stainless steel large round; (b) latch grip stainless steel small round; (c) latch grip superfine diamond flame; (d) latch grip superfine diamond football; (e) latch grip composite finishing point; (f) latch grip abrasive disc; (g) friction grip diamond fissure; (h) friction grip diamond round; (i) friction grip diamond pear; (j) friction grip superfine diamond flame; (k) friction grip superfine diamond tapered fissure; (l) friction grip superfine diamond football.
Removal of caries
Amount of caries removed
Conventionally, in cavity preparation, all caries is removed from the enamel–dentine junction. The reasons for this are the ease with which caries spreads along this junction between the two tissues and the risk of fracture of unsupported enamel that has been undermined by caries. The judgement about whether all caries has been removed from the enamel–dentine junction is based on the colour and hardness of the junction. The area of the enamel–dentine junction should feel hard to a straight probe and staining should normally be removed unless this compromises the tooth structure. Caries in the dentine on the pulpal floor should be removed if it is soft as this will be heavily infected with bacteria. Stained but firm carious dentine may be left in place, especially if there is a risk of pulp exposure, as this dentine will be demineralised but not infected. It is obviously important to prevent further bacterial contamination of the cavity by good isolation, such as rubber dam. A setting calcium hydroxide lining is then placed in this deep area of the cavity to encourage reparative dentine and kill the remaining bacteria. This is described as an indirect pulp cap.
If a small pulp exposure occurs in a symptom-free tooth then a direct pulp cap may be indicated. Again, a small amount of setting calcium hydroxide lining material is applied to the area of exposure. If a larger pulpal exposure occurs during cavity preparation, then removal of the pulp and root canal treatment, or extraction of the tooth, may have to be carried out.
There is currently a debate about whether dental caries should be removed fully or partially from a cavity or whether it should be sealed in place. Evidence suggests that sealing over caries will arrest the process. Fissure sealants placed over occlusal caries extending into the middle third of dentine will arrest the lesion. However, such techniques are only suitable for patients who are regular attenders so that the restored lesions can be regularly reviewed.
Stepwise excavation
For grossly carious occlusal cavities, stepwise excavation may be used. Caries is removed in two steps, 6–12 months apart. At the first visit access is gained, caries is removed from the periphery only and soft caries is left on the cavity floor. The cavity is lined with calcium hydroxide and restored with glass ionomer. It is important to achieve a good seal with the glass ionomer. At the subsequent visit, on re-entry into the cavity the dentine is found to be harder and drier with fewer microorganisms present. A conventional restoration may then be placed.
Ultraconservative caries removal
Another technique is ultraconservative caries removal. This involves preparing the tooth minimally by cutting a 1 mm bevel in the sound enamel surrounding the cavitated lesion. No further preparation is carried out and the tooth is restored with acid-etch retained composites and fissure sealant. This technique has been used successfully to arrest occlusal caries (Ricketts, 2001).
Methods of caries removal
Conventionally, caries is removed using a round bur in a slow-speed handpiece or with a sharp round excavator. The roundness of the bur and the excavator mimics the shape of the spread of caries in dentine. A round bur in a slow-speed handpiece is used to remove caries from the enamel-dentine junction. This combination will easily remove soft carious dentine but will cut through sound dentine and enamel more slowly. This means that the operator can feel the difference between carious and non-carious tissues and distinguish between them. A sharp excavator should be used when removing soft dentine overlying the pulp as the tactile sensation is better than with a handpiece. Excavators are often preferred by anxious patients.
Alternative techniques
Dental caries may be removed in a number of ways other than the conventional use of burs in a handpiece or by hand instruments.
Chemomechanical removal
Chemomechanical removal is an alternative technique for removing caries. It involves the use of a chemical solution, which softens carious dentine thus allowing easy removal. Local analgesia is not usually required. A current product is a red or colourless gel (Carisolv®) which softens the collagen in the carious tissue through chlorination of amino acids. This softened tissue can then be removed mechanically with specially designed hand instruments, which have the appearance of multi-bladed hand excavators.
Clinical situations where this technique may be preferred include:
- Root caries.
- Cervical caries.
- Cavitated carious lesions.
- In needle-phobic patients.
- Where local analgesia is contraindicated.
- In countries where there is a limited availability of rotary instrumentation.
Air abrasion
Air abrasion units employ aluminium oxide particles in a high velocity stream of air to remove tooth substance. Again no local analgesia is required and the units are quiet, which may help anxious patients. The cavities produced are saucer shaped and are suitable for restoration with adhesive techniques. However, there are some disadvantages of this technique, namely the dust produced, limited tactile sensation, poor removal of soft caries and the need to protect adjacent teeth from damage by the alumina particle spray.
Lasers
Lasers for removal of enamel and dentine have yet to achieve full acceptance despite their use for soft tissue surgery.
Pulp protection
Introduction
Following cavity preparation and prior to restoring the tooth, protection of the pulp must be considered. The pulp comprises nerves and blood vessels and damage to the pulp can result in inflammation of the pulp (pulpitis) and dental pain for the patient (see Chapter 4, p. 88). This inflammation may be reversible or irreversible; in the latter case if the pulp is not removed, either by extraction of the tooth or by removal of the pulp tissue, then the pulp will become necrotic and the patient may develop periapical periodontitis or an acute abscess. The pulp can be damaged by dental caries, tooth wear, trauma and by cavity preparation. The best protection for the pulp is dentine but in the absence of a thick layer of dentine then additional pulp protection must be provided. A lining material may also act as a therapeutic agent by providing active protection of the dentine.
Objectives of pulp protection
- Therapeutic:
- Stimulate odontoblasts to lay down reparative dentine
- Encourage remineralisation of dentine
- Act against any remaining bacteria.
- Protect from chemicals.
These may come from the oral cavity, bacteria or from the restorative material.
- Protect from temperature.
Metal restorative materials such as amalgam and gold will transmit changes in temperature from the oral cavity and in the absence of a suitable layer of dentine additional protection must be provided.
- Seal the dentinal tubules. This will prevent fluids containing bacteria, molecules and ions entering the dentinal tubules and as result prevent pain and possible further caries.
Methods of pulp protection
- Minimal cavities: Either a dental adhesive to seal the dentinal tubules or no pulp protection.
- Moderately deep cavities: A layer of a resin modified glass ionomer to give thermal and chemical protection.
- Deep cavities: A thin layer of setting calcium hydroxide as a therapeutic lining, followed by a layer of resin modified glass ionomer.
Techniques for placement
A small ball-ended instrument is used to place the setting calcium hydroxide material. The calcium hydroxide should be placed in a thin layer on the deepest part of the cavity. For the glass ionomer, a flat plastic or ball-ended plastic is used and the material is applied to the pulpal floor and/or pulpal wall depending on the cavity shape. The lining material should not extend to the cavity margins.
Moisture control
Why is moisture control important?
The water spray of the high speed handpiece and three-in-one syringe and the patient’s own saliva result in large volumes of fluid accumulating in the mouth. This needs to be removed for the following reasons:
- Patient comfort.
- Visibility for the operator and assistant.
- Avoid contamination of dental materials.
- Reduce or prevent bacterial contamination of cavities.
- Overall operating efficiency.
Methods of moisture control
- Aspiration: Suction is used to remove fluids from the mouth. High volume suction is used with high speed handpieces and ultrasonic and sonic scalers. Low volume suction, such as a saliva ejector, is used for smaller volumes of fluid such as patients’ saliva.
- Air: The air spray from the three-in-one tip is used to blow excess moisture from cavities and the surfaces of the teeth. It can also be used to keep water off the mouth mirror to improve vision for the operator.
- Absorbent materials: Cotton wool rolls are a common method of moisture control. They may be placed in the buccal and lingual sulcus to absorb saliva. They also act to retract soft tissues, such as the lips and tongue. Care should be taken when removing cotton wool rolls from the oral cavity. The cotton wool roll must be soaked with water before removal as otherwise the mucosa may be damaged, resulting in a ‘burn’ of the soft tissues.
Dry guards are flat triangular pads of absorbent material that are placed inside the cheeks over the parotid duct to absorb saliva and water.
- Rubber dam.
Rubber dam
A rubber dam is used for a number of reasons:
- Moisture control: the teeth are isolated from saliva, blood and gingival fluid. Control of water from the handpiece and the three-in-one is easier to manage.
- Dental materials: many dental materials or techniques will be compromised by moisture and a rubber dam is important for successful restorations.
- Protects and retracts soft tissues: the rubber dam keeps the lips, cheeks and tongue out of the way and can help prevent damage of these tissues during treatment.
- Good visibility: by keeping tissues and moisture out of the operating field, visibility for the operator is much improved.
- Airway protection: a rubber dam prevents patients from inhaling or swallowing restorations such as crowns, small instruments such as burs and pieces of filling material such as amalgam.
- Infection control: by keeping saliva from the operating field, contamination is controlled. This is especially important in the management of deep carious cavities.
- Patient comfort: a rubber dam keeps fluids, materials and instruments out of patients’ mouths and this can increase their comfort.
Reasons against:
- Time: it takes time to apply the rubber dam, but with experience this decreases. Time is saved during operating by the advantages of rubber dam use.
- Learning curve: the technique of using a rubber dam improves with time and practice.
- Patients’ concerns: some patients may feel claustrophobic under the rubber dam. Patients can only talk with difficulty and this makes operator–patient communication more demanding.
- Latex allergy: a non-latex rubber dam is now available so this should not be a difficulty.
How to place the rubber dam
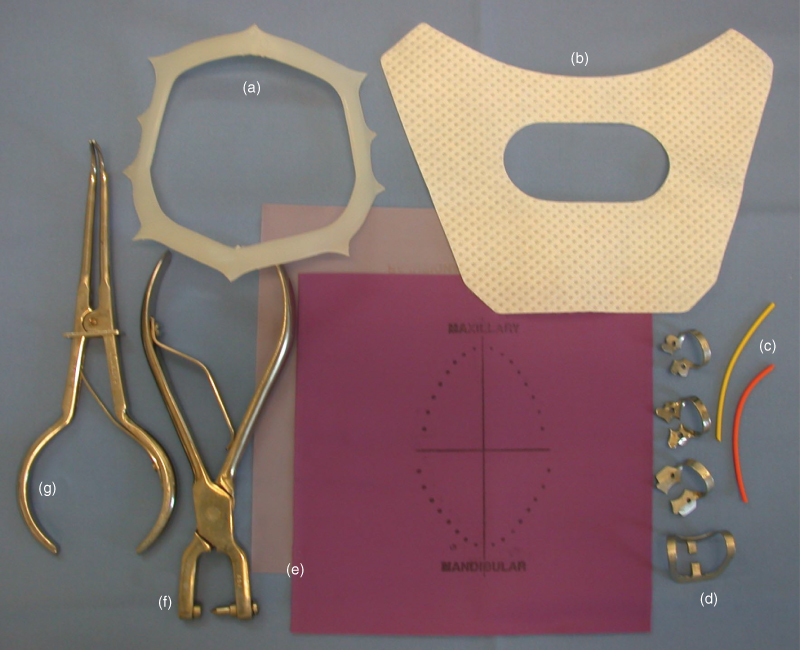
- Assemble the required instruments and equipment (see Figure 13.5).
- Select the appropriate type of rubber dam.
- Rubber dam is made of either latex or a non-latex material and the latter should be selected for patients with a latex allergy. Rubber dam is supplied in different weights and colours and these are usually a personal preference.
- Punch hole(s): First decide how many holes are to be punched on the basis that one hole is punched for each tooth projecting through the rubber dam. For a single buccal, palatal or occlusal restoration only one hole is required. For all other situations, more than one hole is required. Next decide the positions of the holes on the dam. There are a number of methods of doing this:
- Hold the dam in position over the patient’s mouth, checking that the dam does not cover the nose; ask the patient to open wide and locate the tooth/teeth to be isolated. Punch the holes in the dam in these positions.
- Use a rubber dam stamp. This is an inked stamp with all the teeth in both arches. Stamp the rubber dam and punch holes as required.
- Use the paper template supplied by some dam manufacturers. Place the template over the rubber dam sheet and mark the holes required with a pen.
Choose an appropriate size of hole (if the punch has different hole sizes) for the teeth to be isolated. Space the holes allowing a tooth’s width between each hole.
- Select method(s) of dam retention.
Rubber dam may be retained in a number of different ways (Figure 13.6):
Figure 13.6 Rubber dam in place, showing various methods of retention.
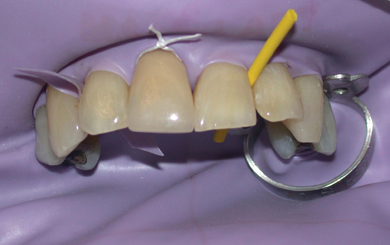
- Clamps: Many shapes and sizes of clamps are available. Winged clamps should be used if the dam and clamp are to be placed at the same time, whereas wingless clamps should be placed either before or after the dam.
- Rubber strips: Strips can be cut from a sheet of rubber dam and used to retain the dam interdentally. Commercial strips of rubber in different diameters are also available to retain the dam.
- Floss: Dental floss may be used to floss the dam between the teeth and as a ligature tied around a tooth to retain the dam.
- Contact areas: Additional forms of retention are not always necessary as the dam may be retained by the contact areas.
- Place dam and method of retention.
- Dam first: This technique should be used where more than one tooth is to be isolated. Stretch each area of dam between the holes and using a flossing movement work between the teeth. The dam may then be retained with any of the methods mentioned above.
- Dam and clamp together: This technique is only suitable for single tooth isolation. A winged clamp is chosen and the dam stretched over the wings. The tips of the rubber dam forceps are placed in the holes of the clamp and the dam and clamp are placed on the tooth. In placing the clamp, slide the clamp over the buccal/palatal surfaces of the tooth until the clamp engages the cervical constriction of the tooth. Remove the forceps and, with a flat plastic, flip the rubber dam over the wings to give a tight seal.
- Clamp first: If this technique is used then a length of floss must be tied to the clamp in case it springs off the tooth prior to the placement of the dam.
- Napkin: An absorbent napkin or paper towel should be placed between the dam and the face for patient comfort.
- Place frame: The frame stretches the dam away from the isolated teeth and holds it in place.
- Saliva ejector: A saliva ejector should be placed if the patient finds swallowing difficult under the dam.
- Removal: To remove the dam, stretch the dam away from the teeth and cut interproximally. Remove the clamp, dam and frame.
Figure 13.5 Rubber dam equipment: (a) frame; (b) napkin; (c) rubber strips; (d) selection of clamps; (e) rubber dam: latex and nonlatex; (f) hole punch; (g) clamp forceps.
Direct restoratives: clinical properties, handling and placement
Teeth may require repair as the result of dental caries, tooth wear, trauma or developmental defects. Despite decreases in the occurrence of primary dental caries in most industrialised countries, the restoration of teeth continues to be necessary. Maintenance and replacement of existing restorations represent a large component of this dental treatment, particularly in the older adult.
A number of factors have to be taken into account when choosing the most appropriate restorative method and material for a clinical situation. The limiting factors include:
- Patient motivation and suitability.
- The number of remaining teeth and their relative positions.
- The condition of their supporting tissues.
- The amount of remaining tooth structure.
- The restorative materials available, and their longevity as restoratives.
- The occlusion and opposing teeth and restorations.
- Aesthetic and other wishes of the patient, including cost factors.
When any method or material is chosen, it must be used in the most appropriate clinical situation.
Available materials
The direct restoratives in current, general use are amalgam, composite, glass ionomer and combinations of the last two groups.
Dental amalgam
Dental amalgam is a mixture of mercury and an alloy containing silver and tin with added copper and zinc. The alloy particles may be lathe cut or spherical in shape: some alloys have a combination of the two shapes. Clinically, spherical alloys are easier to pack but a small diameter instrument will sink through the mix. Lathe cut alloys require more condensation pressure. The alloy and mercury are held together in a capsule, with the two components separated by a plastic diaphragm. When the diaphragm is broken and the capsule is placed in the mixing machine (amalgamator), the two components are mixed together (triturated) to form a silver-coloured paste. This paste is then condensed into the cavity. This is a very important stage: well-condensed amalgams are stronger than poorly condensed ones as more of the weaker mercury-rich γ2-phase is removed during carving (see Chapter 9, p. 182).
Amalgam is weak in thin section so cavities have to be cut suitably deep (2 mm) and because amalgam does not adhere to tooth tissue, the cavity must be undercut.
Dental amalgam continues to be used despite concerns about health and the environment because it has high clinical success, known performance, relatively low cost and is easy to manipulate. Despite the high usage of this material it is not ideal and suffers from several problems including marginal breakdown, fracture and poor appearance. Secondary caries is the most common reason given for the replacement of amalgam restorations but this diagnosis may not necessarily always be correct. There is a well-recognised need for effective alternatives, not only because of its less than ideal properties but also because of public and political concerns about its use, the changing patterns of dental disease and patient expectations of dental care.
Dental amalgam has been in use since the nineteenth century. Mercury is toxic but there is no credible scientific evidence to suggest that the small amount of mercury released from dental amalgam restorations on chewing contributes to disease or has any toxicological effects in humans. True amalgam allergy is extremely rare. A number of investigations specifically related to the health problems associated with dental amalgam have been carried out. In these studies no link has been shown between amalgam and such complaints as headache and fatigue or between amalgam and cancer. It has also been shown that no symptoms among dental staff and their children can be related to the use of dental amalgam, assuming that correct hygiene measures are employed. Some studies have found other organic causes for the patients’ complaints and this possibility should not be overlooked (Eley, 1997).
Resin composites
Resin composites used in denti/>
Stay updated, free dental videos. Join our Telegram channel
VIDEdental - Online dental courses


